Silk Loop Return Integration
Overview
Section titled “Overview”What This App Does
Section titled “What This App Does”The Loop Returns Standalone App V2 is a centralized solution designed to automate and streamline return workflows between TikTok Shop, Shopify, and Loop Returns.
Instead of manually managing returns across multiple platforms, merchants can rely on automated data synchronization to ensure return information flows seamlessly between systems. This eliminates repetitive operational work, reduces processing errors, and provides a unified view of return activity across channels.
With the V2 upgrade, the app keeps the existing TikTok Shop → Loop Returns → Shopify return management workflow while introducing a refreshed user interface, a redesigned onboarding experience, improved billing management, enhanced monitoring, and clearer return-level operation views.
With a guided onboarding experience and built-in access control, the app enables teams to manage cross-platform returns efficiently and confidently from a single dashboard.
Key Features
Section titled “Key Features”-
Independent Account & Subscription: Create a dedicated account and manage your subscription – all in one place, no Silk Connector login needed.
-
Refreshed UI & Navigation: Use the redesigned merchant interface with clearer page layouts, updated navigation, and a more consistent workflow experience.
-
Guided Onboarding Flow: Complete connector channel selection, platform setup checks, authorization, reason mapping, and go-live confirmation through a step-by-step onboarding wizard.
-
Guided Three-Party Authorization: Complete Shopify, Loop Returns, and TikTok Shop authorization in one flow.
-
Connector Channel Selection: Select TikTok Shop for Shopify, AfterShip, ShoppeDance, or SKU IQ as the connector channel during onboarding.
-
TikTok Shop Market Selection: Select the country or market where your TikTok Shop is registered before authorization. The app routes you to the corresponding TikTok Shop authorization platform based on the selected market. Currently supported markets include the United States, United Kingdom, and supported EU countries (Spain, Germany, France, Italy, Ireland, Poland, Belgium, Netherlands, Austria, Hungary, Czech Republic, Portugal, and Greece).
-
Automated Return Creation: Returns approved in TikTok Shop are automatically created in Loop Returns.
-
Real-Time Status Sync: Loop return status syncs back to TikTok Shop where supported.
-
Returns Workspace: Search, filter, sort, refresh, export, and inspect return-level records directly from the Returns page.
-
Monitoring & Tasks: Review return activity, background jobs, failed tasks, sync health, and operational alerts.
-
Enhanced Settings: Configure default reason mapping, category-based reason templates, reject reason, auto-create label behavior, Shopify order reference behavior, language/timezone, and policy window settings.
-
Team Collaboration: Invite team members and assign admin roles.
-
Support-Assisted Account Operations: Request disconnection or merchant account deactivation through a support-reviewed process to avoid accidental data or authorization loss.
How the Integration Works
Section titled “How the Integration Works”The integration is designed to automate the return lifecycle across platforms through the following flow:
-
Return Request or Return Event A return request, return approval, or return status change is received from TikTok Shop.
-
Order and Product Matching The app identifies the related Shopify order and line items. The system prefers stable item identifiers when available and falls back to SKU-based matching when needed.
-
Automatic Return Creation Once the order and product information is matched, the app creates the corresponding return in Loop Returns based on the configured reason mapping and return settings.
-
Status Synchronization As the return is processed in Loop Returns, status updates are reflected in the app and synced back to TikTok Shop where supported.
-
Error Tracking and Recovery If a return cannot be processed successfully, the app records the sync status, issue type, task status, and error details so merchants or support teams can troubleshoot the issue.
This automation reduces manual intervention while maintaining accurate cross-platform return tracking.
Video Tutorials
Section titled “Video Tutorials”Authorization & Settings Setup: Silk Loop Returns Integration v2.0 - Authorization & Settings Setup
How to Process Return: https://www\.youtube\.com/watch?v=8LZox5Fl\_gs\&t=3s
Prerequisites
Section titled “Prerequisites”Before you begin using the Silk Loop Returns Integration App, please ensure the following conditions are met.
Required accounts
Section titled “Required accounts”You must have active accounts for the following platforms:
-
Shopify store: A functioning Shopify online store where your products are managed.
-
Loop Returns: An active Loop Returns account with administrative access.
-
TikTok Shop:An active TikTok Shop seller account.
Note: The Shopify store and Loop Returns account you authorize during setup must be the exact accounts used for order fulfillment and return processing. Switching accounts later may require re-authorization.
Connector Channel Selection
Section titled “Connector Channel Selection”During onboarding, you need to select the connector channel used to synchronize TikTok Shop orders to Shopify. The app currently supports the following connector channels:
| User-facing option | What it means |
|---|---|
| TikTok Shop for Shopify | TikTok Shop 1P integration is responsible for synchronizing TikTok Shop orders to Shopify. |
| AfterShip | AfterShip is used as the external order connector. The Loop Returns Standalone App still manages the return lifecycle. |
| ShoppeDance | ShoppeDance is used as the external order connector. The Loop Returns Standalone App still manages the return lifecycle. |
| SKU IQ | SKU IQ is used as the external order connector. The Loop Returns Standalone App still manages the return lifecycle. |
All connector channels use the same core return automation flow. The app does not collect AfterShip, ShoppeDance, or SKU IQ API credentials and does not call their APIs directly.
If you use AfterShip, ShoppeDance, or SKU IQ, keep both order sync and the existing return/refund sync enabled while completing the setup of the Silk Loop Returns Integration.
Do not disable return/refund sync in your existing connector until you are ready to officially switch your production return workflow to the Silk Loop Returns Integration.
At the production cutover, keep order sync enabled in the connector, disable its return/refund sync, and allow the Silk Loop Returns Integration to manage new return and refund events. This helps minimize missed return events while avoiding duplicate processing after the switch.
Email Registration Rules
Section titled “Email Registration Rules”This Standalone App uses a separate account system from Silk Connector.
To maintain clear system boundaries:
-
The registration email must not have been previously used for a Silk Connector main platform account where email boundary validation is enabled.
-
If the email already exists in Silk Connector or within the same standalone account boundary, registration may be blocked.
-
Invited users should accept invitations through the standalone app invite flow.
-
Owner and Admin roles are managed inside the app.
Note: If your team already uses Silk Connector, please register this app with a new business email address unless Silk Support confirms that the email can be reused.
Consistent Order & Product Mapping
Section titled “Consistent Order & Product Mapping”The integration matches return items between TikTok Shop and Shopify to determine which products are eligible for return.
In most cases, the system uses the Line Item ID to match the returned product with the corresponding order item in Shopify. If the Line Item ID cannot be matched, the system will fall back to SKU-based matching.
Regardless of which connector you use to synchronize TikTok Shop orders to Shopify (the recommended integration is TikTok Shop for Shopify), the following conditions should be met to ensure successful return synchronization:
-
TikTok Shop orders must be successfully synchronized to Shopify before return processing.
-
Products must exist on both platforms.
-
SKU values in TikTok Shop should match the SKU values in Shopify.
-
SKU fields should not be empty on either platform.
-
Shopify order references should remain stable.
-
Line item identity should be preserved by the connector channel where possible.
If the system cannot match products between the two platforms:
-
Return creation in Loop will fail.
-
The return may enter an error state.
-
The system may display errors such as “SKU Mismatch”, “Product Not Found”, or missing order/item matching errors.
-
The merchant may need to handle the affected return directly in TikTok Shop and fix product/SKU mapping before future returns.
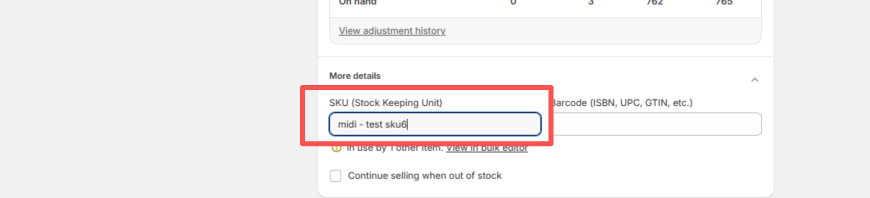
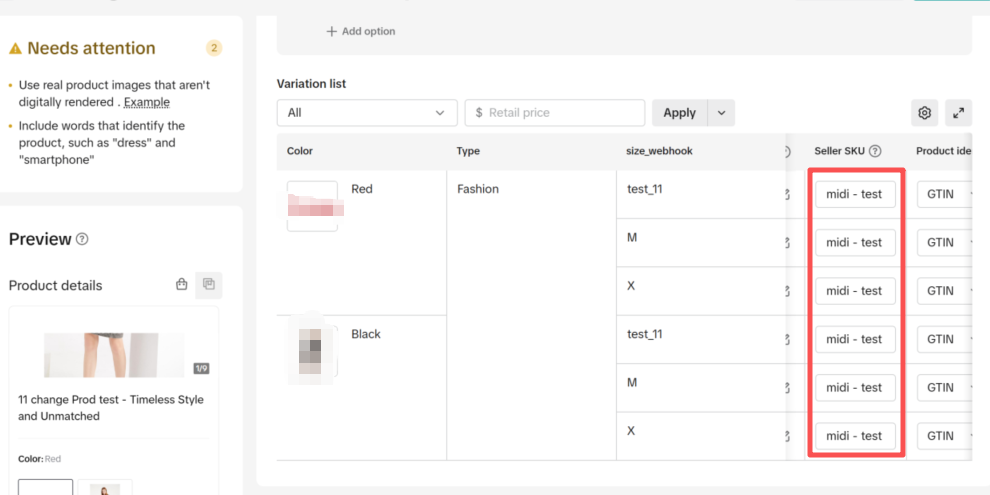
Best Practice: We strongly recommend keeping SKUs consistent between TikTok Shop and Shopify and conducting regular SKU audits to maintain accurate product mapping.
Product SKU in Shopify
Product SKU in TikTok Shop
Additional Platform Configuration
Section titled “Additional Platform Configuration”To ensure smooth operation, please verify the following settings in each platform:
| Platform | Required Configuration |
|---|---|
| TikTok Shop | - Return window is fixed at 30 days (no configuration needed). - Return approval must be enabled (manual or automatic). - Return shipping carrier and return shipping fee must be pre-configured by TikTok Shop team. |
| - Disable Exchange and Replacement - Log in to your TikTok Shop Seller Center - Navigate to Orders - >Return Settings - Go to Exchanges and Replacements - By default, both features are enabled. Toggle Exchange and Replacement off. - Click Save to apply the changes 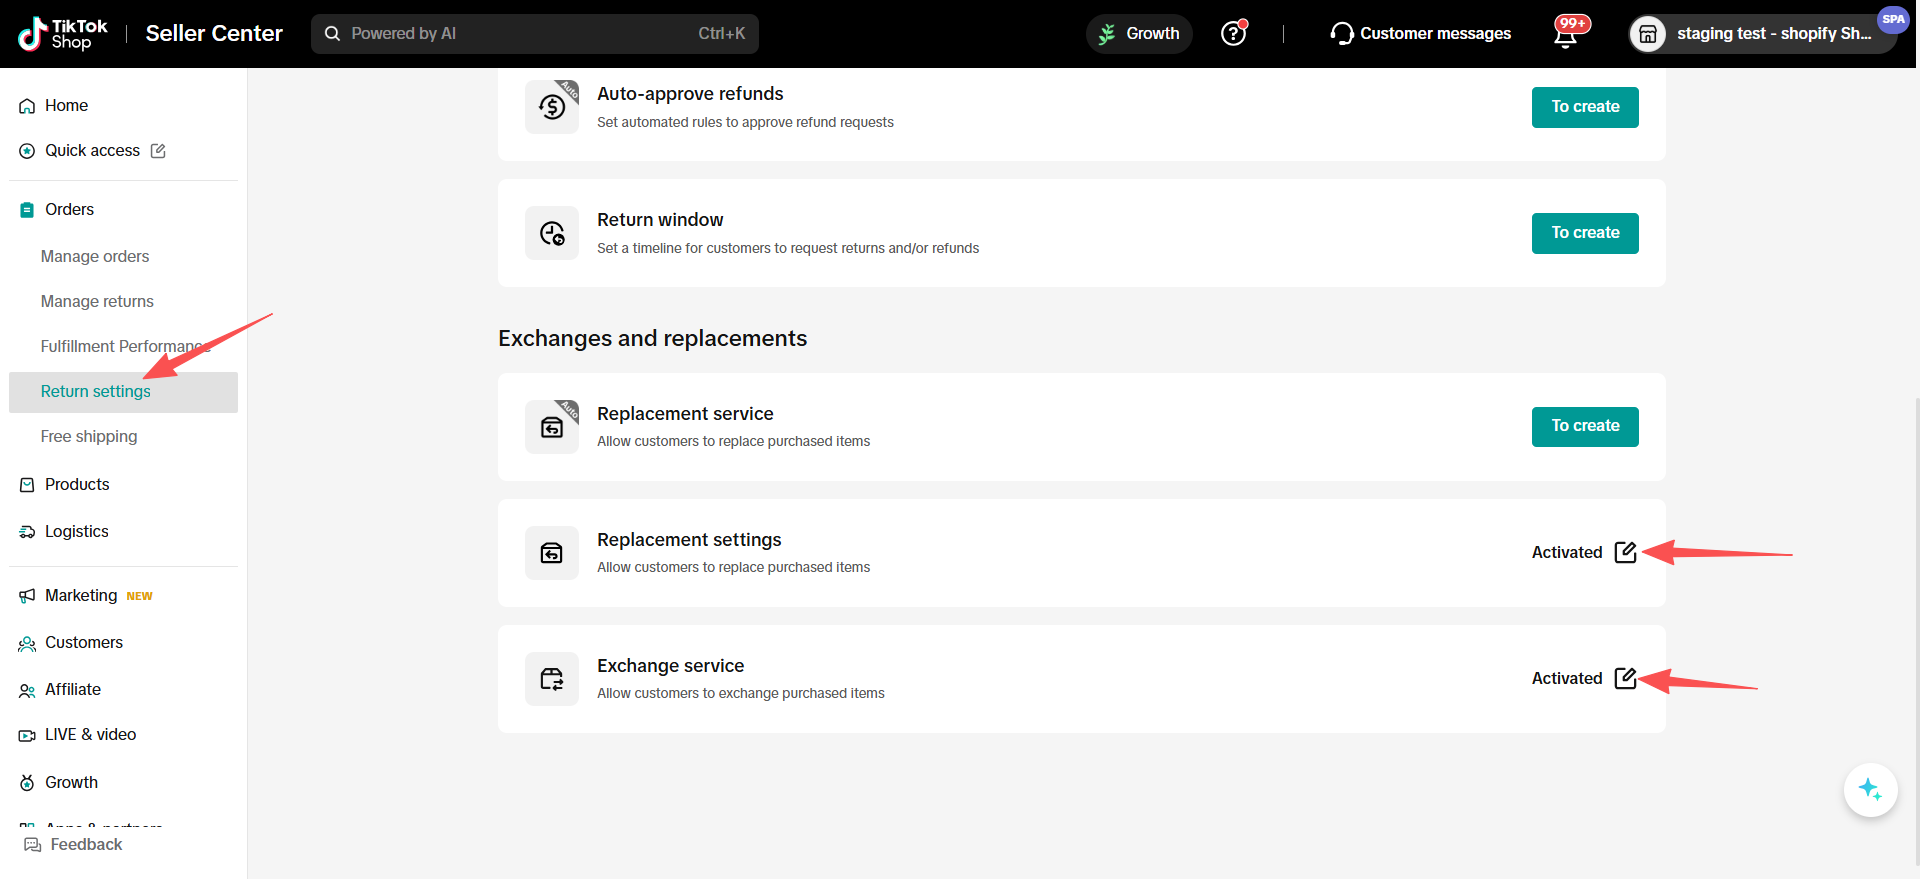 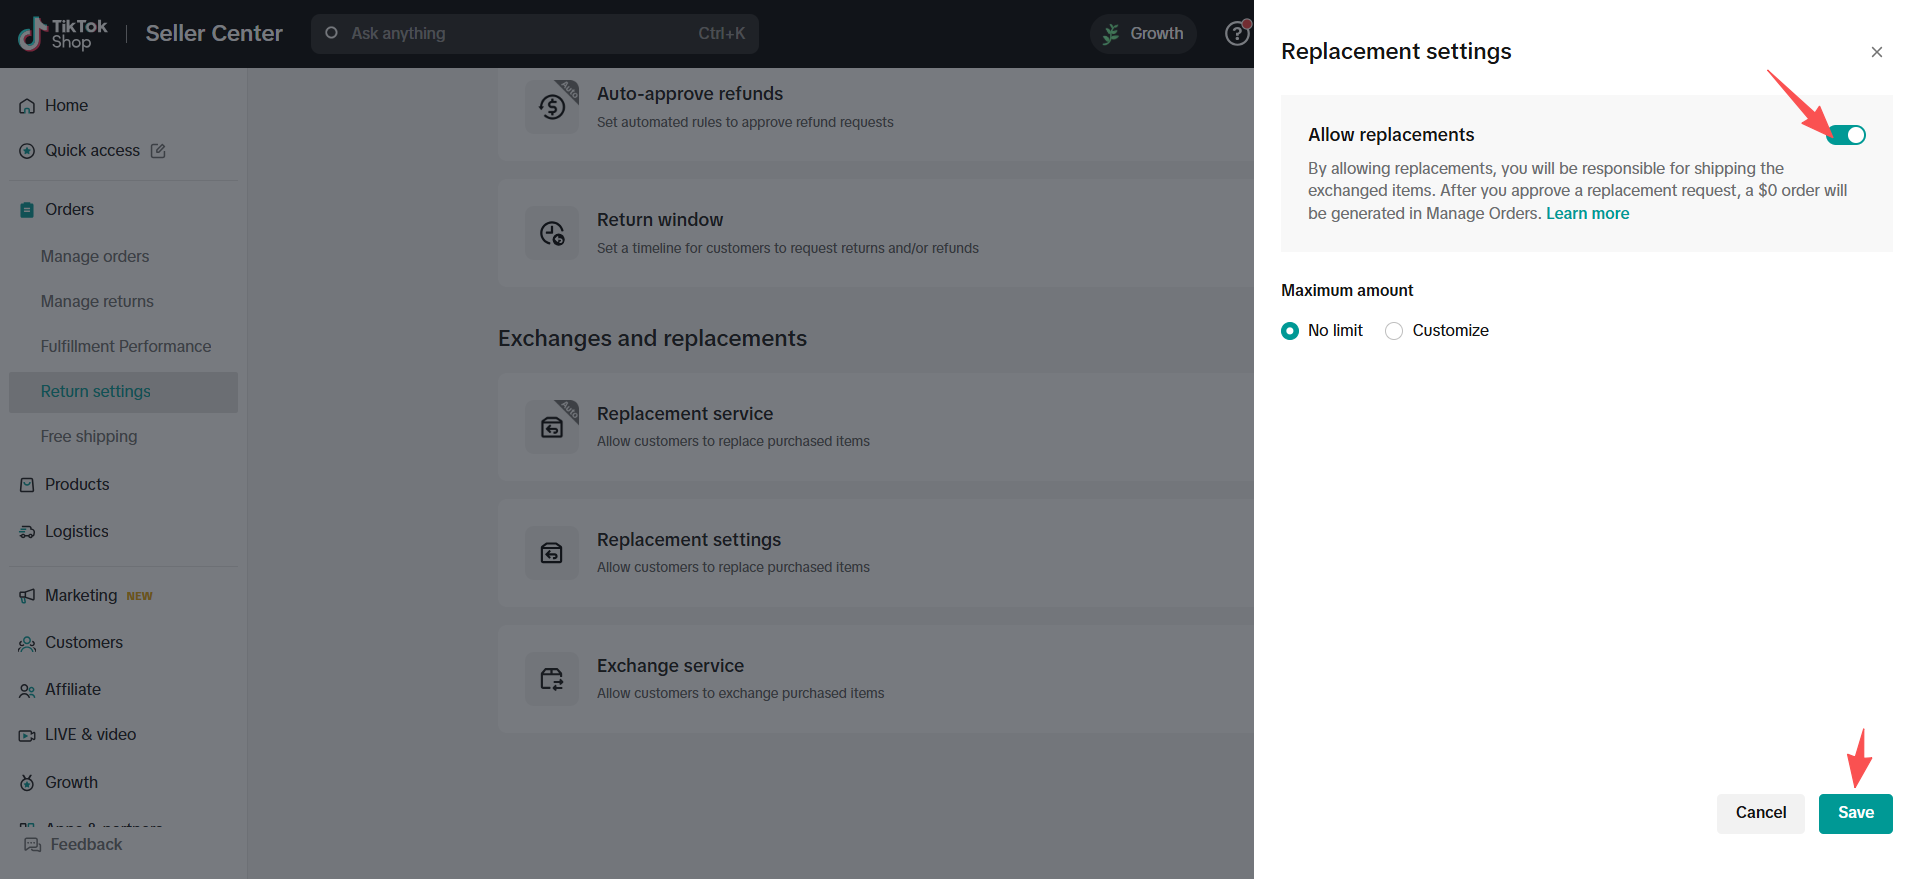 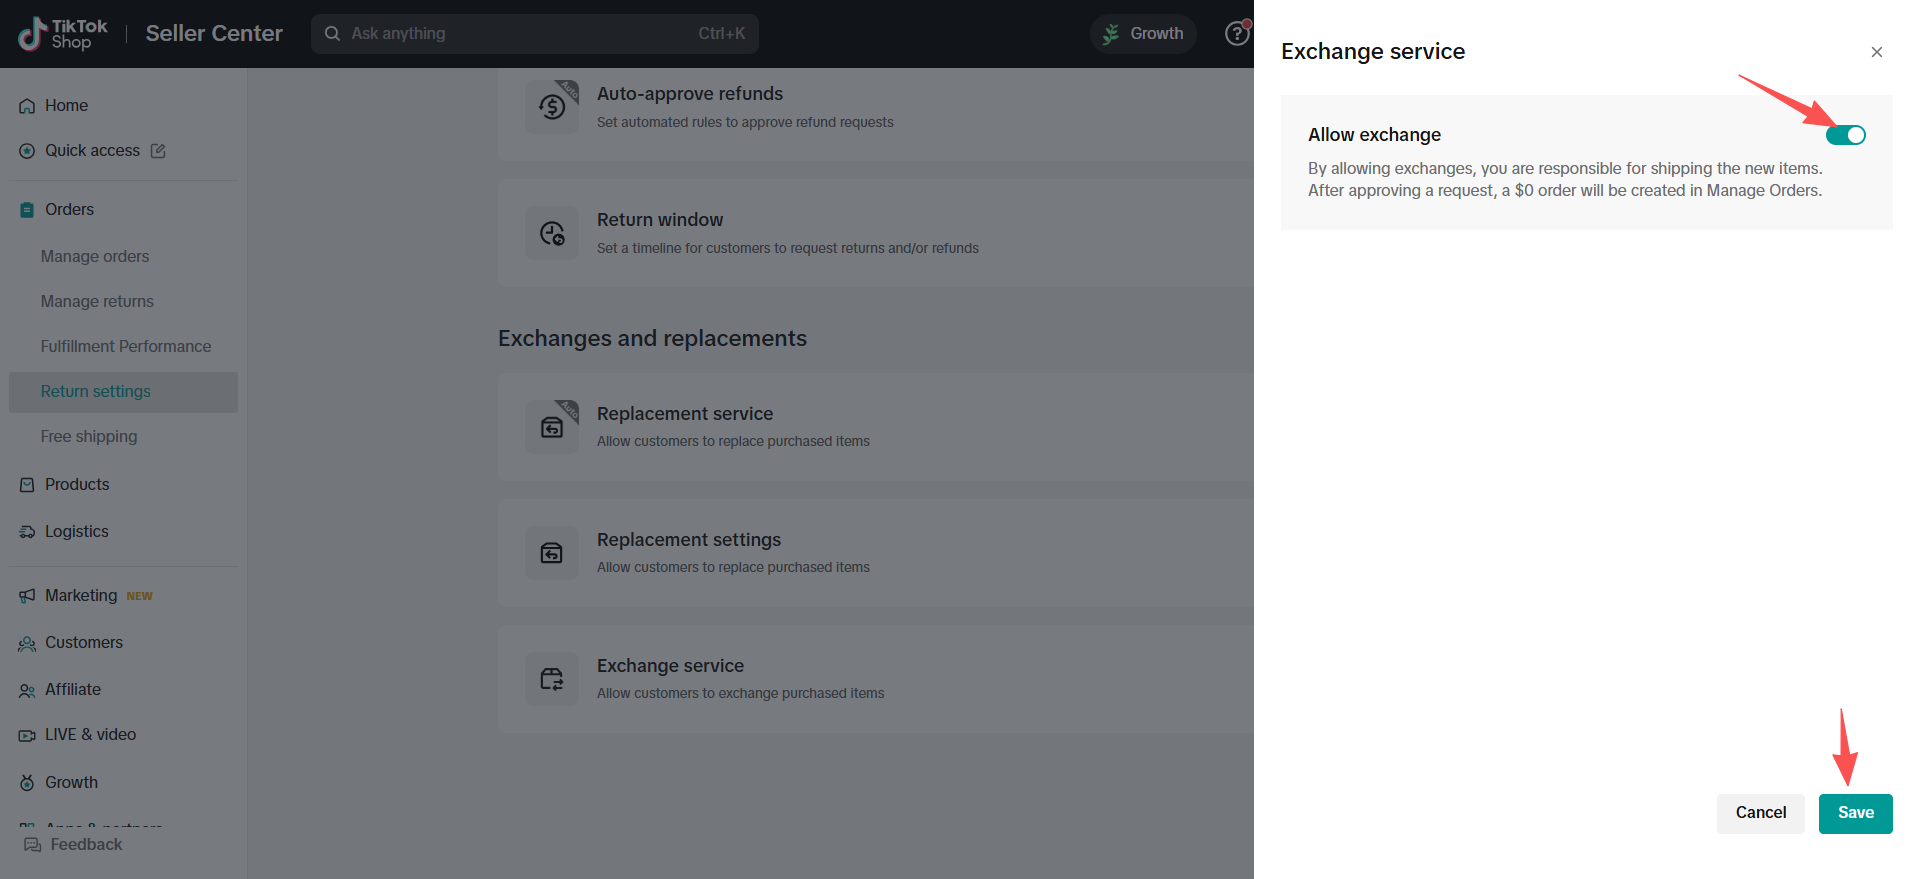 | |
| Loop Returns | - Return window must be set to 30 days (to match TikTok Shop).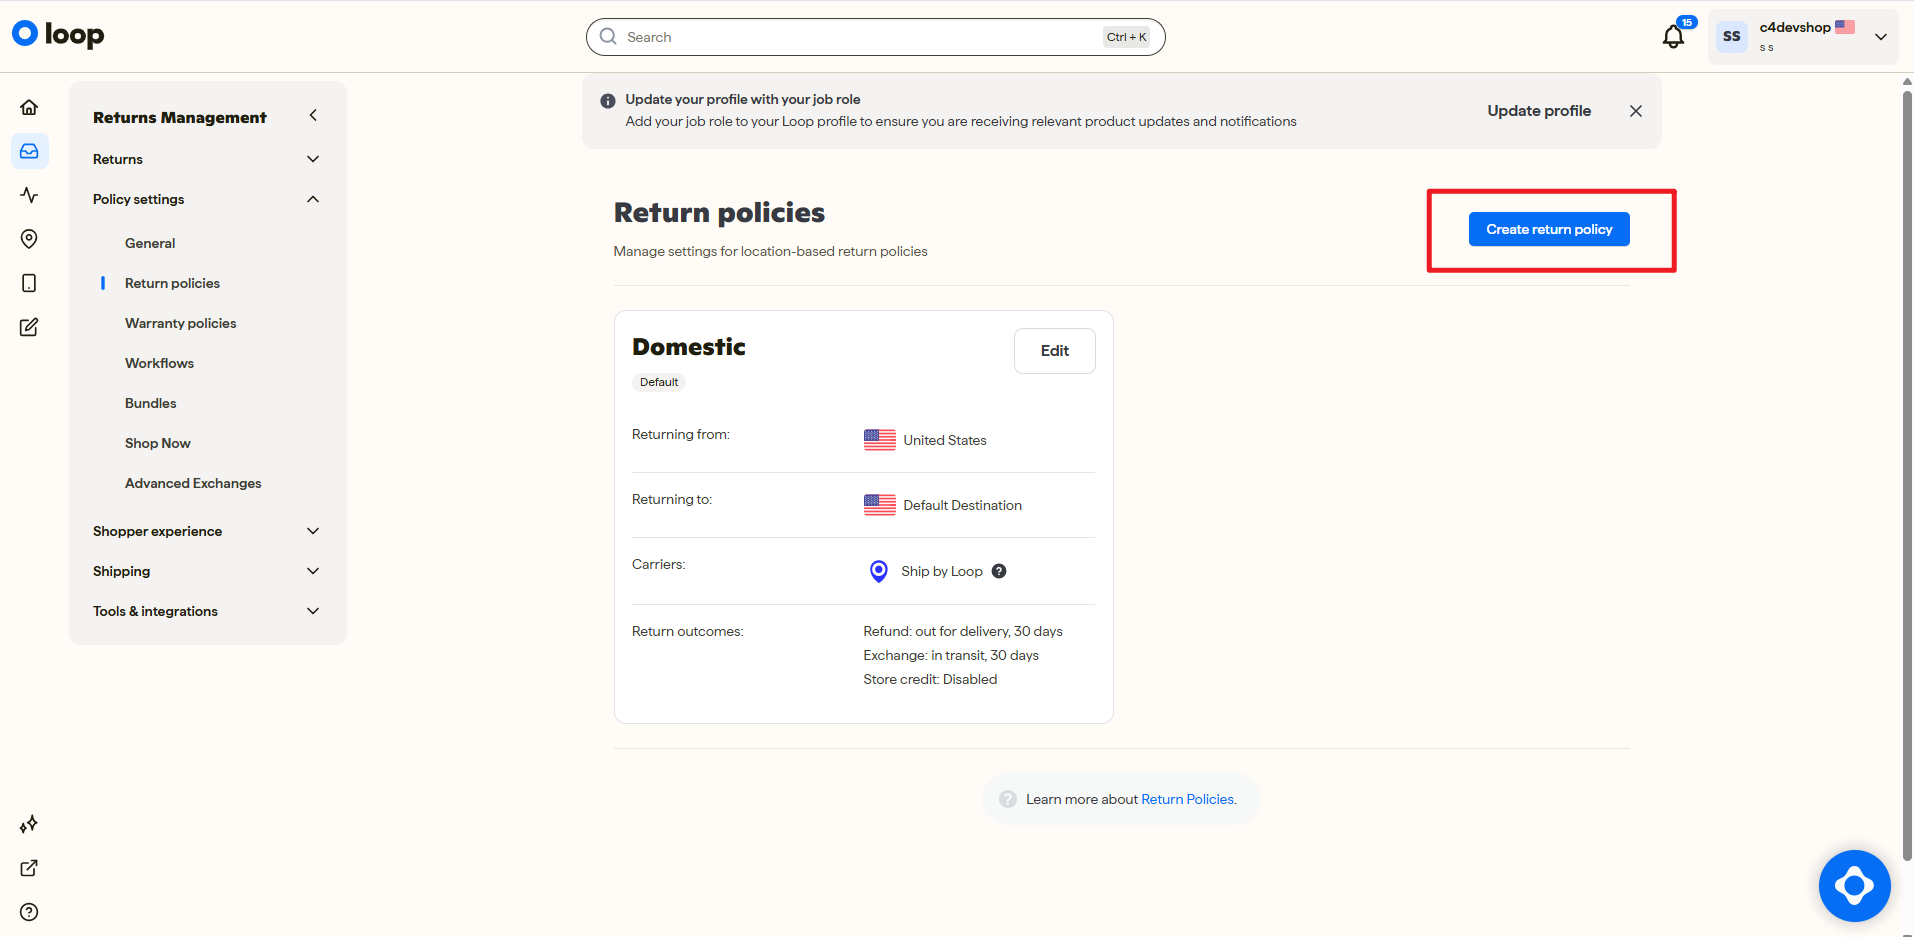 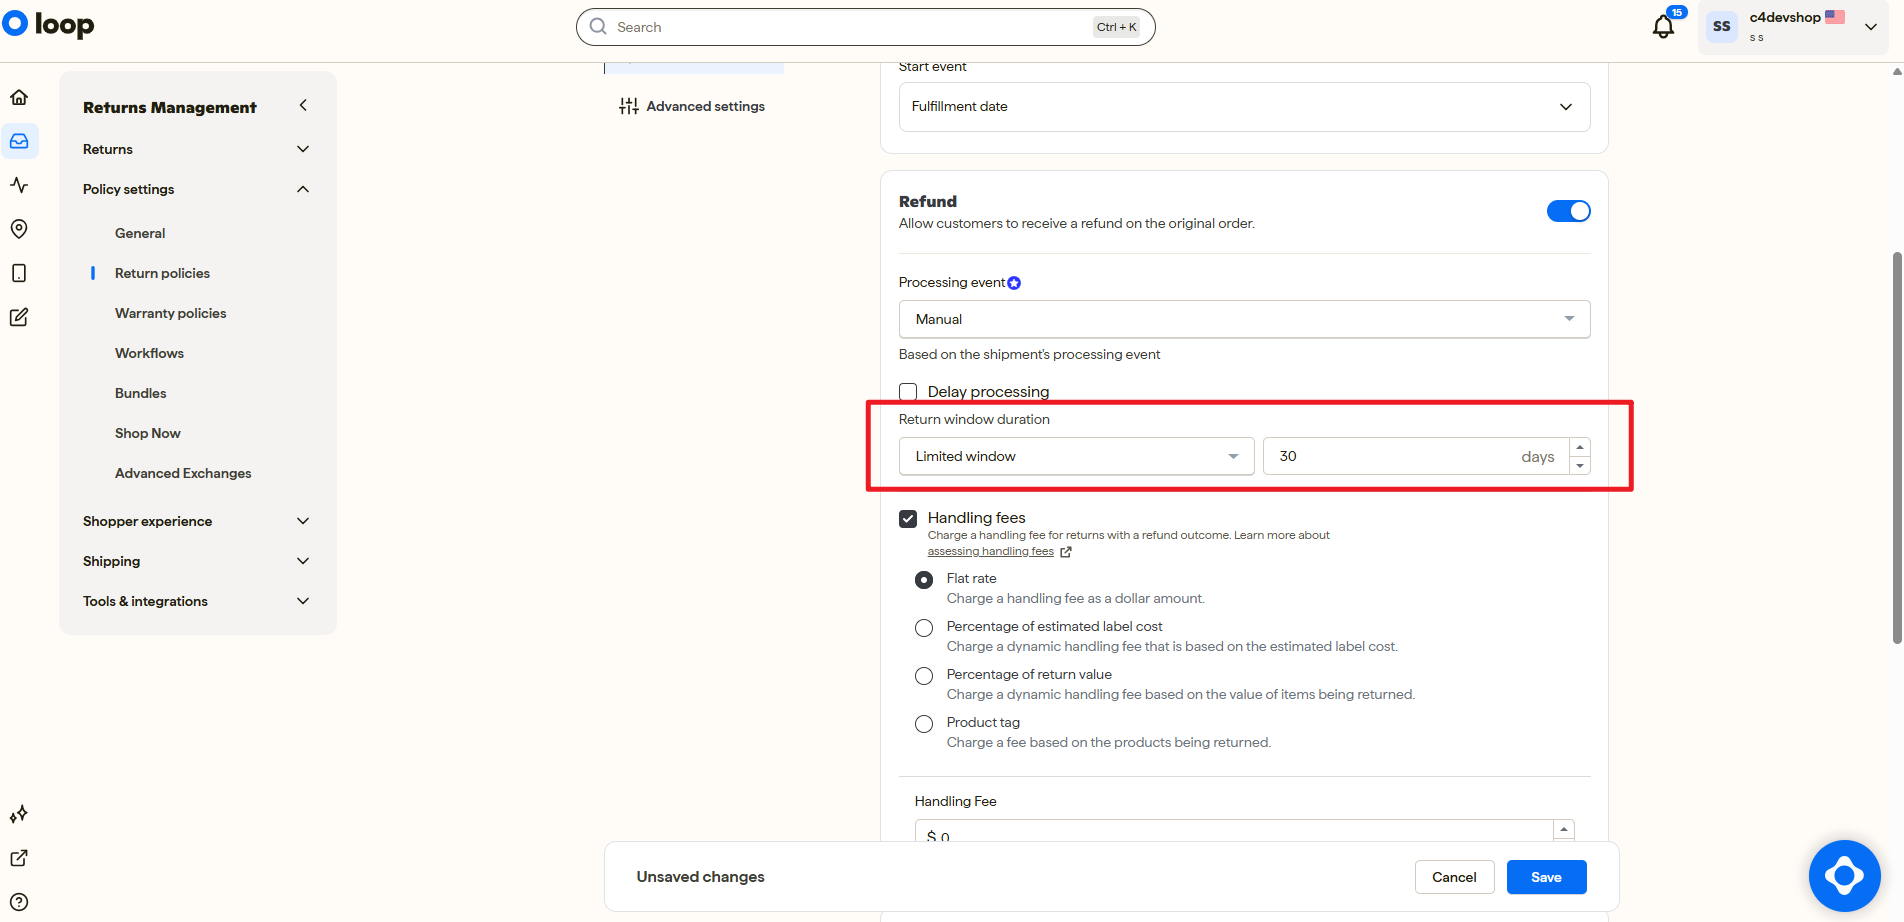 - Refund option must be enabled in Return Policies. 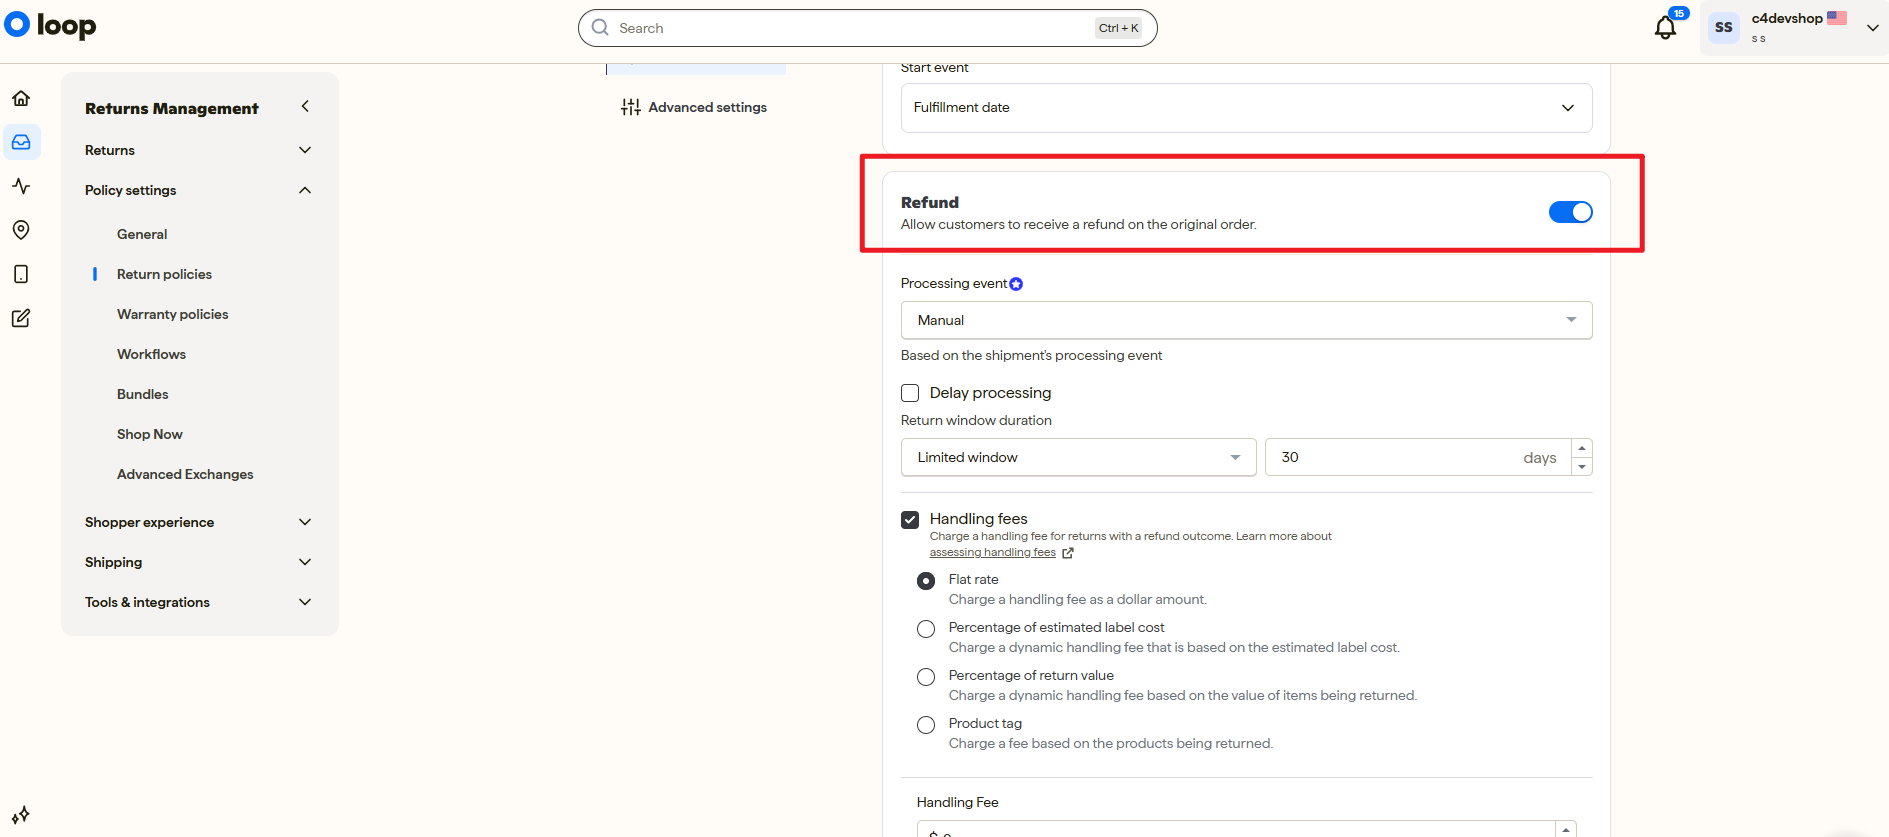 - (Optional) Enable “Generate Labels” if auto return labels are required. |
| Shopify | - The store must be active. - All products must have valid SKUs. - Orders must be successfully created before return processing. |
| Disable Return and Refund Sync at Production Cutover | > Important: Do not disable return/refund sync in your existing connector during initial setup or before you are ready to officially switch to the Silk Loop Returns Integration. > > Your existing connector should continue processing return and refund events until the production cutover. Because connector switching is currently a manual process and cannot occur simultaneously across systems, disabling the existing connector too early may interrupt the synchronization of existing or in-flight returns. When you are ready to officially go live with the Silk Loop Returns Integration: 1. Confirm that Shopify, Loop Returns, and TikTok Shop are fully authorized and that the required Silk Loop configuration has been completed. 2. Confirm that existing or in-flight returns are understood and can continue to be handled appropriately. 3. Keep order sync enabled in your existing connector. 4. Disable return/refund sync in the existing connector as part of the production cutover. 5. Begin using the Silk Loop Returns Integration for new return and refund events. 6. Monitor the first new returns after cutover to confirm that synchronization is working as expected. > Note: A short transition gap may occur because the old connector and the Silk Loop Returns Integration cannot currently be switched at exactly the same time. We recommend coordinating the cutover during a controlled period and monitoring return activity closely before and after the switch. > > - TikTok Shop for Shopify Contact the TikTok Shop team to coordinate disabling return and refund sync for your account when you are ready for production cutover. - AfterShip - At production cutover, go to Settings > Channel Setting > Return and Refund Sync and turn off the setting. 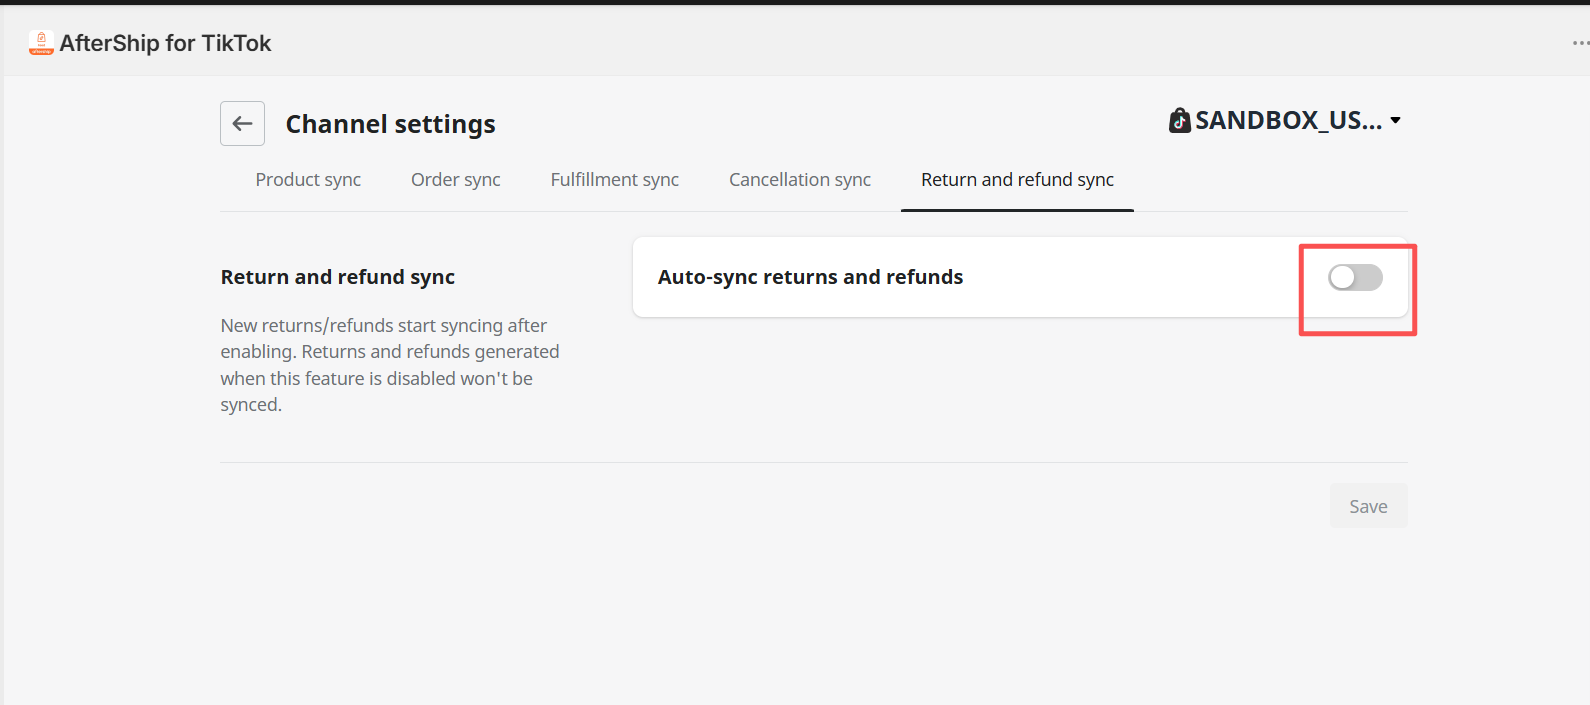 - ShoppeDance - At production cutover, go to Settings**> Order Sync**** > Sync Returns** and disable **Sync **Refund. 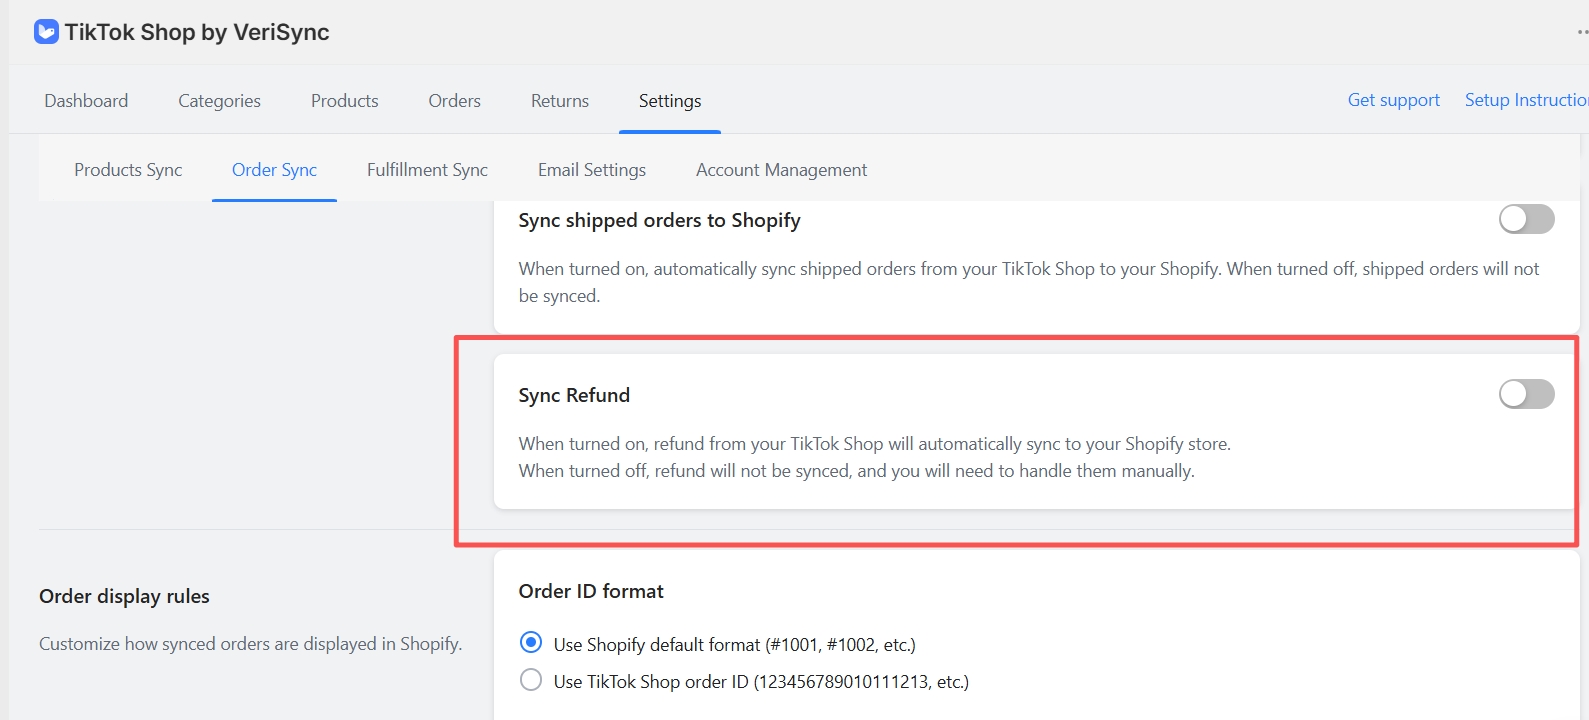 - SKU IQ At production cutover, review SKU IQ sync settings and disable return/refund sync if this option is available. > Important: Do not disable order synchronization. The selected connector must continue synchronizing TikTok Shop orders to Shopify. > > |
Connection Switching Scenarios & Data Handling
Section titled “Connection Switching Scenarios & Data Handling”Connector switching affects how historical orders and returns are handled.
| Scenario | Order & Return Handling | Required Actions |
|---|---|---|
| Switching from another connector channel to this standalone app flow | The app processes returns according to data available after the current setup. Historical returns created before the switch may not be automatically backfilled. | Complete or manually handle in-flight returns from the previous connector before switching. Verify Shopify order and SKU mapping before enabling automation. |
| Switching from TikTok Shop for Shopify to AfterShip, ShoppeDance, or SKU IQ | The external tool becomes responsible for TikTok Shop-to-Shopify order bridging. The app still expects Shopify, Loop Returns, and TikTok Shop authorization and still runs the return lifecycle. | Disable return/refund sync in the external connector, keep order sync working, and validate the first new return. |
| Disconnecting a platform account | Core sync and automation can stop until authorization is restored. Disconnect actions are support-mediated to preserve audit history. | Submit a disconnect request or work with support. Reauthorize the required platforms before resuming automation. |
| Adding multiple TikTok Shop connections | The app supports connection-aware work, but multi-connection rollout should be coordinated carefully to avoid duplicate return writers. | Coordinate with Silk Support before enabling multiple TikTok Shop connections for the same merchant setup. |
Note:“Historical data” refers to orders, returns, jobs, and webhook events created before a connector or authorization change.
Integration Setup & Authorization
Section titled “Integration Setup & Authorization”This section guides you through creating your account and completing the mandatory three‑party authorization (Shopify → Loop Returns → TikTok Shop).
Create Your Account
Section titled “Create Your Account”How to register
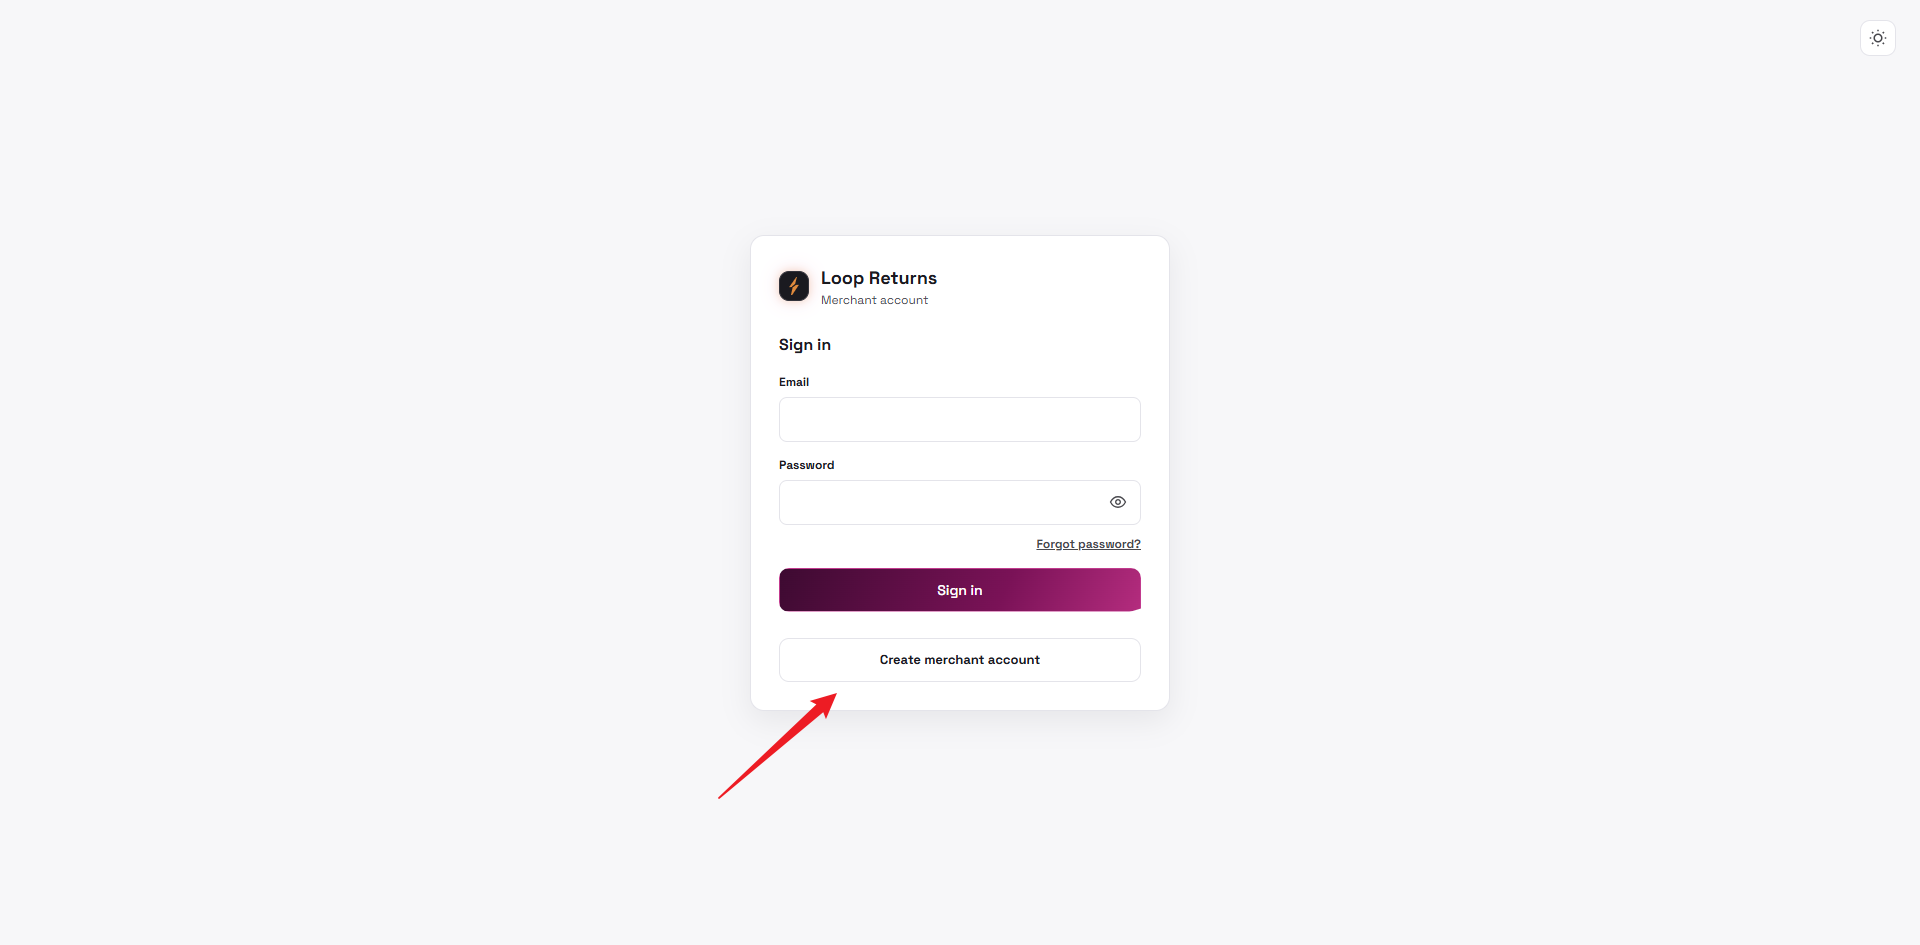
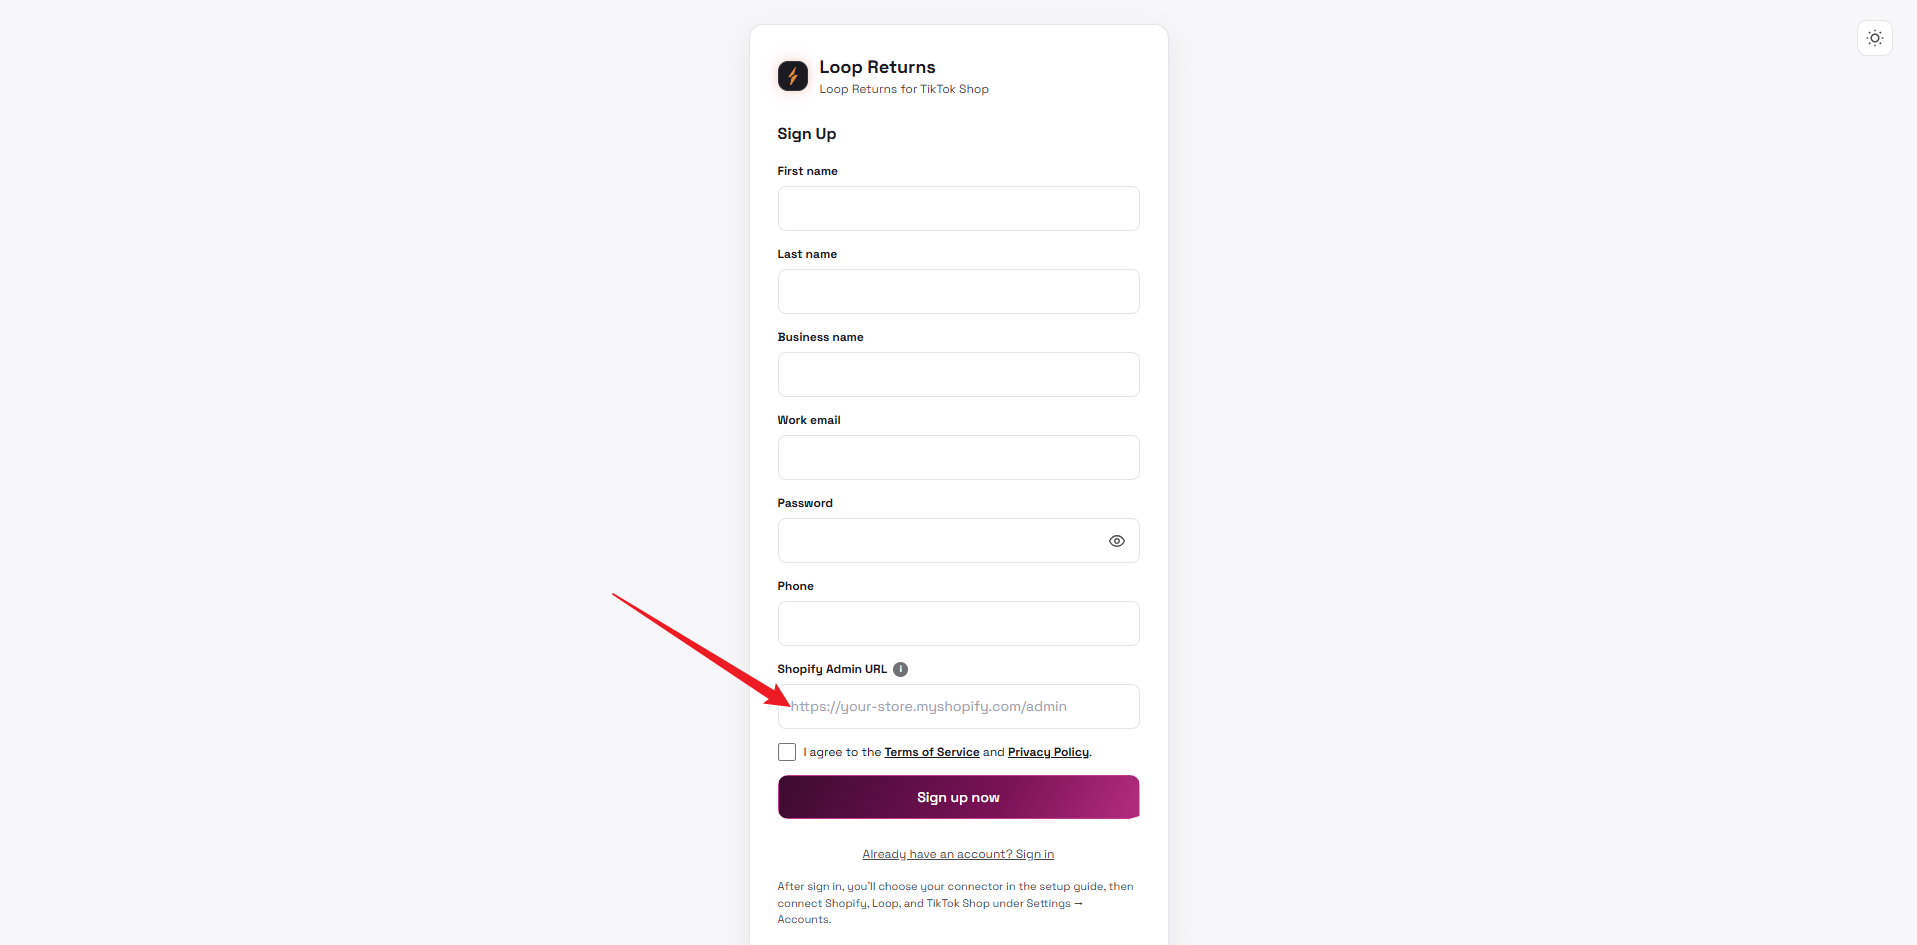
- Navigate to the Silk Loop Returns Integration App and click Sign Up.
- Fill in the registration form with the required fields
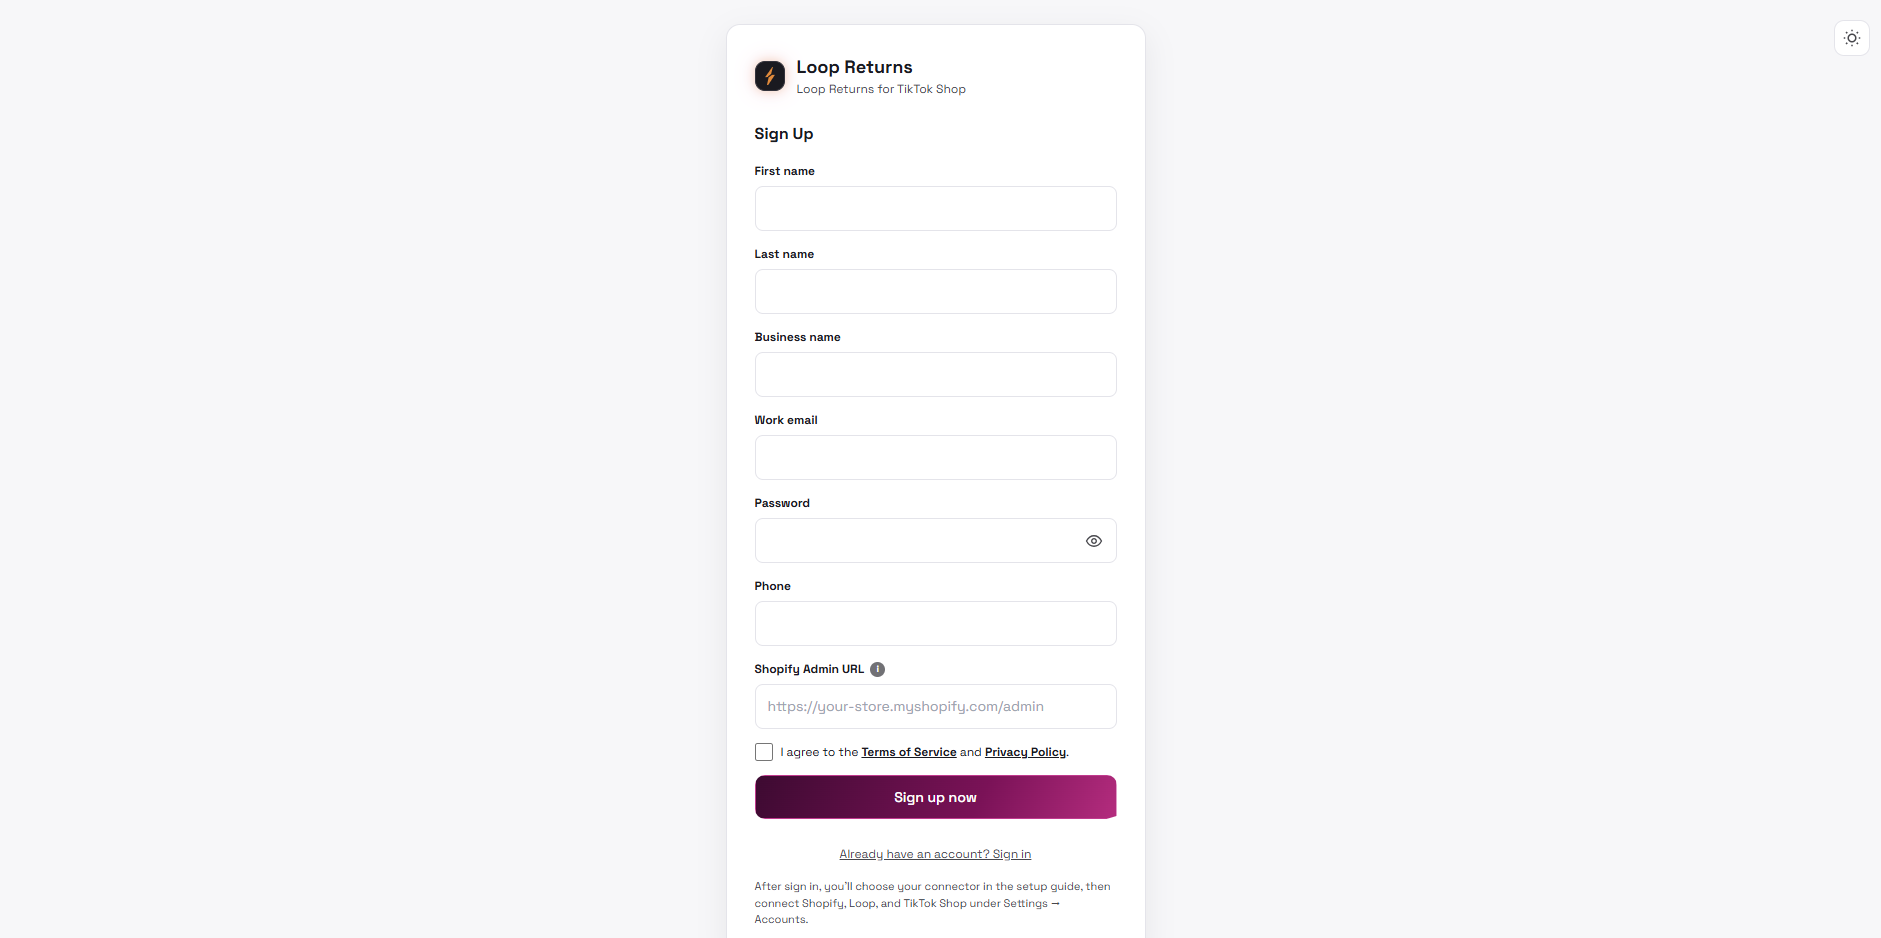
- Enter your Shopify Admin URL in the following format:
https://your-store.myshopify.com/admin
How to find your Shopify Admin URL:
-
Log in to your Shopify Admin through
admin.shopify.com. -
Navigate to Settings → Domains.
-
Find your store’s **.**myshopify.com domain (for example,
your-store.myshopify.com). -
Enter your Admin URL using the following format:
https://your-store.myshopify.com/admin
Note: Do not copy
https://admin.shopify.com/store/...URL from your browser’s address bar. Always use your store’s.``myshopify.com/adminURL.
-
Read and agree to the Terms of Service by checking the box.
-
Click Sign Up.
Password reset
If you forget your password:
-
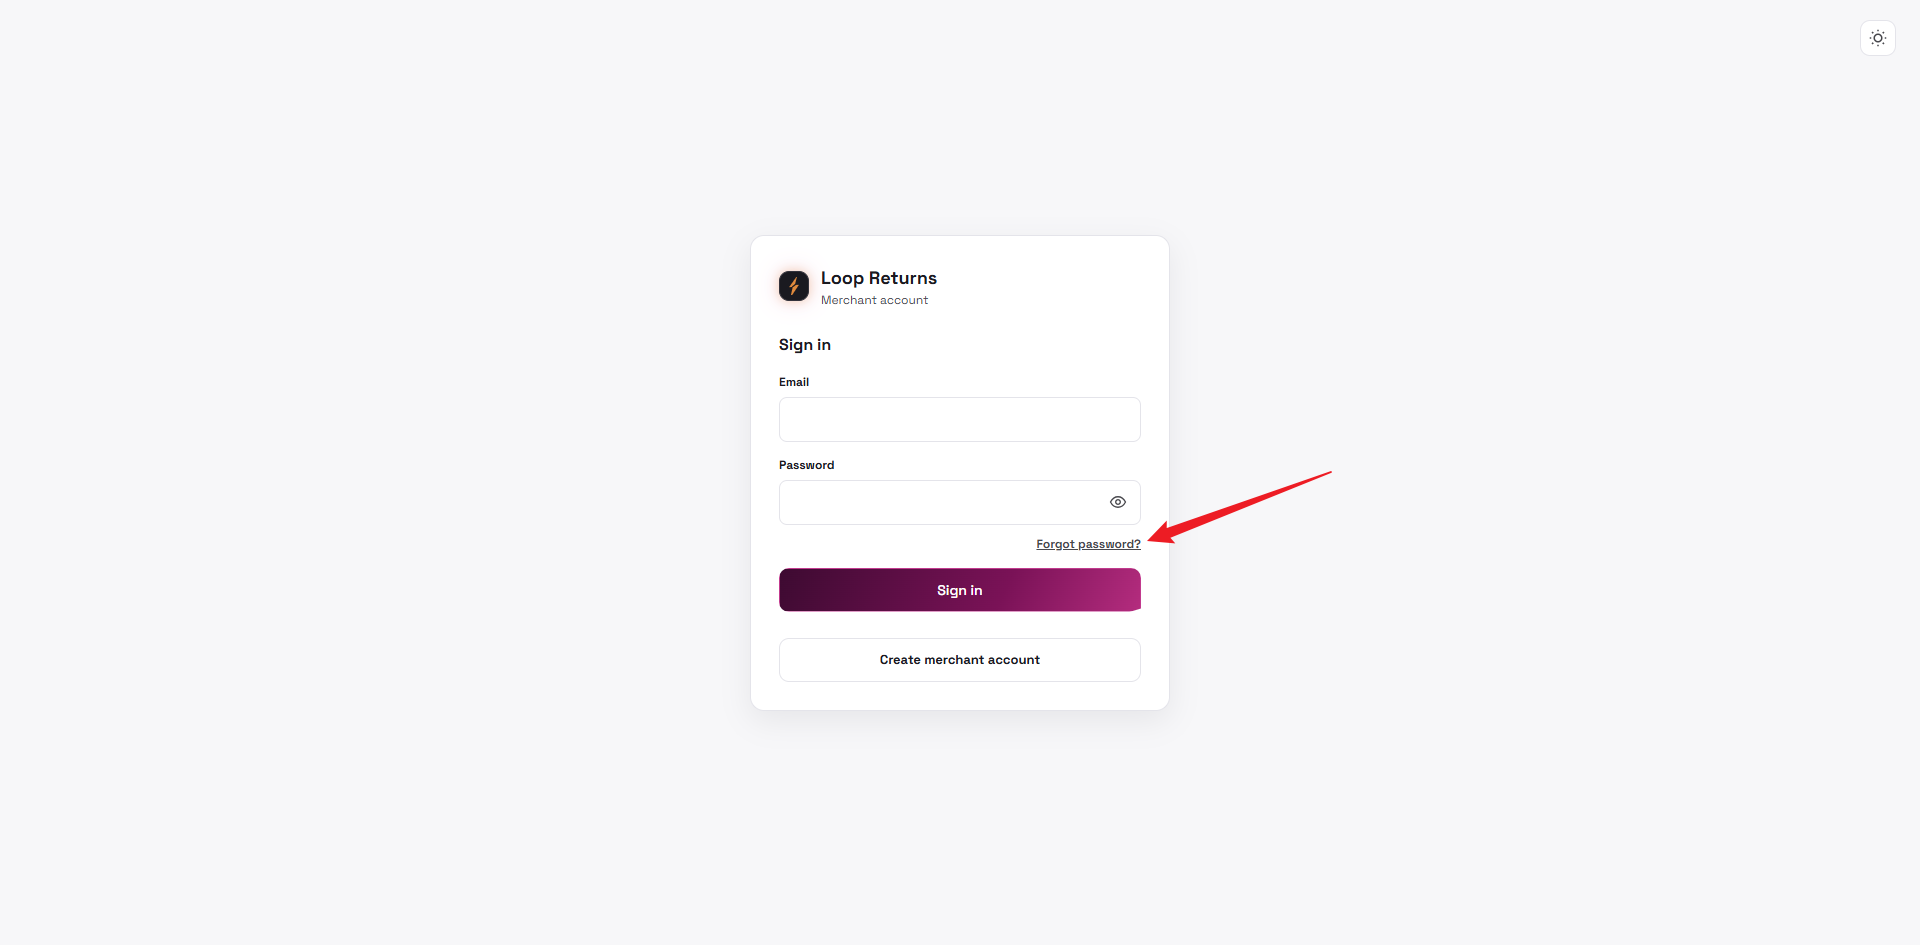
On the login page, click Forgot Password?
-
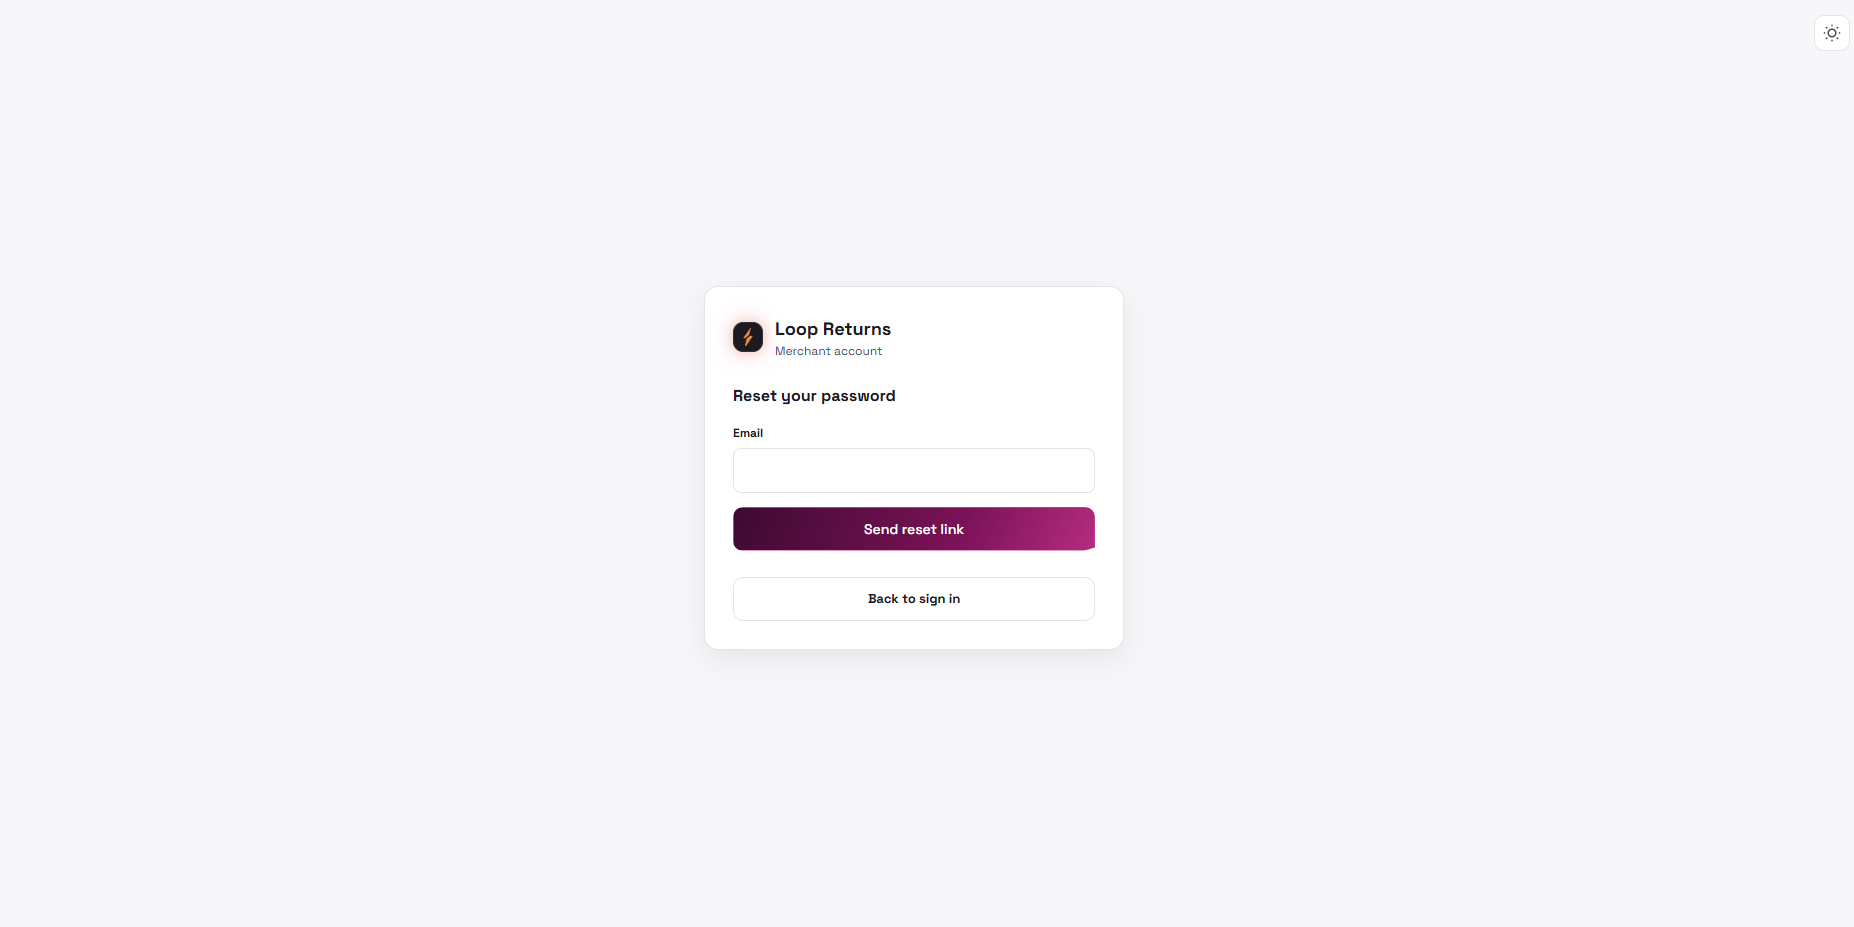
Enter the email address you used to register.
-
Check your inbox for a password reset email with a secure link (valid for a limited time).
-
Click the link and follow the instructions to set a new password.
-
Return to the login page and sign in.
Subscription
Section titled “Subscription”Subscription Overview
Section titled “Subscription Overview”The Loop Returns Standalone App is available as a subscription service. Access to the full suite of features is controlled by your subscription status.
Core Value of Subscription:
-
Grants ongoing access to automated return management workflows.
-
Ensures continuous system operation and data synchronization.
-
Includes technical support and service maintenance.
The app uses subscription status to control protected operations while keeping read-only visibility available.
Read-only areas such as return history, subscription status, and basic account information remain accessible even when a subscription is not active. Protected operations such as settings saves, return refreshes, exports, go-live completion, and external sync actions can be blocked when the subscription status is not eligible.
Common subscription states include:
| Status | Access behavior |
|---|---|
| Active | Full access to read and protected operations. |
| Grace period | Full or mostly full access, with billing warning and remaining grace time. |
| Canceled before period end | Access remains until the paid period expires. |
| Expired | Read-only access; protected operations are blocked. |
| Inactive / Not paid / Payment failed | Read-only access or limited access; subscription action is required. |
Billing & Payment Method
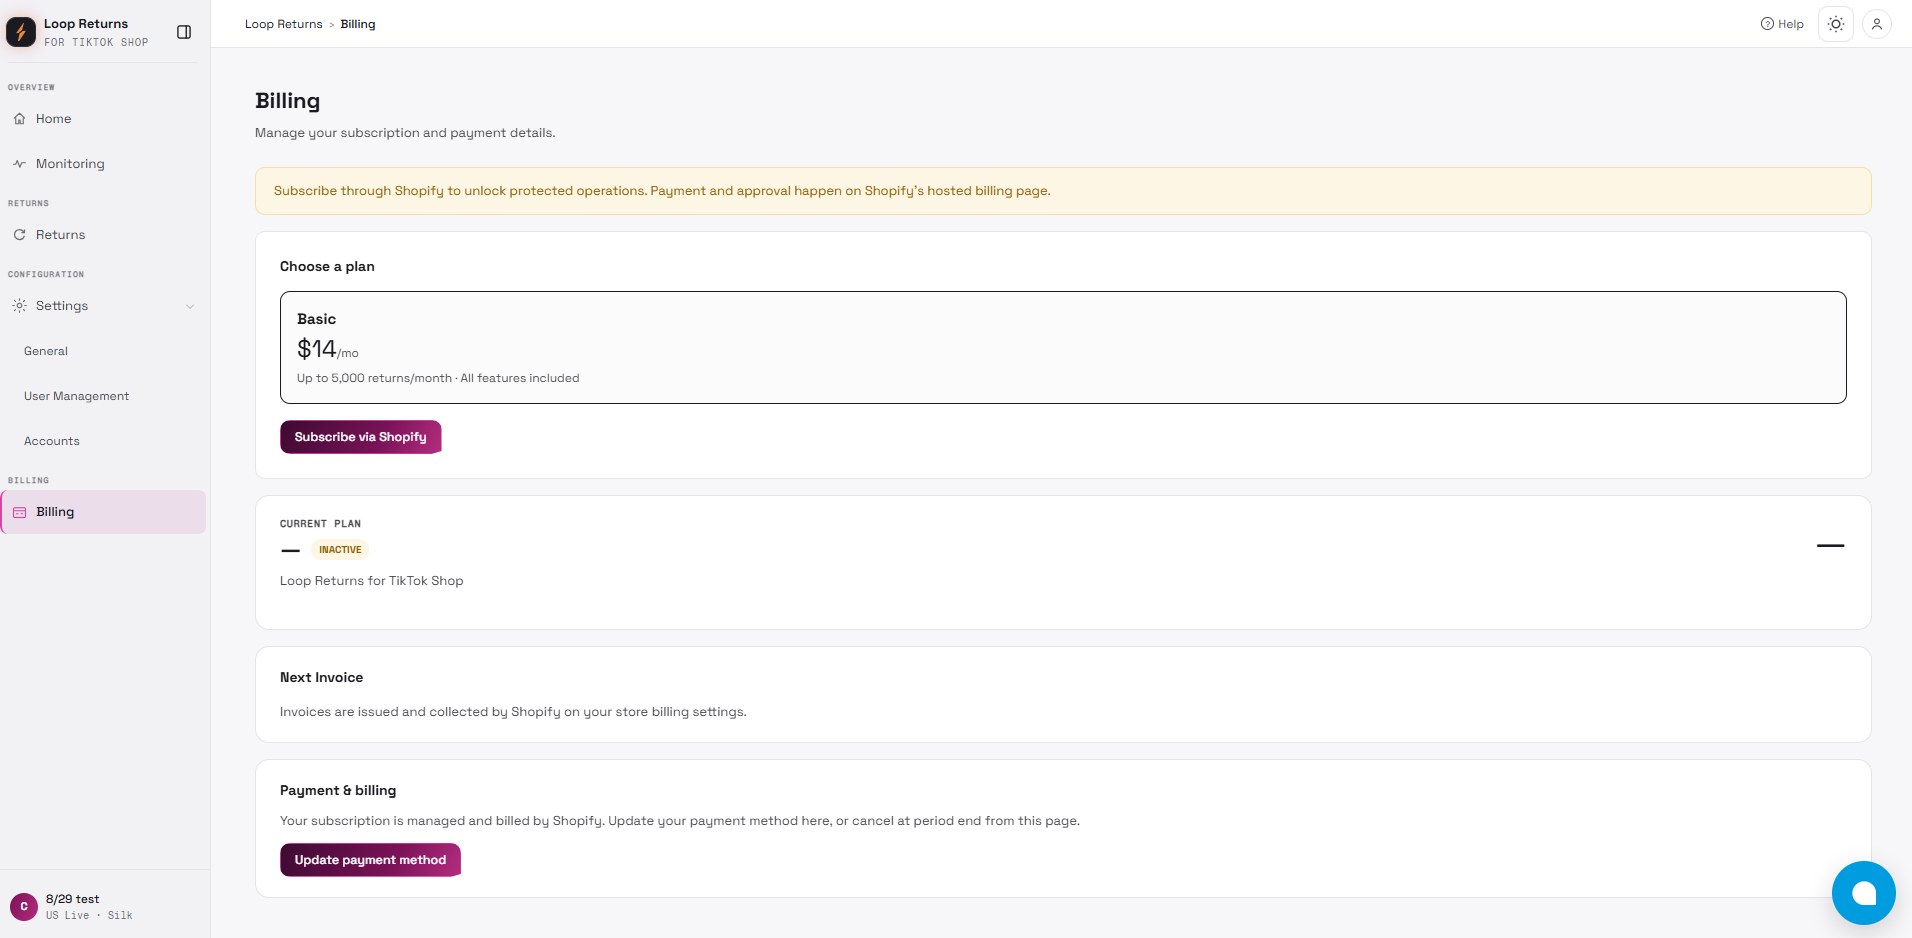
Section titled “Billing & Payment Method”The app provides a Billing page where you can view and manage your subscription.
Depending on the current app deployment and billing configuration, your subscription may be processed through Stripe or Shopify Billing. The available billing provider, subscription plan, price, payment method, and billing actions will be displayed directly on the Billing page.
From the Billing page, you may be able to:
-
View your current subscription status.
-
Review the available subscription plan.
-
Start or complete subscription checkout.
-
Update your payment method through the billing provider portal.
-
Cancel your subscription.
-
Reactivate a canceled or expired subscription where supported.
Available payment methods may vary depending on the billing provider and account configuration. Please follow the options shown during checkout.
The plan list is dynamic. The Billing page should always be treated as the source of truth for the plans, prices, payment methods, billing period, and order limits available to your account.
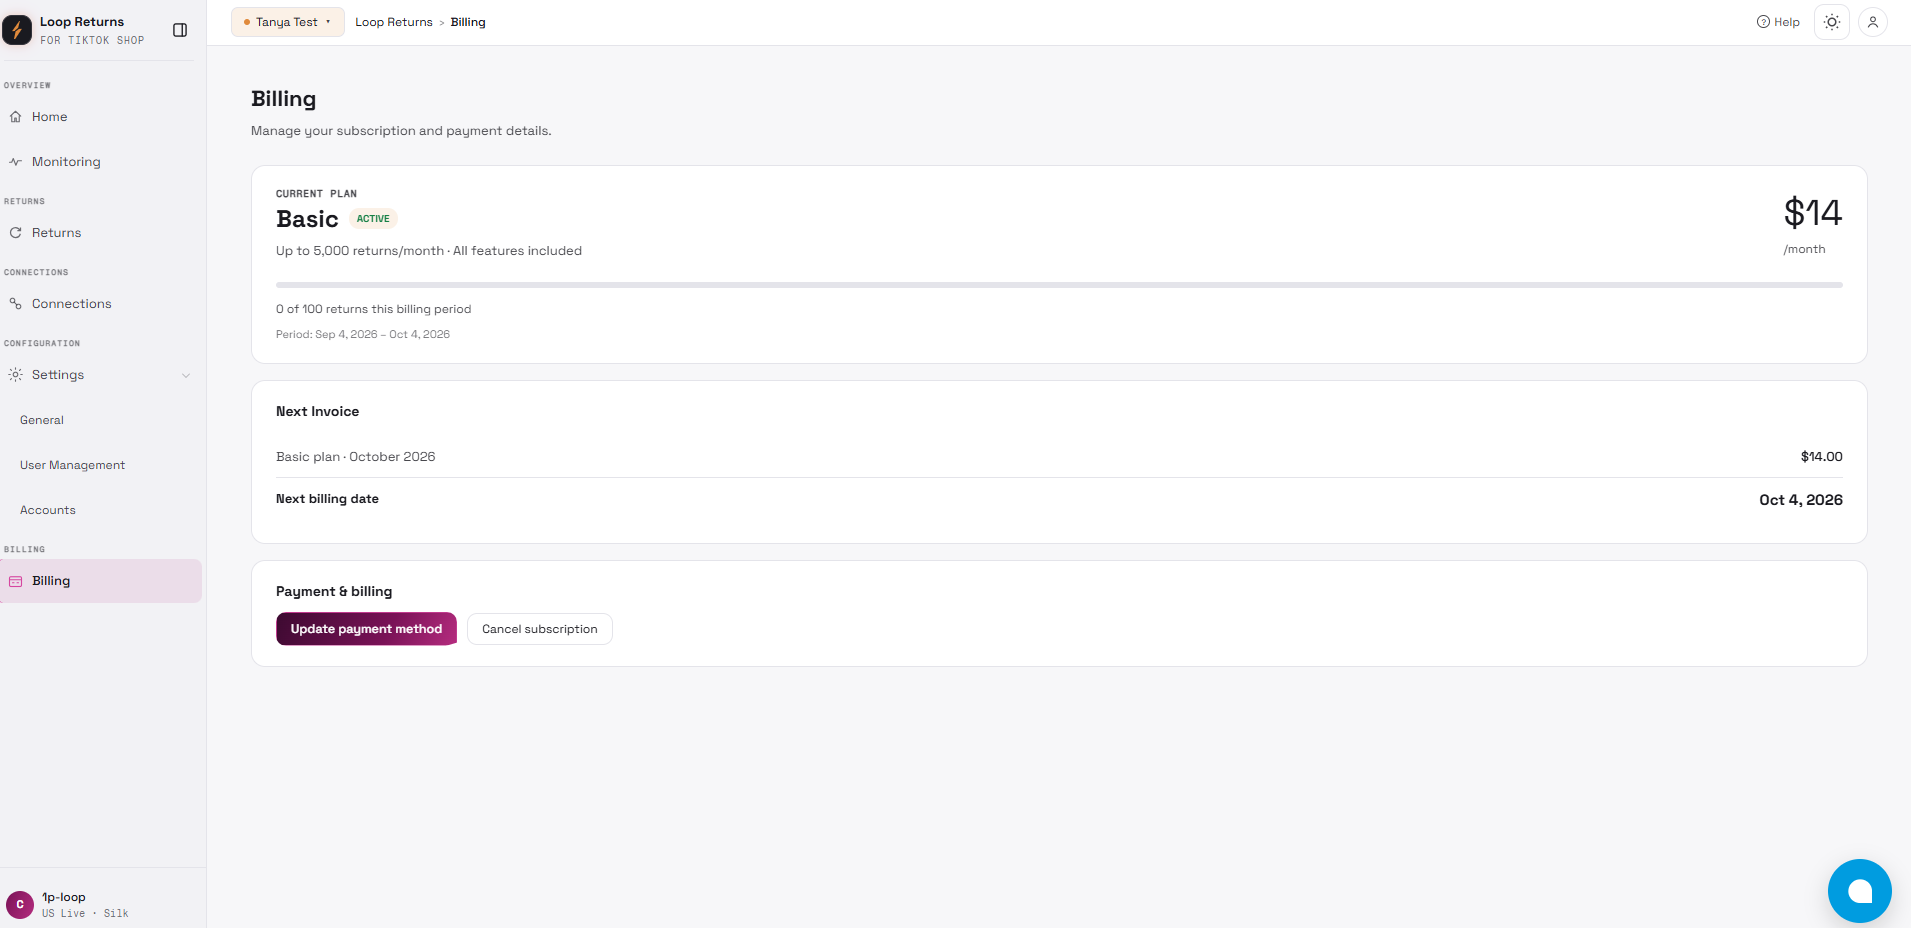
Subscription Activation Flow
Section titled “Subscription Activation Flow”-
Open the Billing page or subscription prompt.
-
Review the available plan.
-
Start subscription checkout.
-
Complete payment with the configured billing provider.
-
Return to the app.
-
Confirm the subscription status.
If payment is delayed, canceled, or fails, the app displays the current subscription state and may keep the account in a read-only state until the issue is resolved.
Onboarding Wizard
Section titled “Onboarding Wizard”After registration or first login, incomplete merchants are routed into a guided onboarding wizard.
The onboarding wizard helps merchants complete setup in a clearer step-by-step flow instead of relying only on separate authorization pop-ups.
The setup flow covers the following areas:
| Step | What the user does | Completion rule | screenshots |
|---|---|---|---|
| 1. Select connector | Choose TikTok Shop for Shopify, AfterShip, ShoppeDance, or SKU IQ. | Selection is saved to the merchant onboarding state. | 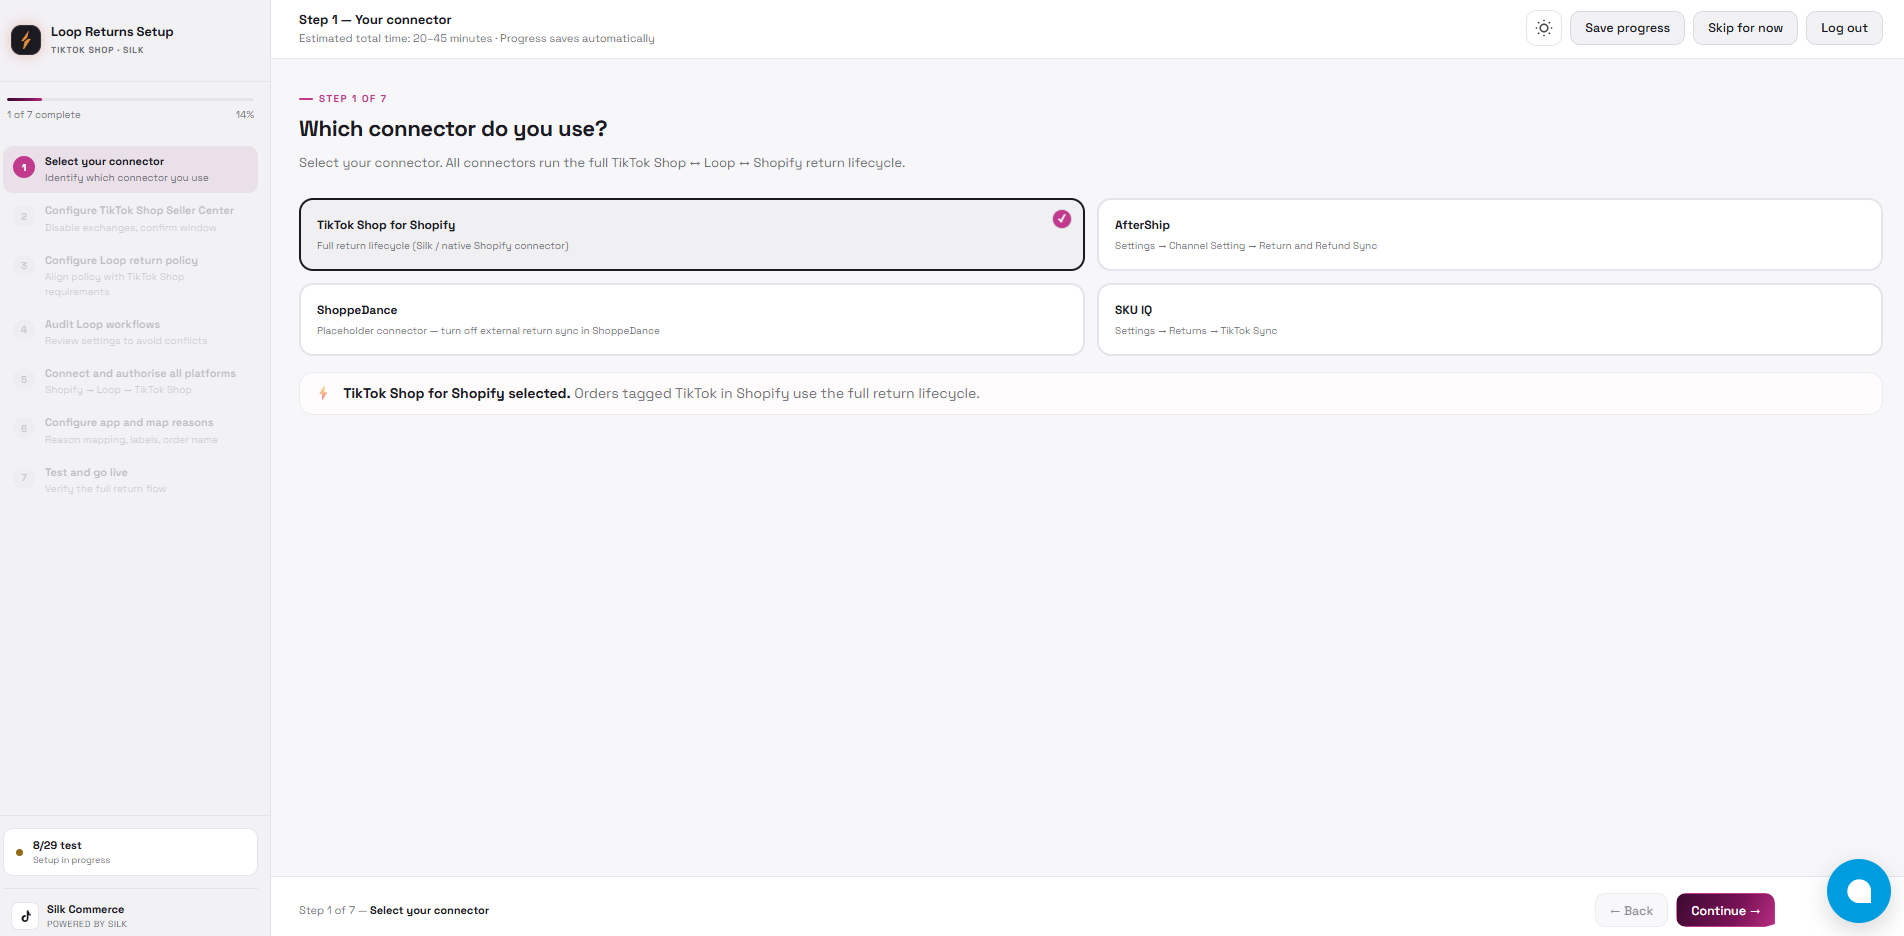 |
| 2. Confirm TikTok Shop prerequisites | Confirm that replacement/exchange flows are disabled for the supported v1 flow and that the TikTok Shop return window is compatible. | Required checklist items are checked. | 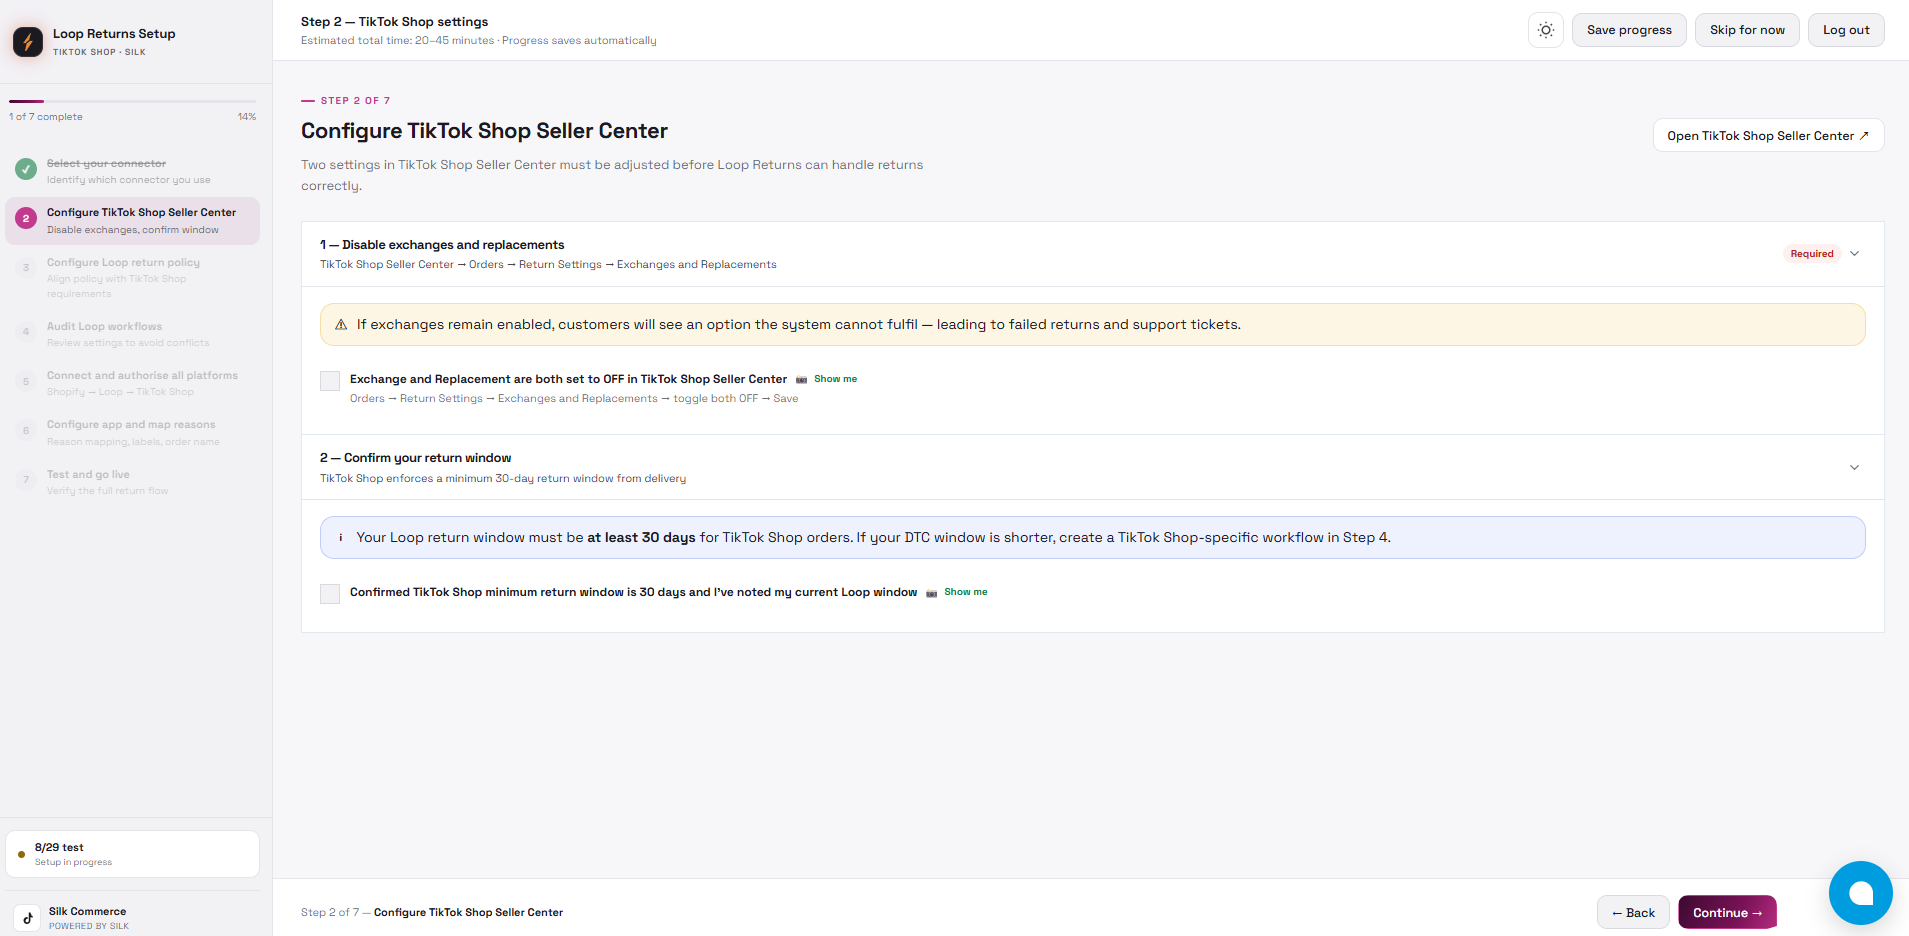 |
| 3. Confirm Loop policy requirements | Confirm Loop return window, label generation, refund outcomes, shipping fee behavior, and other policy requirements for TikTok Shop returns. | Required checklist items are checked. | 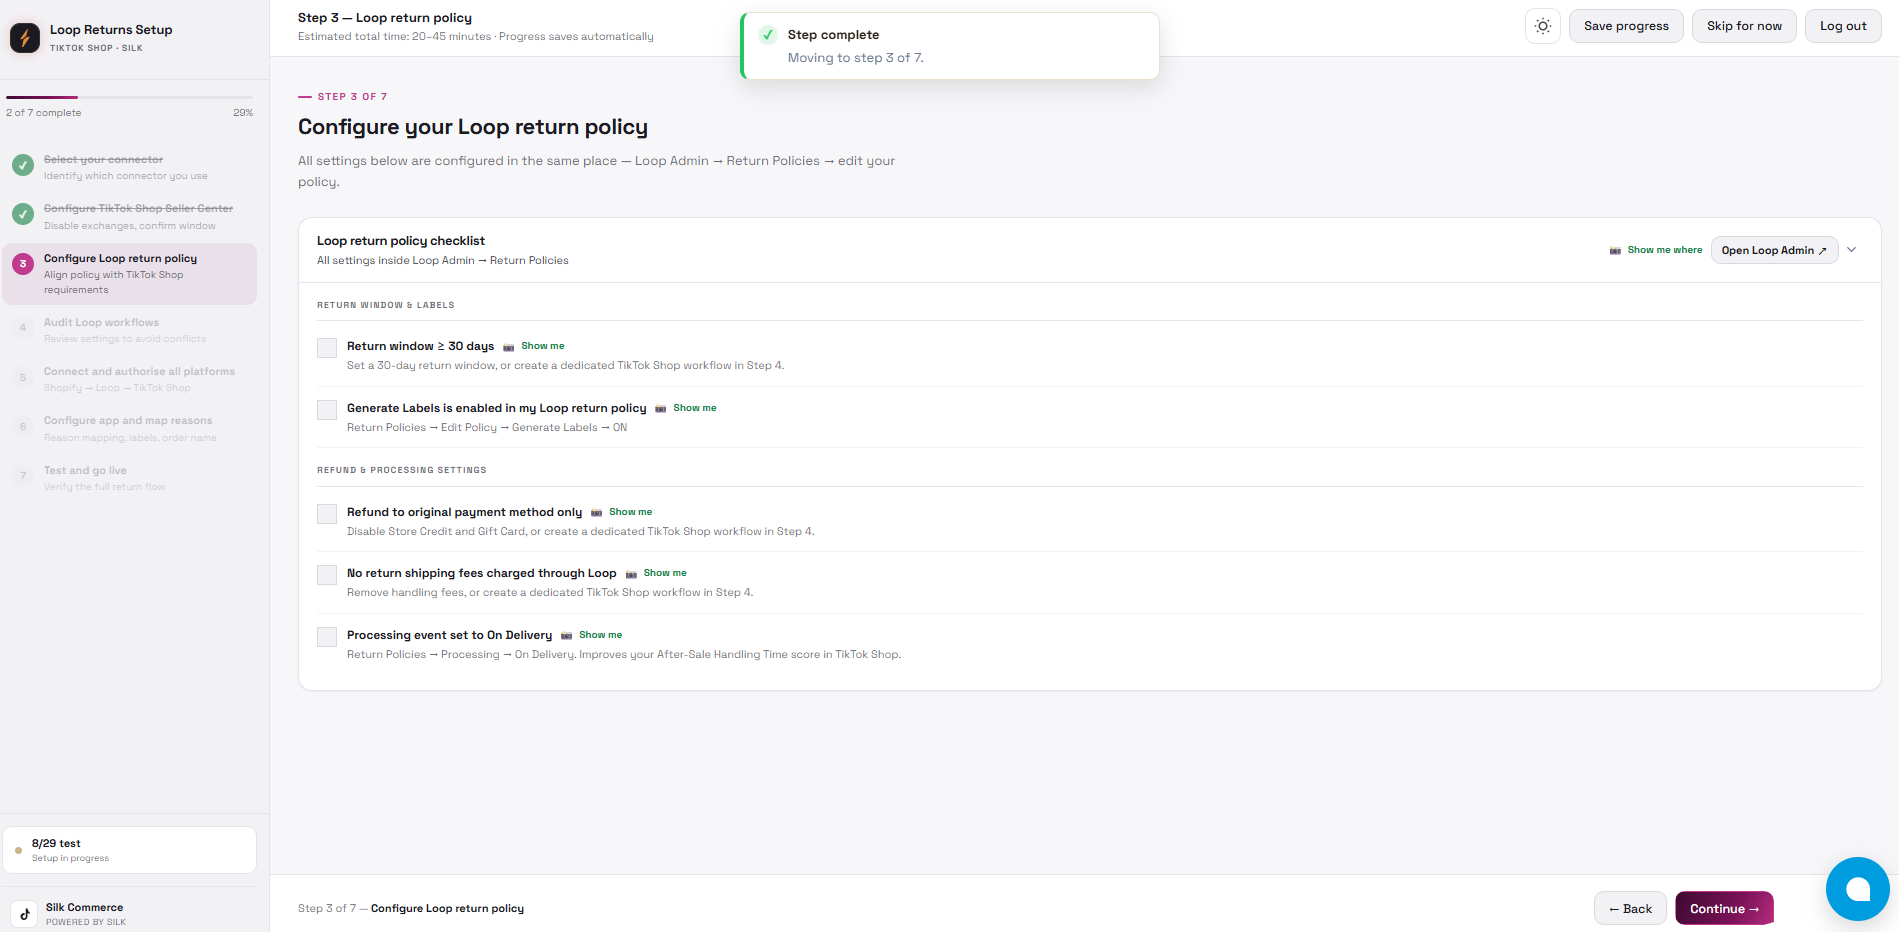 |
| 4. Review Loop workflow conflicts | Review Loop workflows that could conflict with TikTok Shop refunds, including partial refunds and DTC-only workflow behavior. | Required workflow checklist items are checked. | 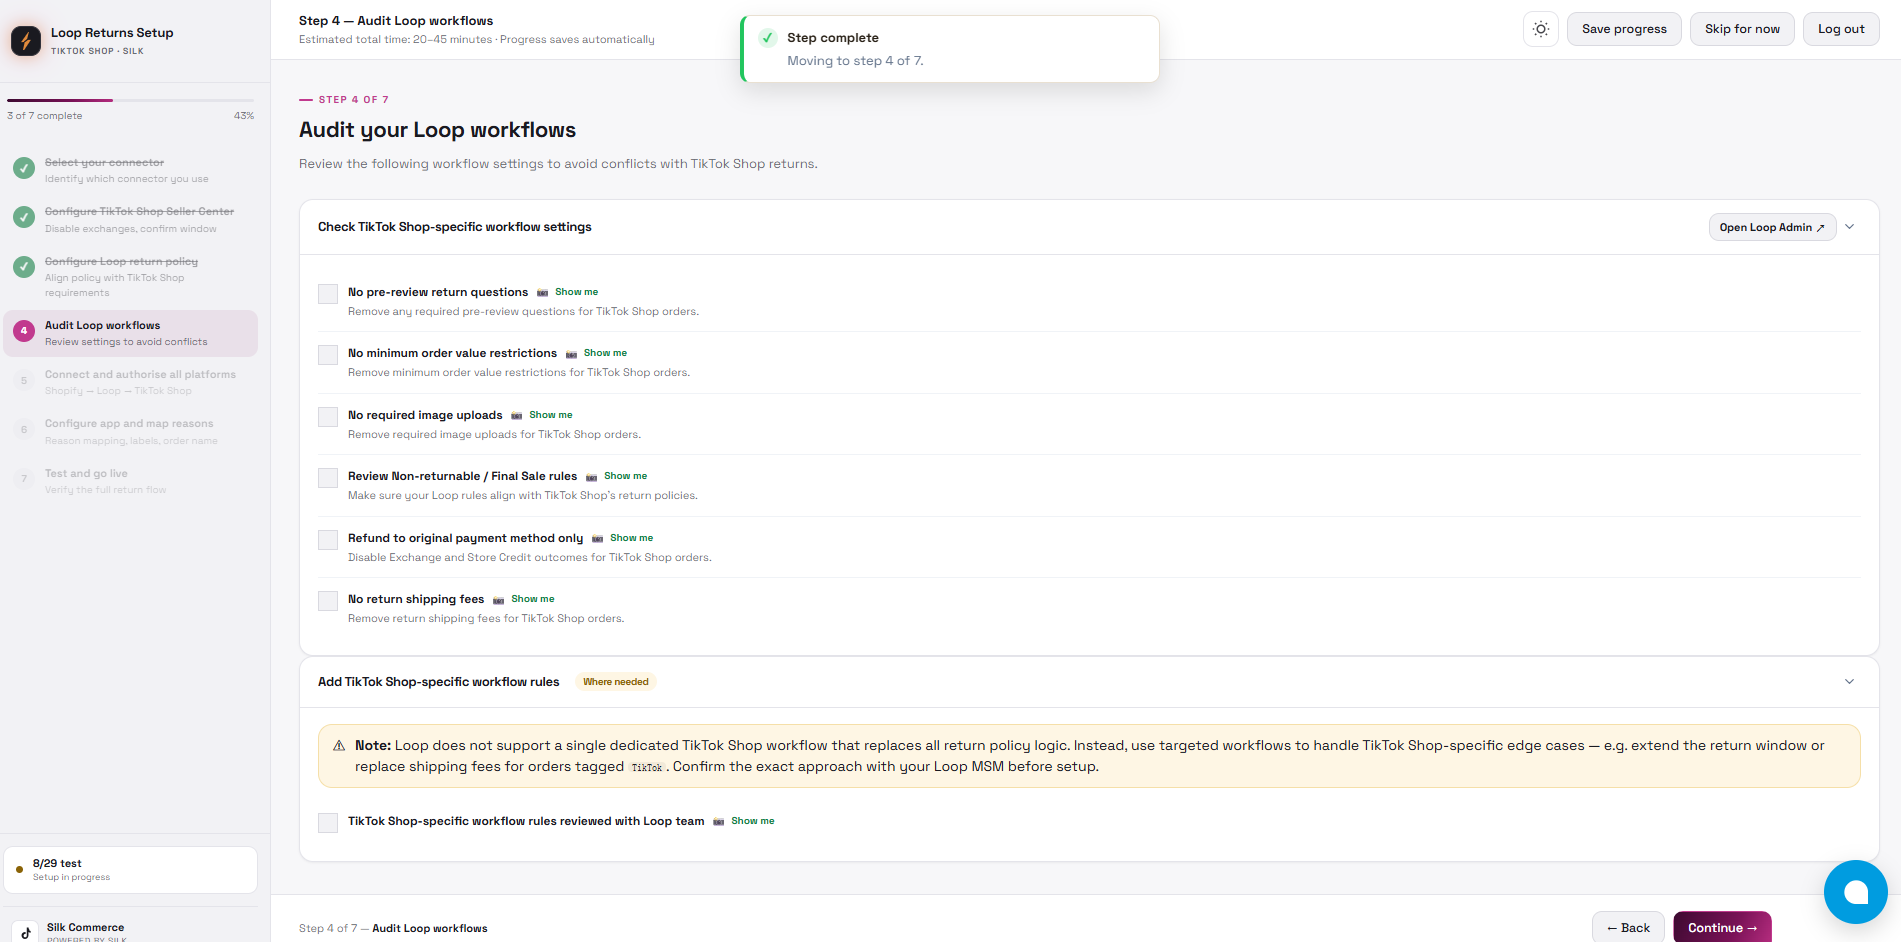 |
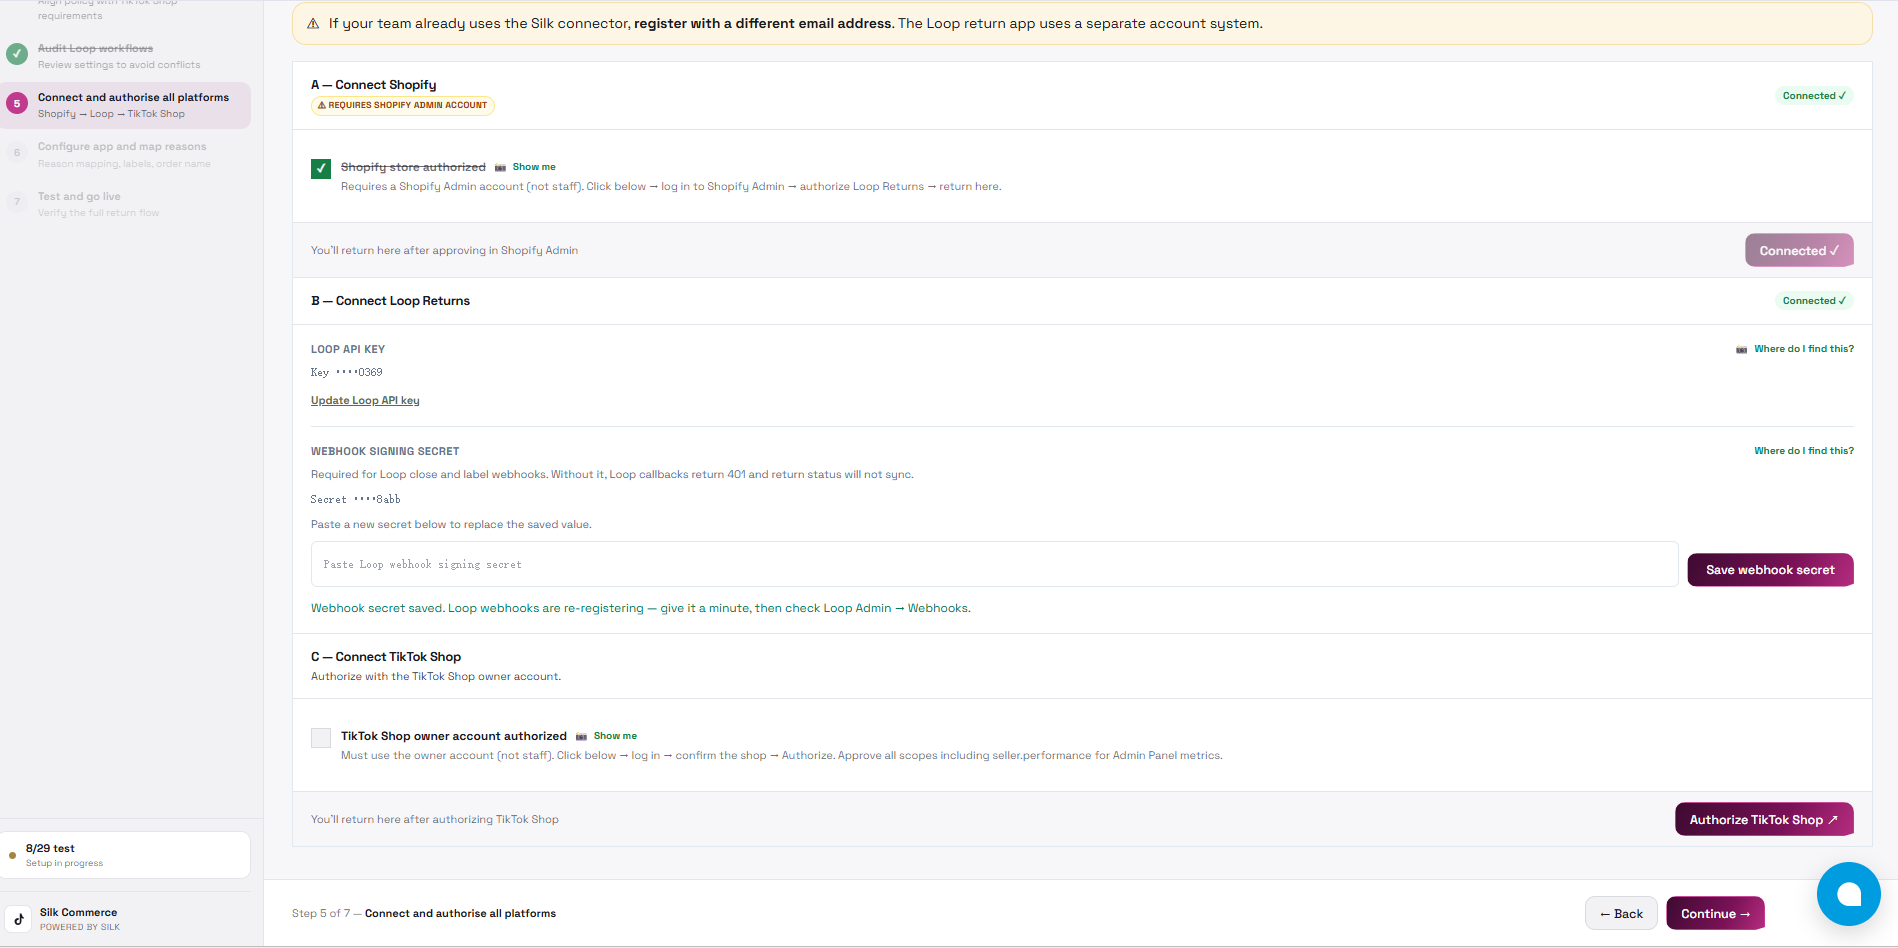
| 5. Authorize platforms | Connect Shopify, Loop Returns, and TikTok Shop. Before authorizing TikTok Shop, select the country or market where your TikTok Shop is registered. The app routes the authorization request to the appropriate platform based on this market. | All three platform statuses are connected, and the correct TikTok Shop market is selected. | 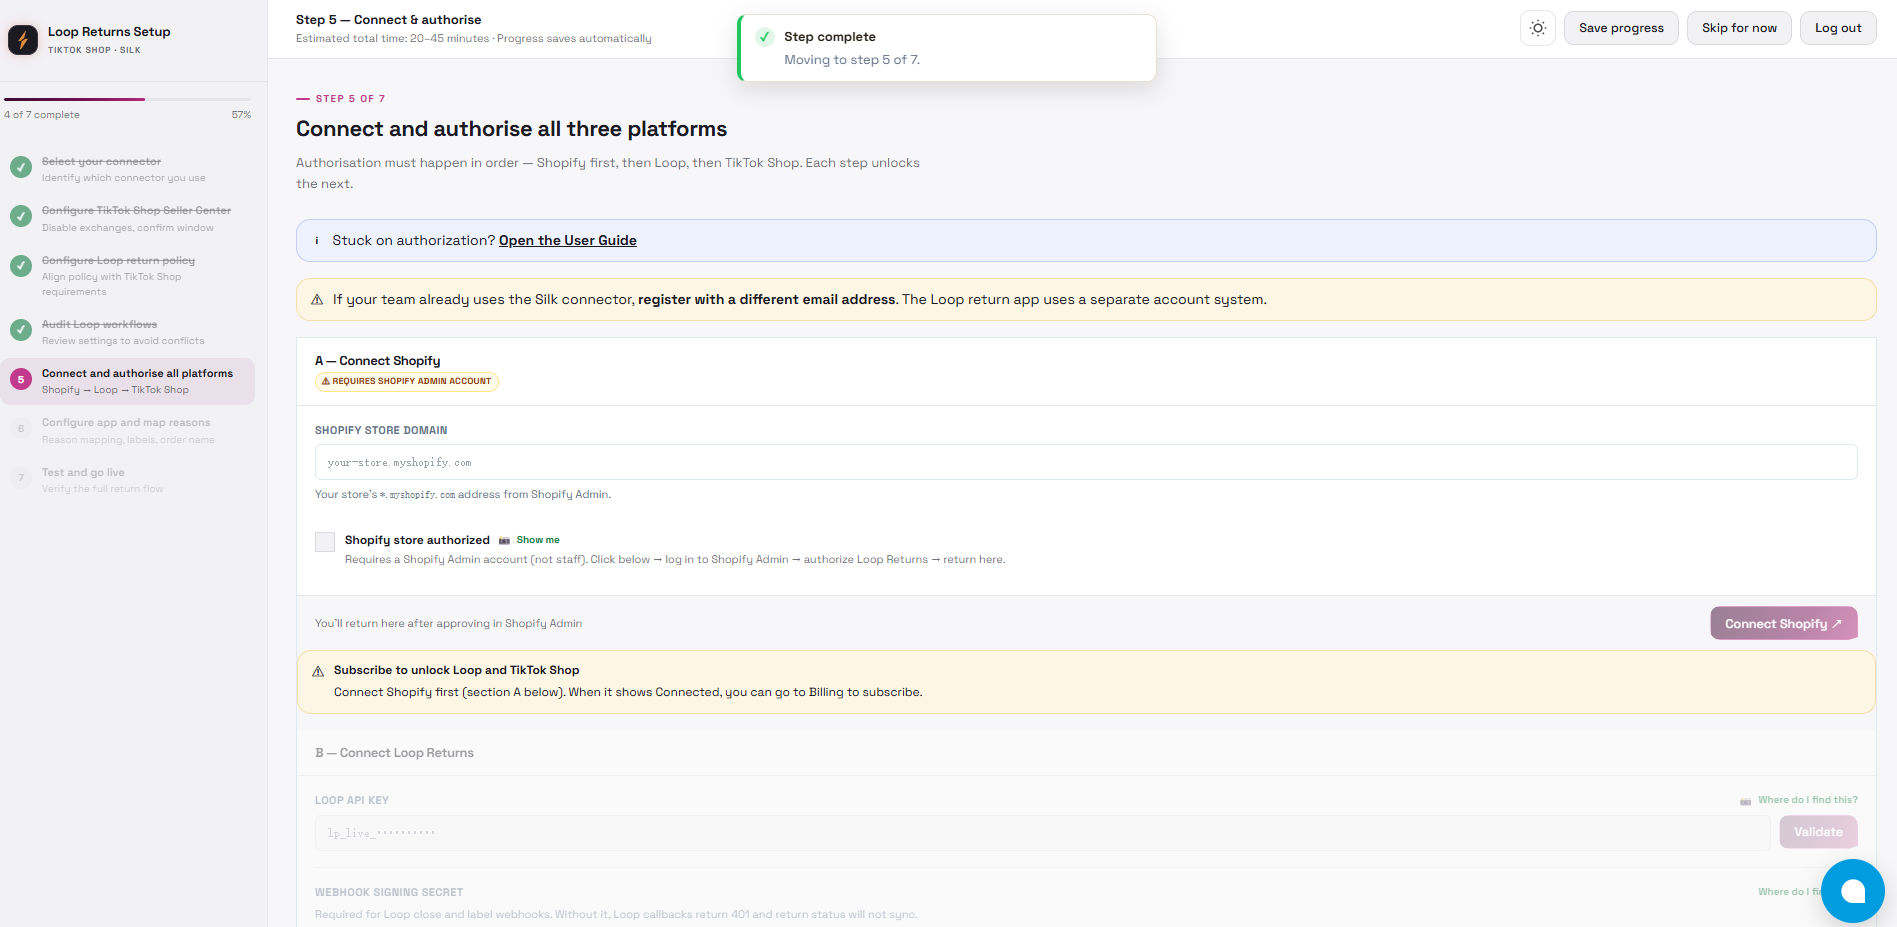 |
| 6. Configure return reason mapping | Review or save the suggested TikTok Shop -> Loop Returns reason mappings. | The step can continue after review; save mappings when changes are made. | 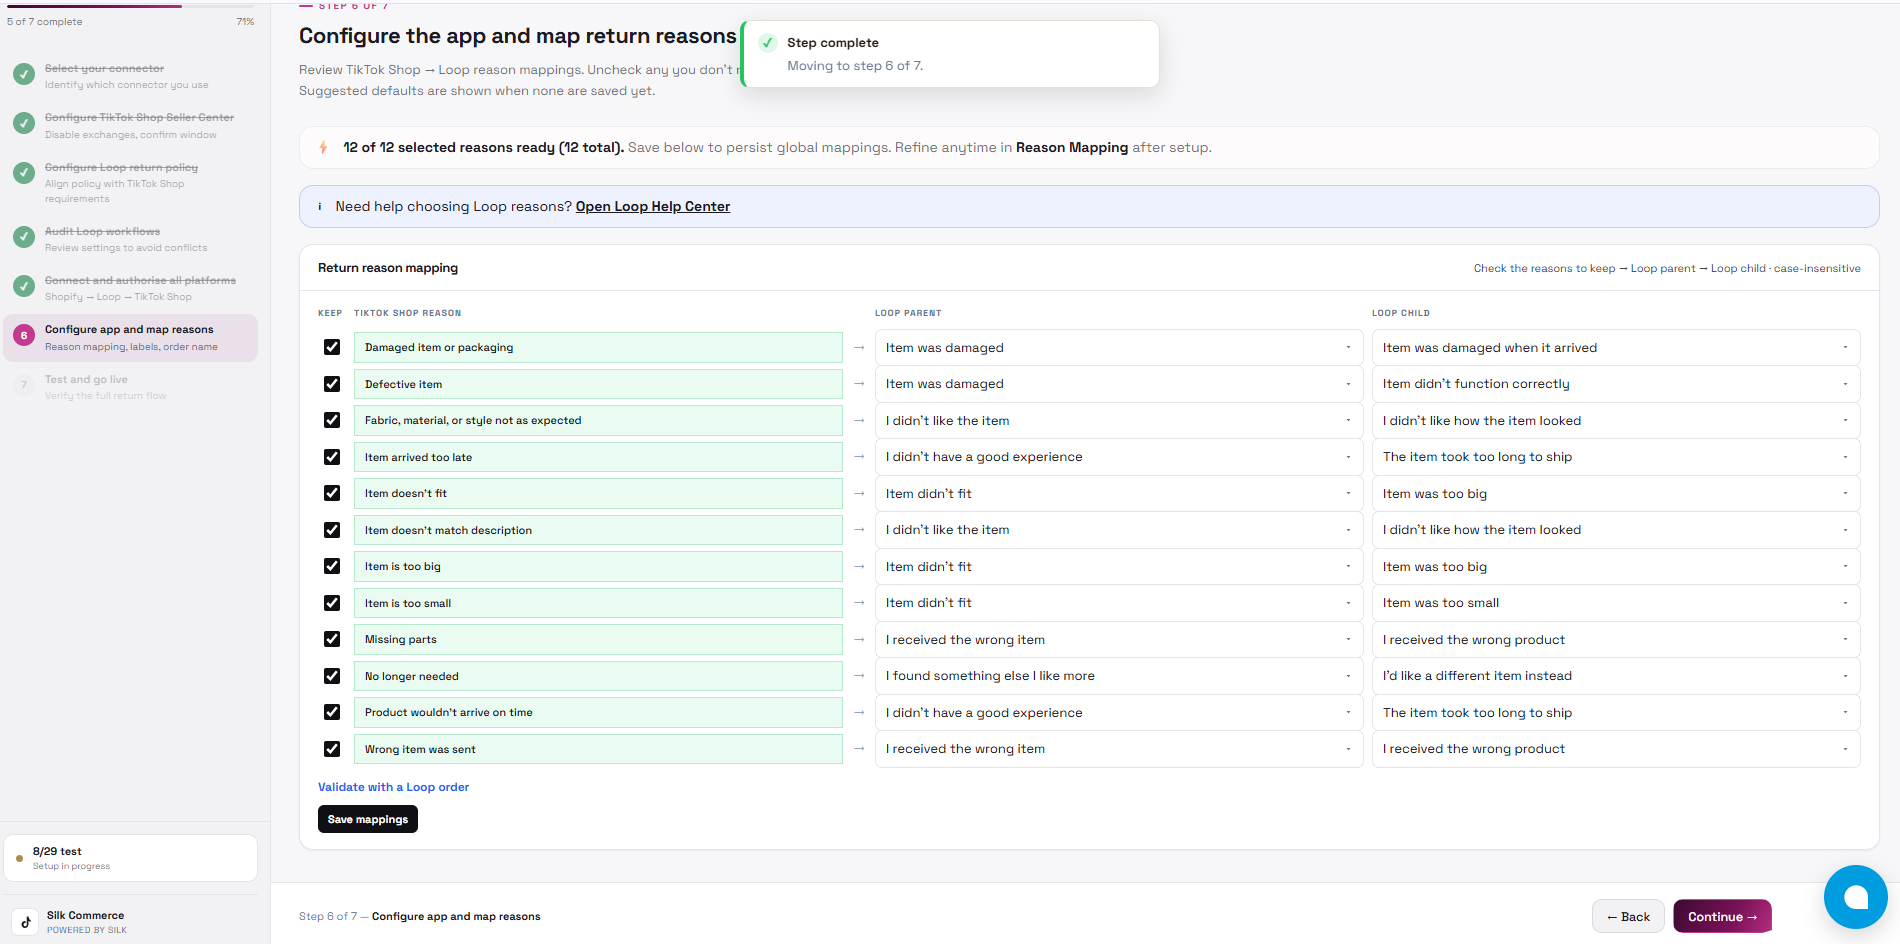 |
| 7. Complete manual integration test | Run a controlled test return and confirm the expected behavior before go-live. | The test checklist is checked, then final completion is submitted. | 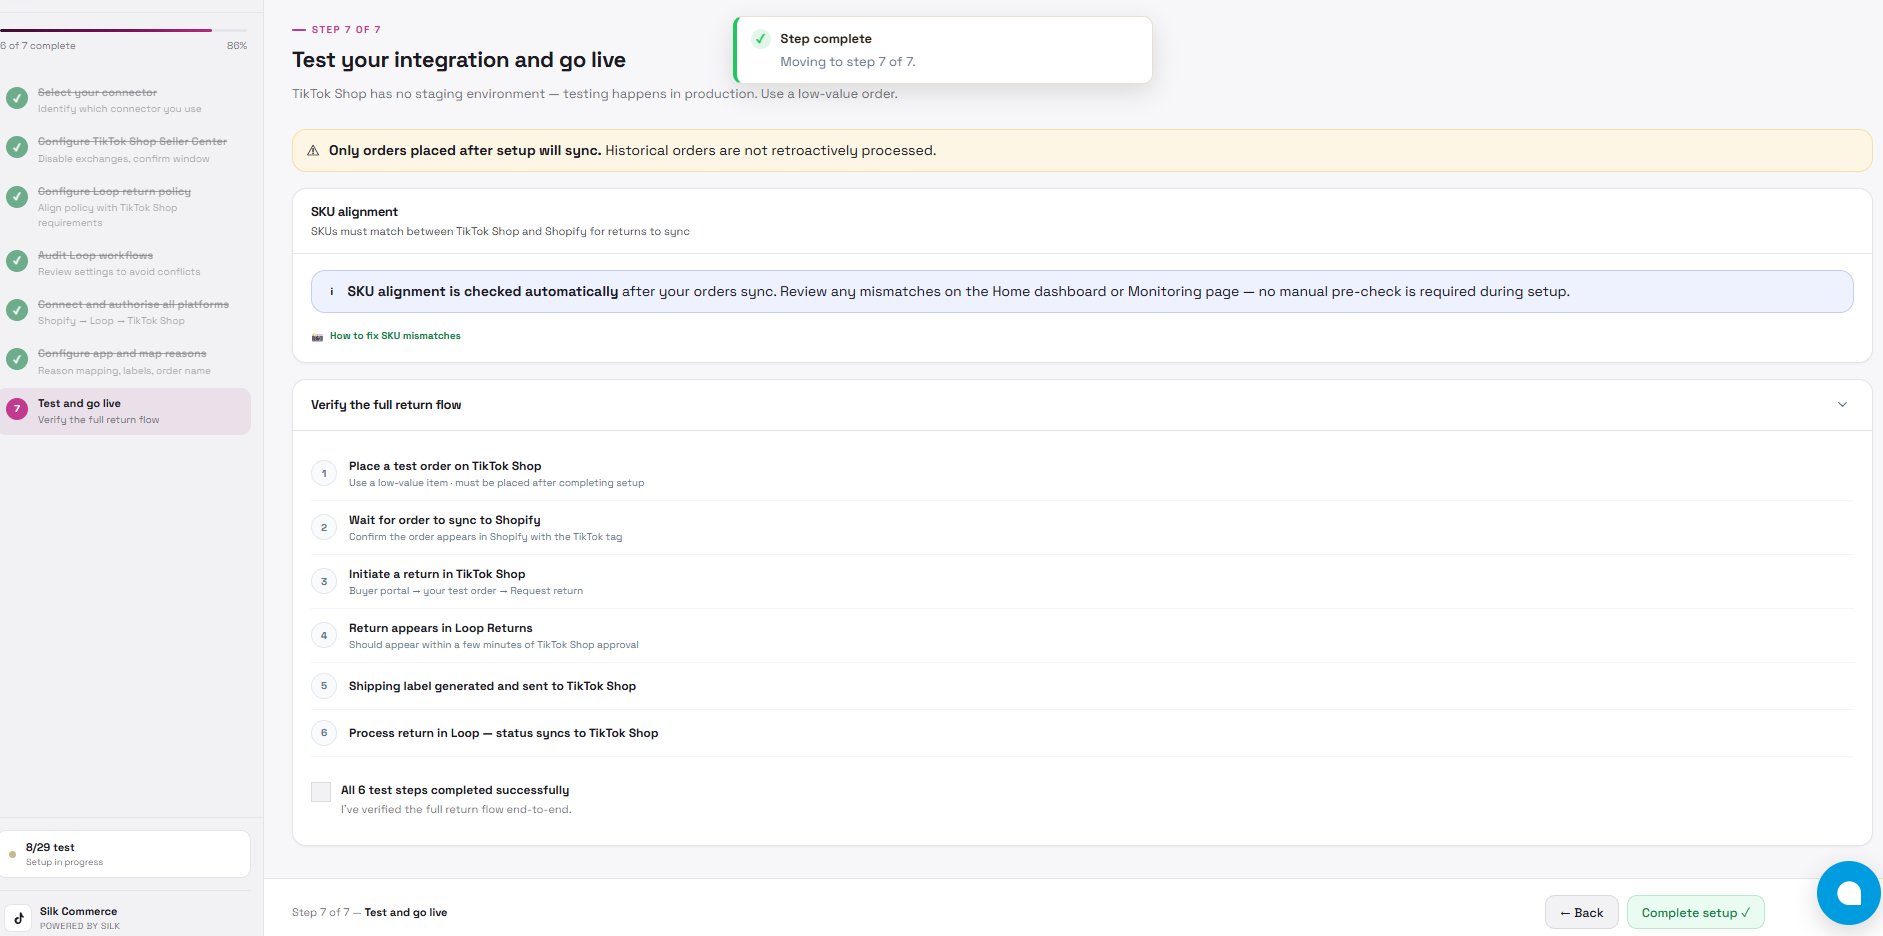 |
The wizard includes Save Progress, Skip for now, and Logout actions. Saved progress is restored for the current connection so the merchant can continue later.
Final completion requires the required platform authorizations. If Shopify, Loop Returns, or TikTok Shop authorization is missing, the setup cannot be fully completed.
Complete Required Authorizations
Section titled “Complete Required Authorizations”The app requires three platform authorizations.
Recommended authorization order:
-
Shopify
-
Loop Returns
-
TikTok Shop
You may leave the wizard before all authorizations are complete, but protected return operations remain unavailable until the required platform connections and setup checks are completed.
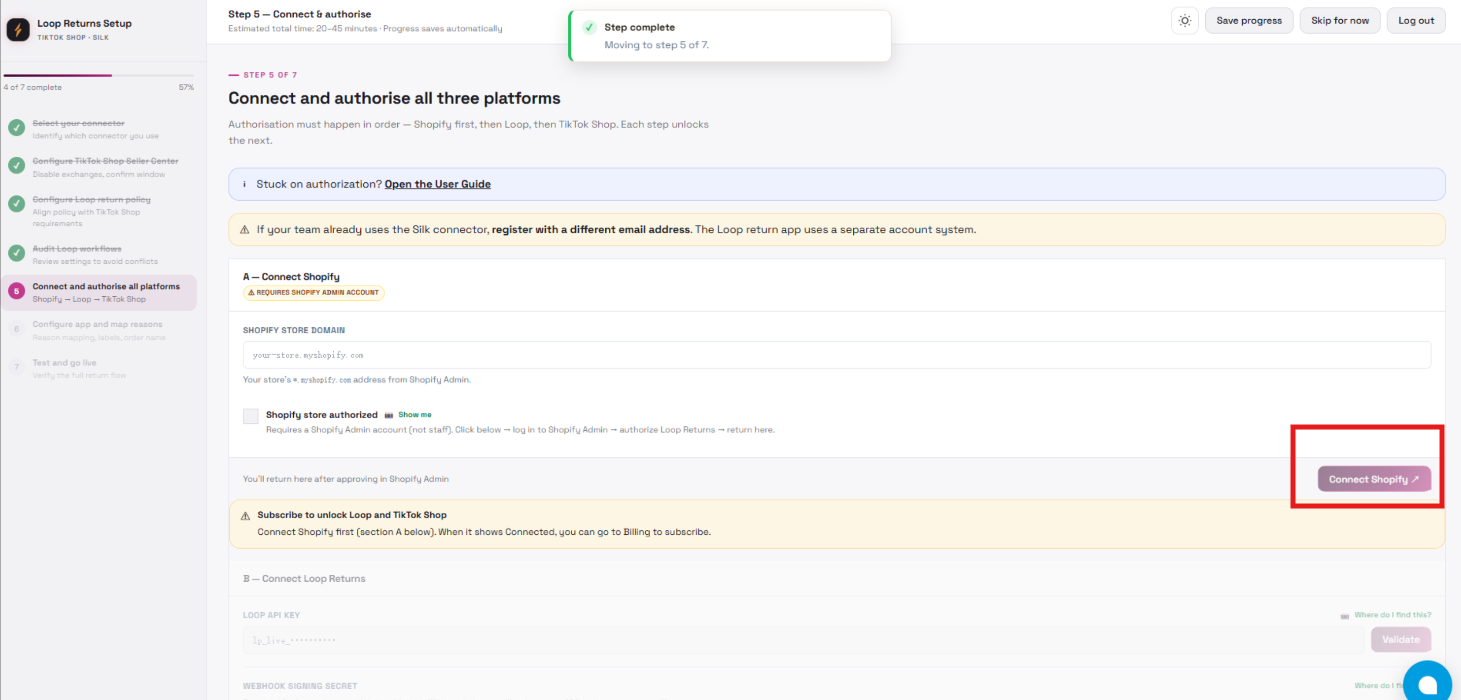
Connect Shopify
Section titled “Connect Shopify”-
Open onboarding or Settings -> Accounts.
-
Enter or confirm the Shopify shop domain if prompted.
-
Click the Shopify connection action.
-
Complete the Shopify OAuth flow.
-
Return to the app.
-
Confirm the Shopify connection status is connected.
Connect Loop Returns
Section titled “Connect Loop Returns”-
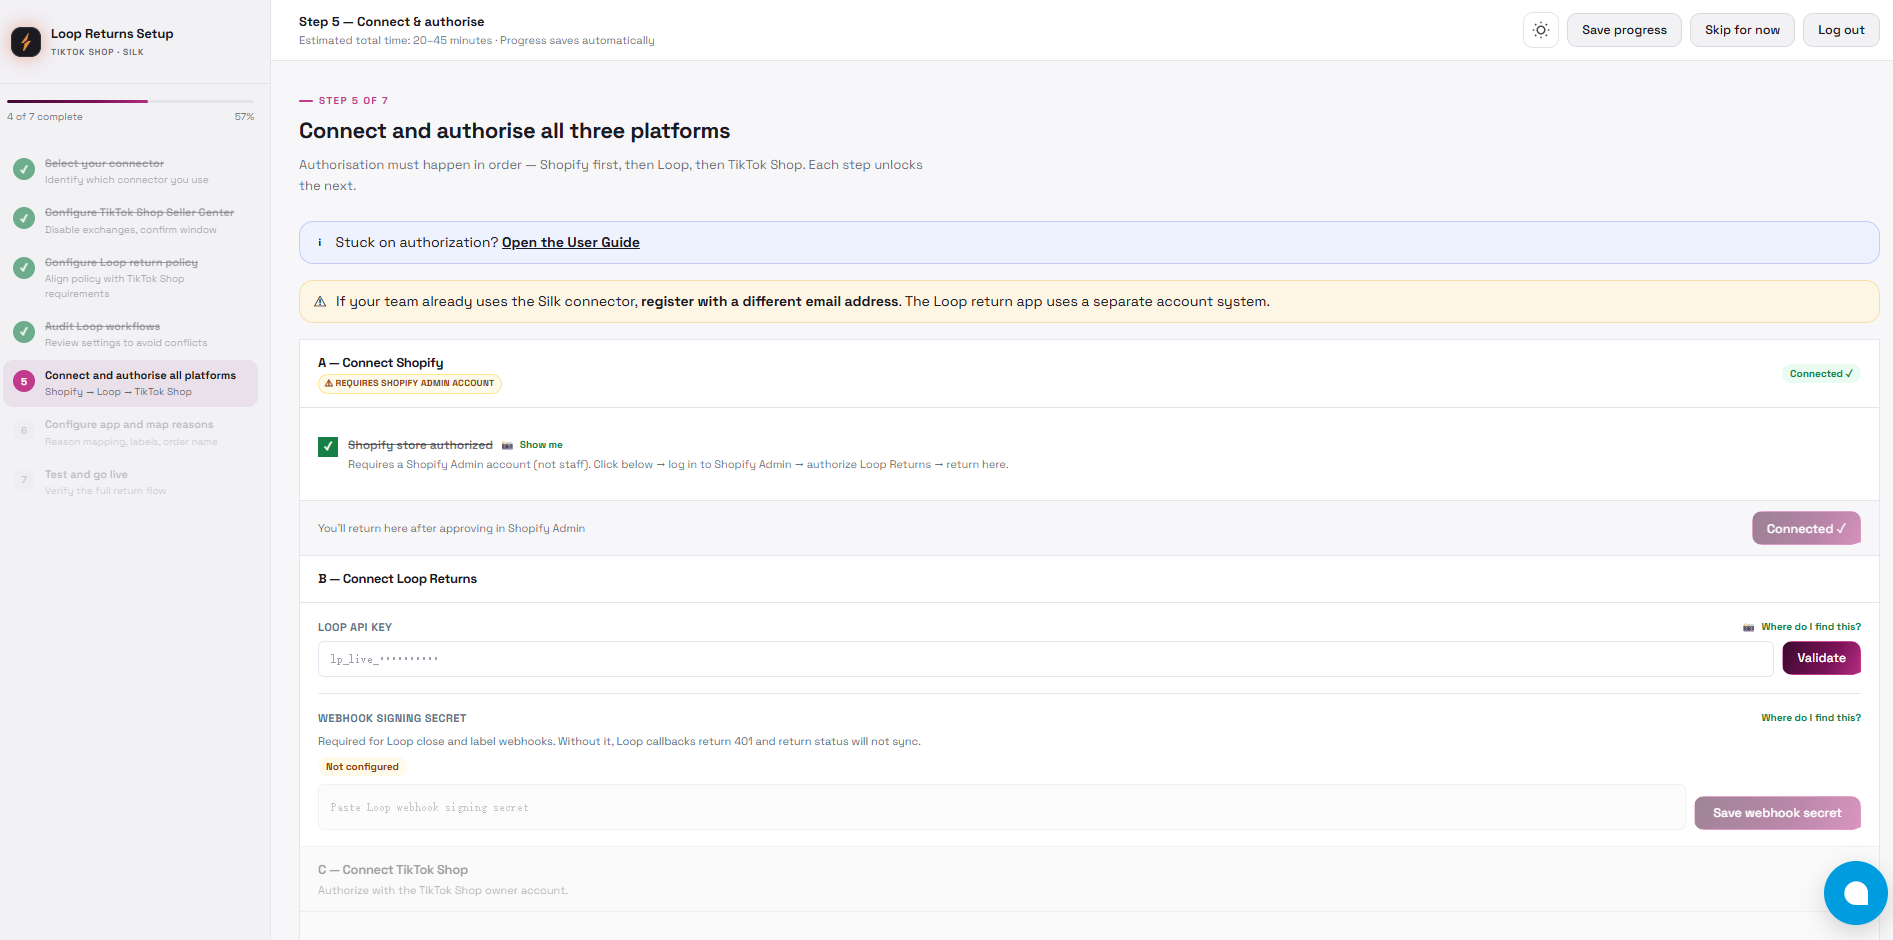
Open the Loop Returns authorization step.
-
Log in to your Loop Returns dashboard.
-
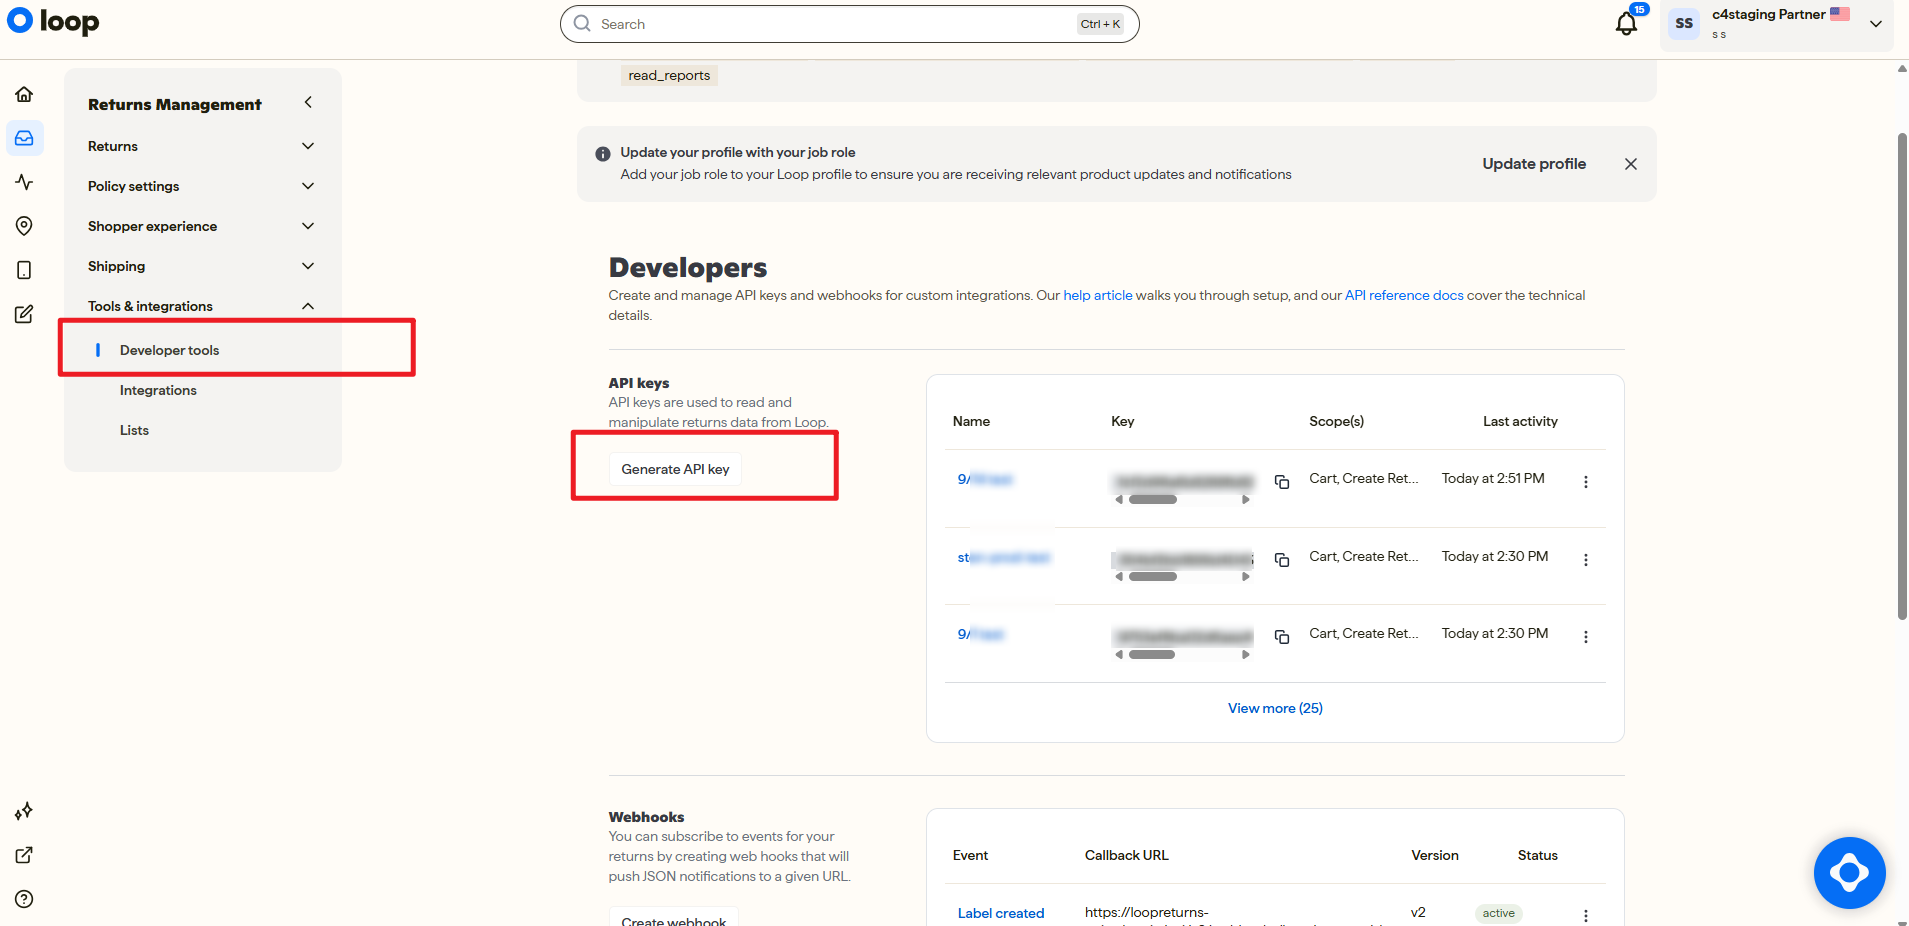
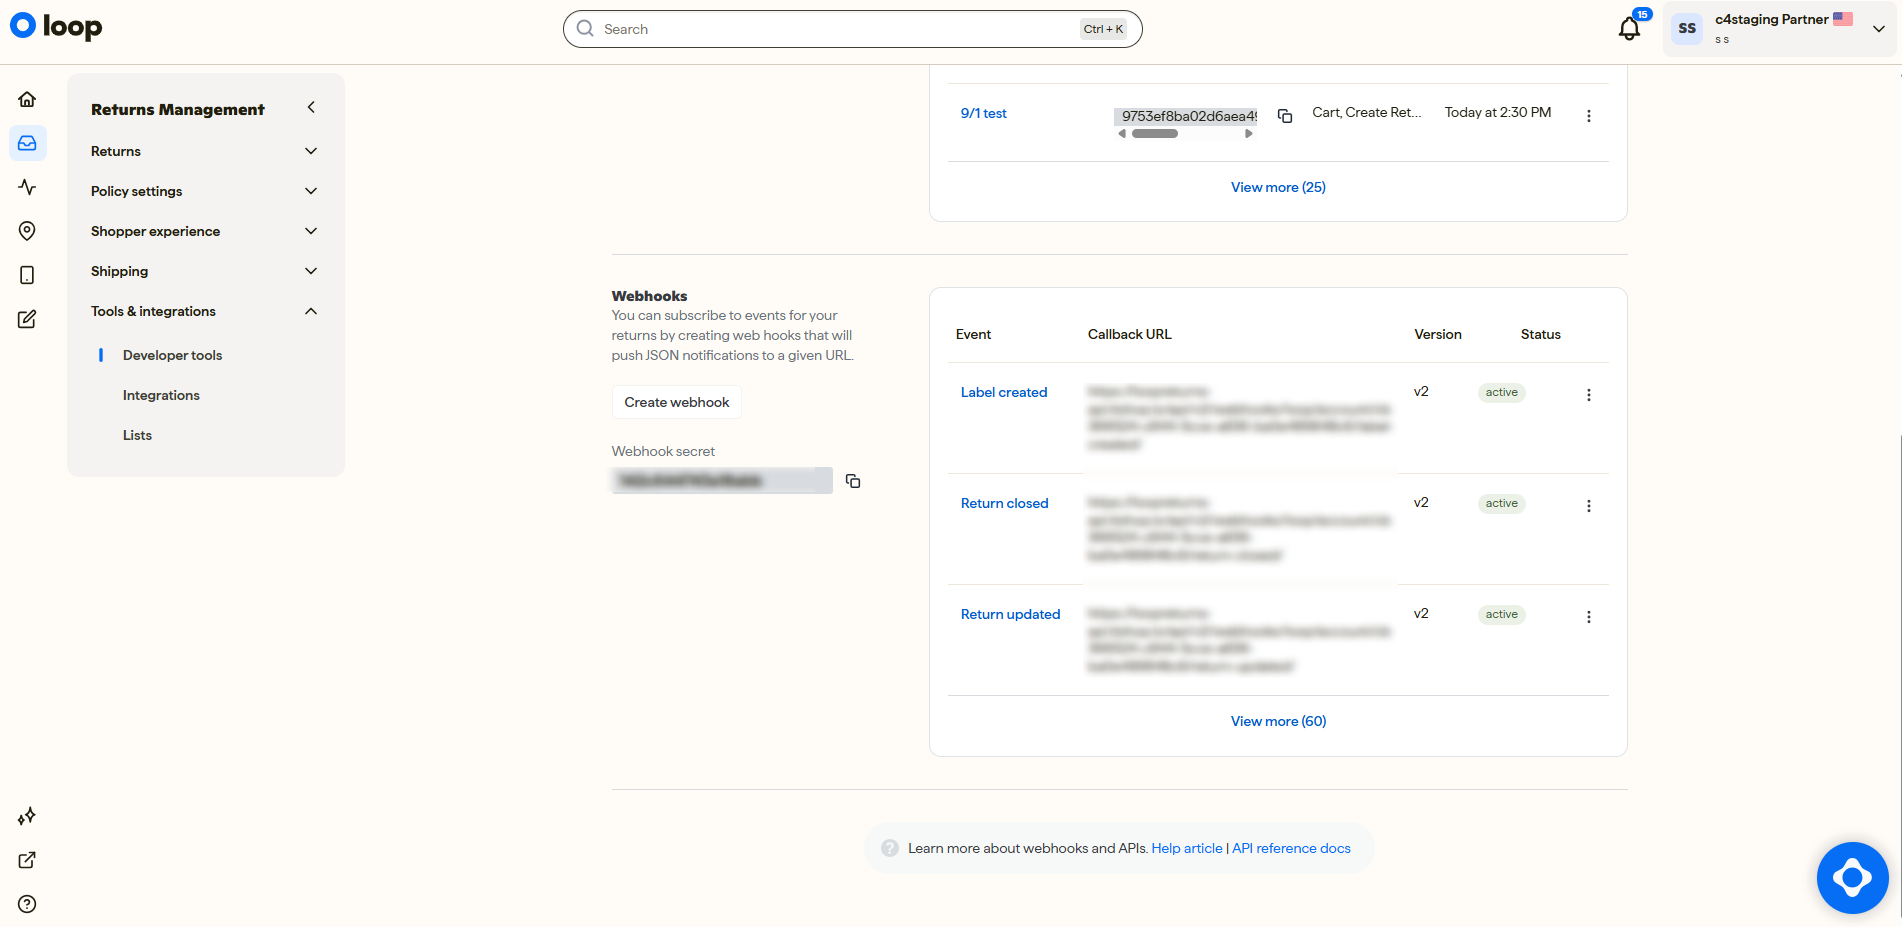
Navigate to Return Management → Tools & integrations → Developer tools → API keys.
-
Click Generate New API Key.
-
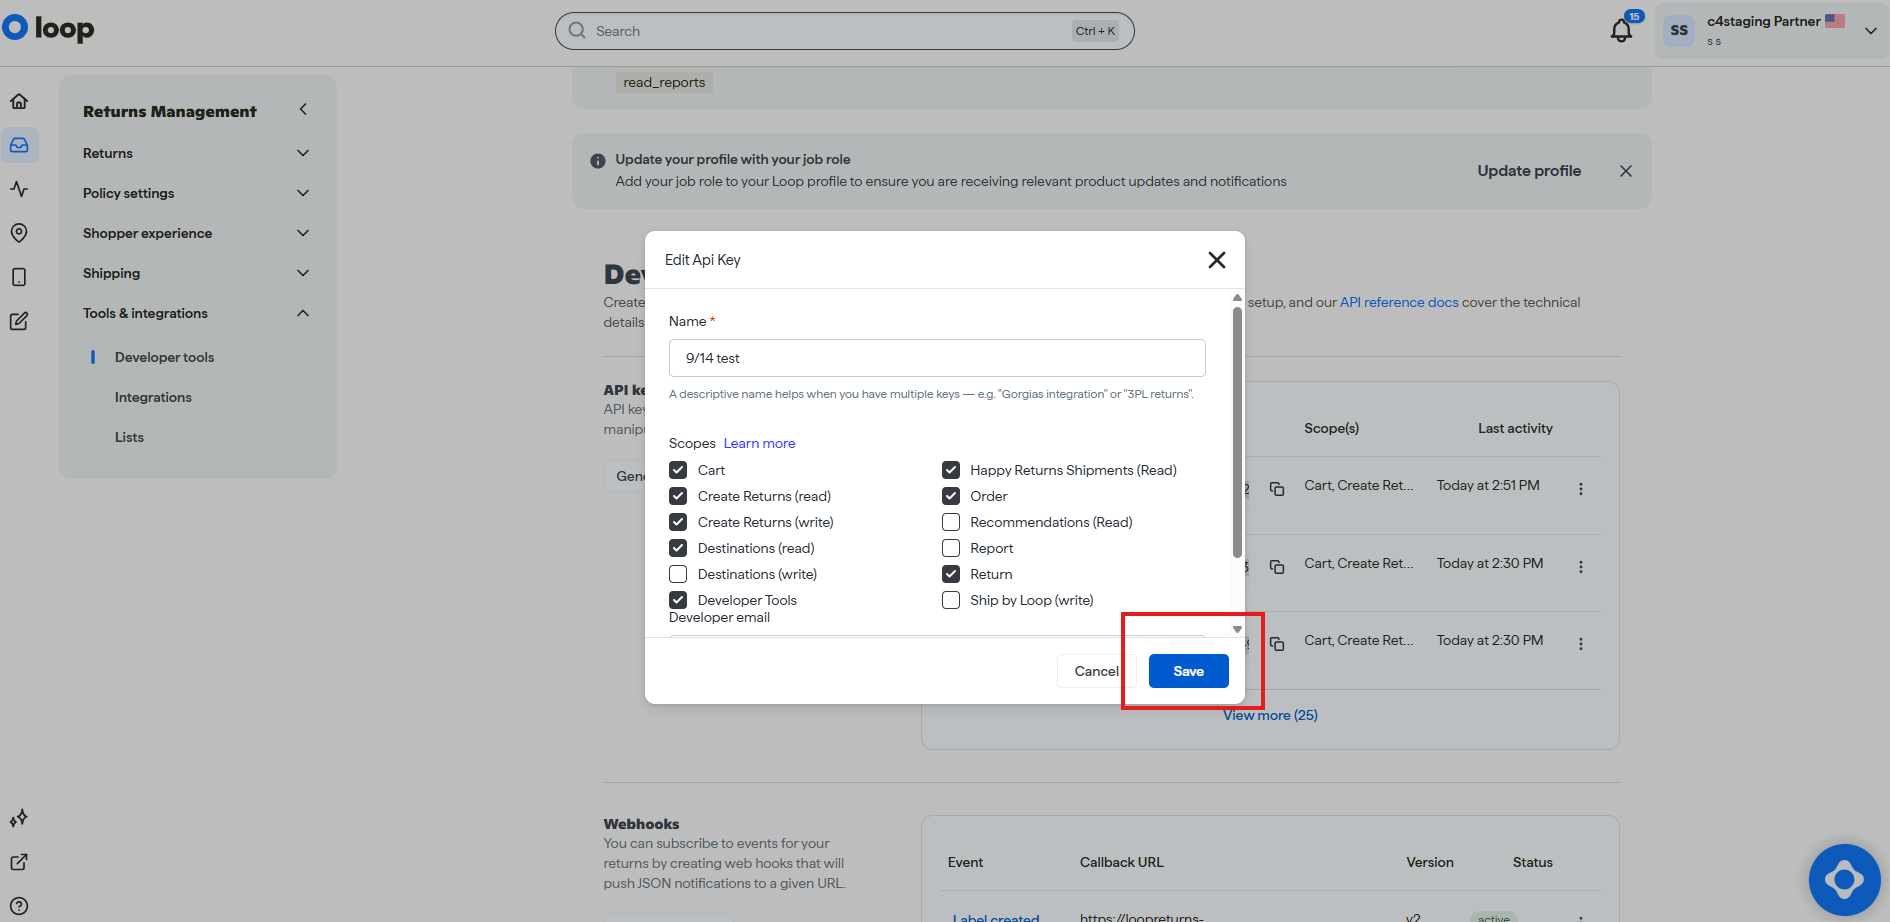
Select the required permissions: Cart, Return, Order, Developer Tools, Create Returns.
-
Give the API key a descriptive name.
-
Click Generate.
-
Copy the generated key and paste it into the Loop API Key field in the app.
-
Validate the key.
-
Confirm the Loop Returns connection status is Connected.
If validation fails, check that the key is copied correctly, belongs to the same Loop workspace used for return processing, and has the required permissions.
Connect TikTok Shop
Section titled “Connect TikTok Shop”-
Open the TikTok Shop authorization step.
-
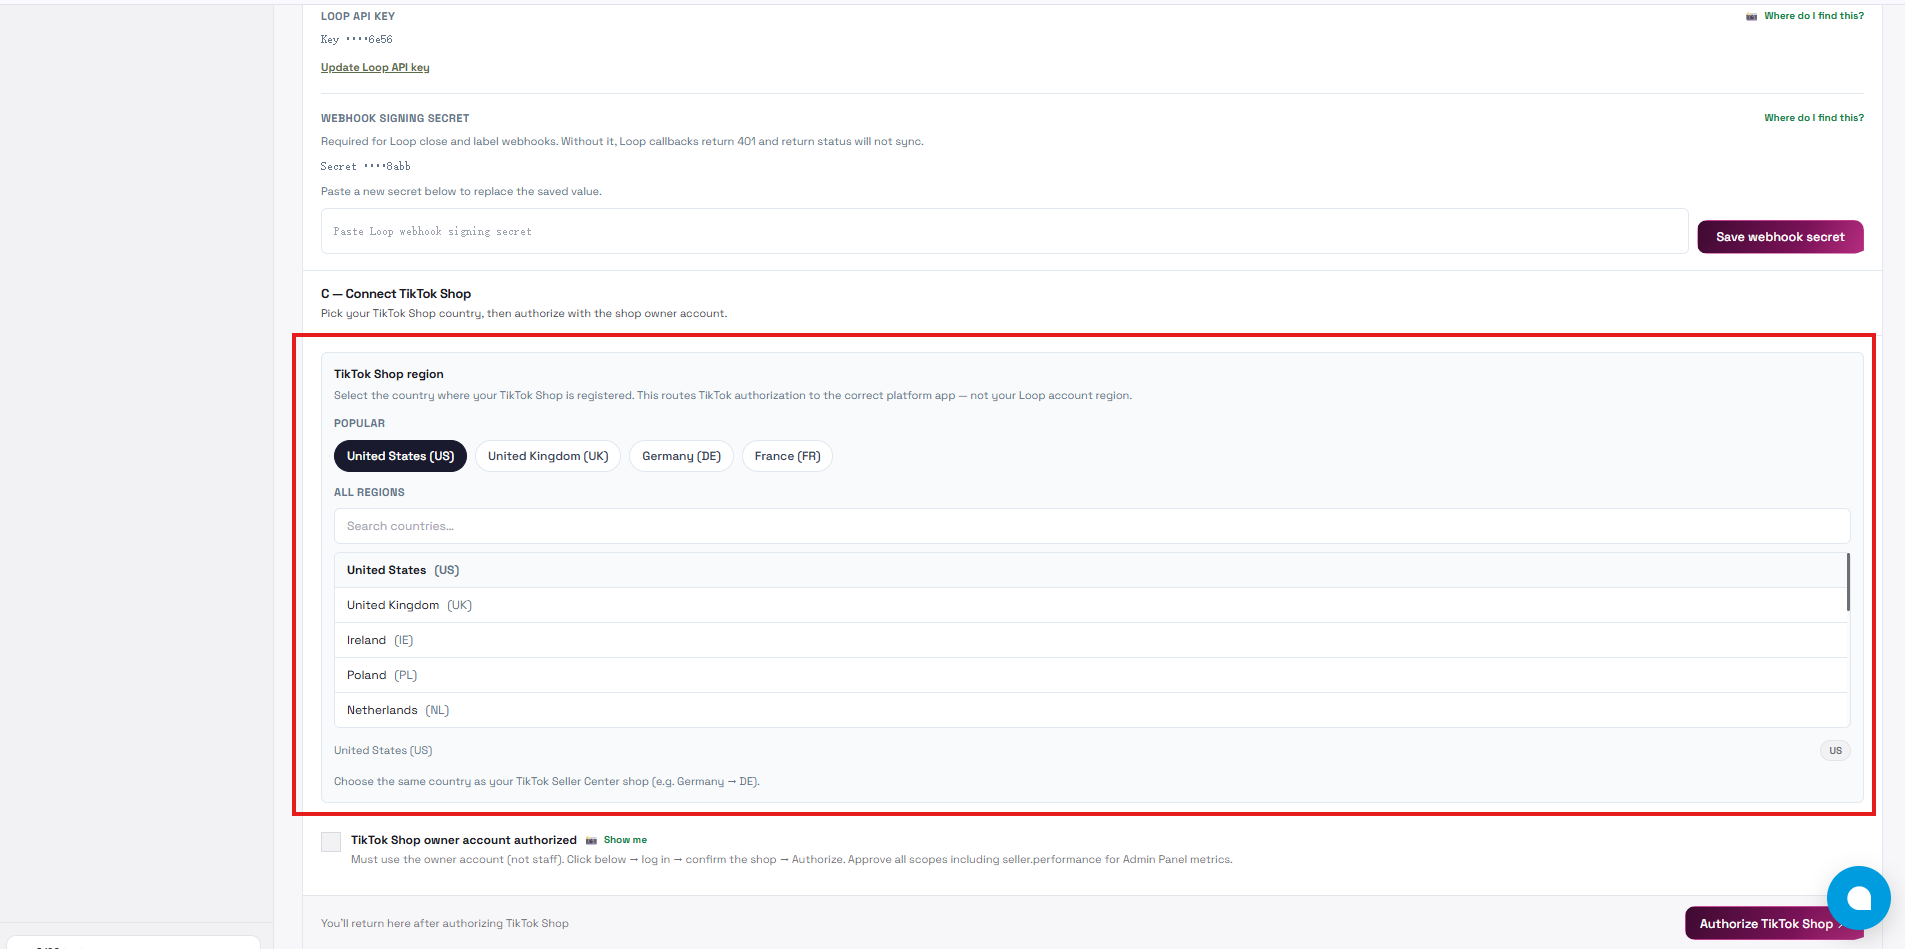
Under TikTok Shop region, select the country or market where your TikTok Shop is registered.
The selected region determines which TikTok Shop platform is used for authorization. Select the market of your TikTok Shop store, not the region of your Loop Returns account.
-
Confirm that the selected TikTok Shop region is correct.
-
Click Authorize TikTok Shop.
-
You will be redirected to the corresponding TikTok Shop authorization page.
-
Sign in with the TikTok Shop owner account.
-
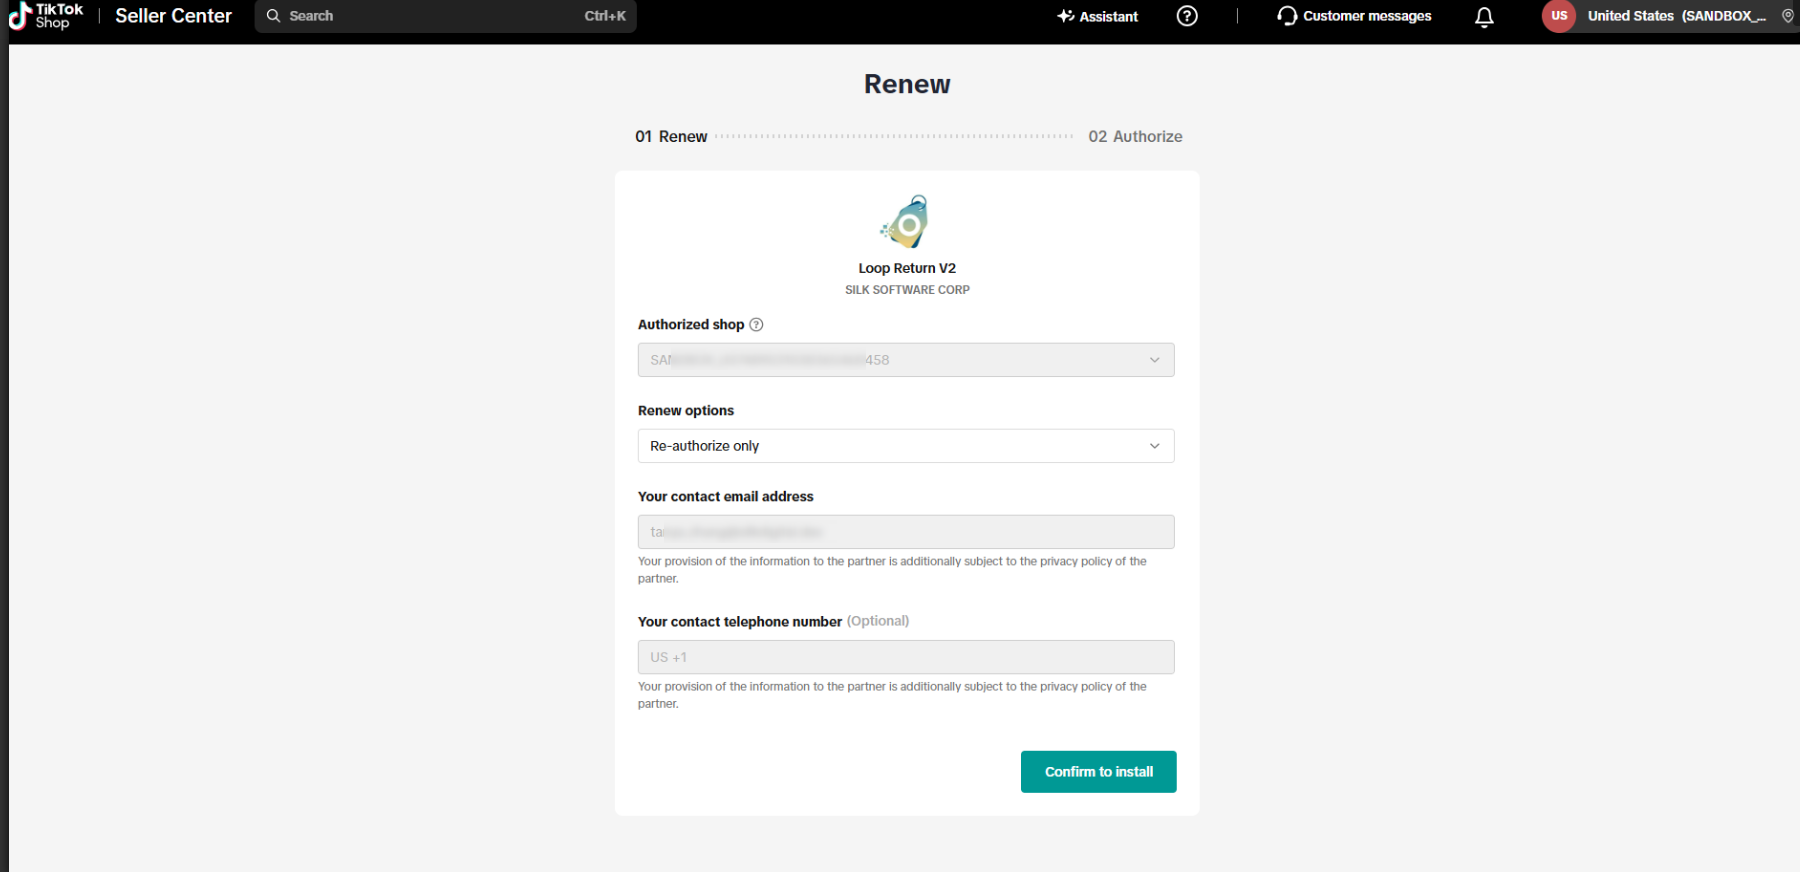
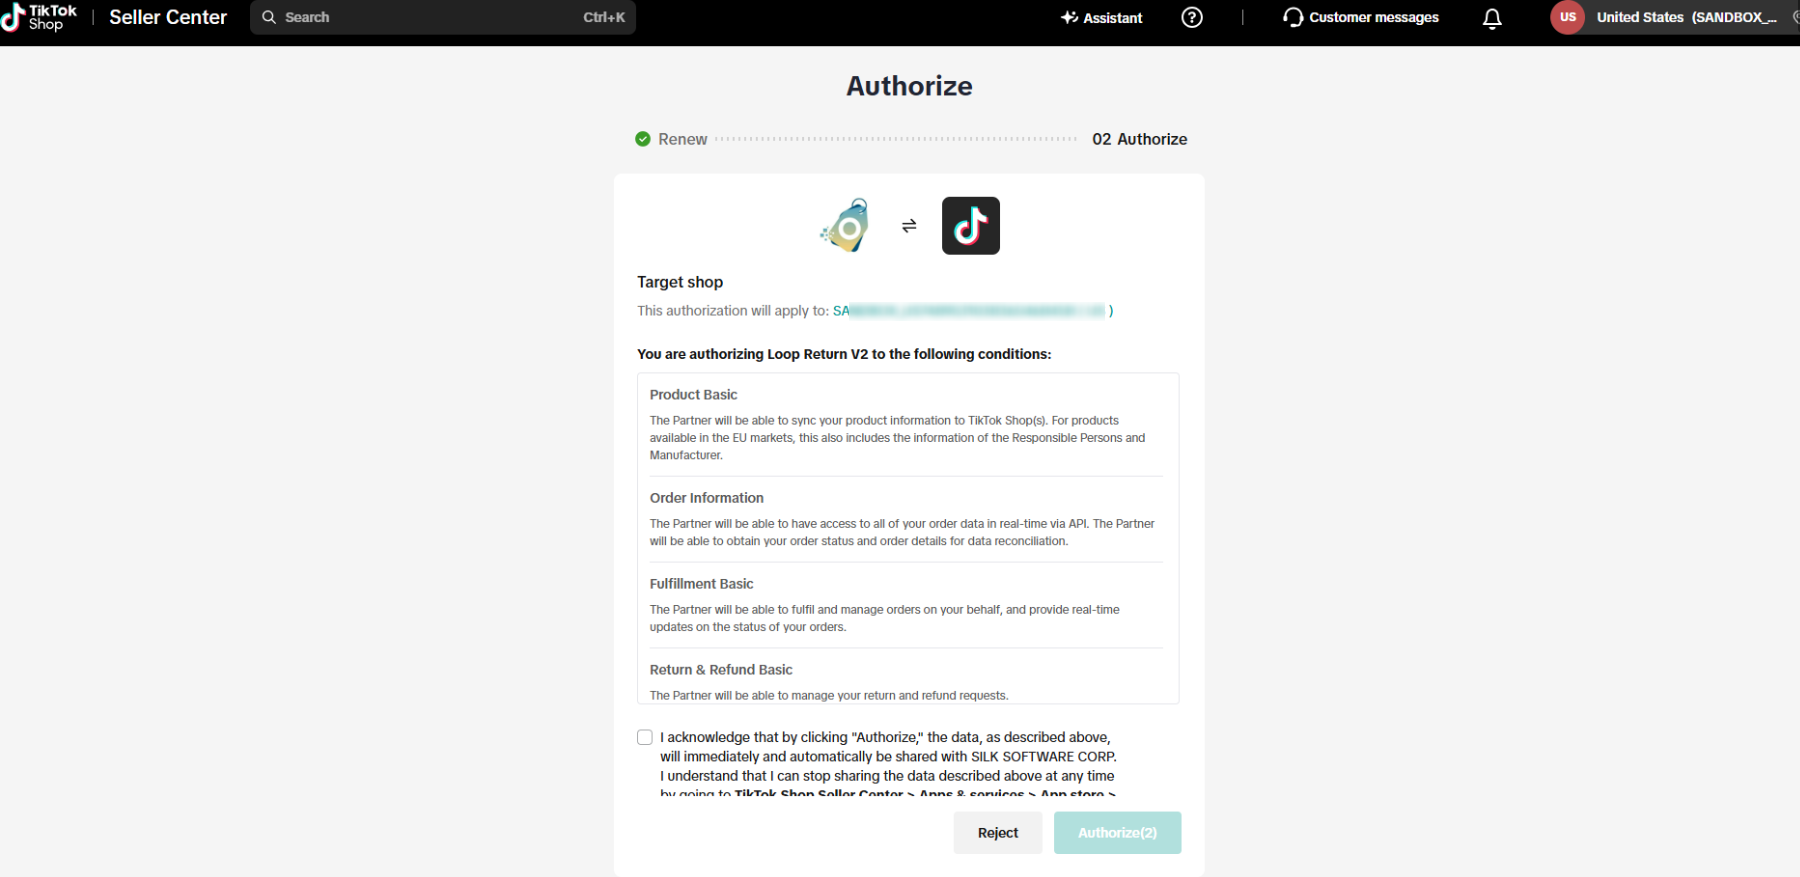
In TikTok Shop Seller Center, confirm the shop you want to connect to.
-
Review the partner access duration, contact details, and requested permissions where required.
-
Confirm the installation and authorization.
-
Return to the Silk Loop Returns Integration App if TikTok Shop does not redirect automatically.
-
Confirm that the TikTok Shop connection status is connected.
Note: Make sure the selected region matches the country where your TikTok Shop is registered. Selecting the wrong region may route you to the incorrect TikTok Shop authorization platform.
First Login Experience
Section titled “First Login Experience”After login, the app checks:
-
Authentication session
-
Merchant profile
-
Subscription status
-
Connector channel
-
Shopify, Loop Returns, and TikTok Shop connection status
-
Onboarding completion
-
Enabled merchant features
If onboarding is incomplete, the app can route you back to the onboarding wizard.
If the subscription is inactive, expired, or payment is not completed, the app may keep read-only pages available while blocking protected operations.
Note: You can always revisit connection status from Settings → Accounts.
Multi TikTok Shop Connections
Section titled “Multi TikTok Shop Connections”Multi TikTok Shop Connections allow merchants to connect and manage multiple TikTok Shop stores under the same Loop Returns Integration account, using the same Shopify store and the same Loop Returns authorization.
This feature is designed for merchants who need to manage returns for multiple TikTok Shop stores through one Shopify / Loop Returns setup. Each TikTok Shop store is managed as an independent Connection, and return data is displayed and processed separately based on the selected Connection.
Note: Shopify and Loop Returns are account-level authorizations and only need to be completed once. When creating a new TikTok Shop Connection, only the new TikTok Shop store needs to be authorized.
Connections Page
After this feature is enabled, merchants can go to the Connections page to manage all TikTok Shop stores connected to the current Loop Returns Integration account.
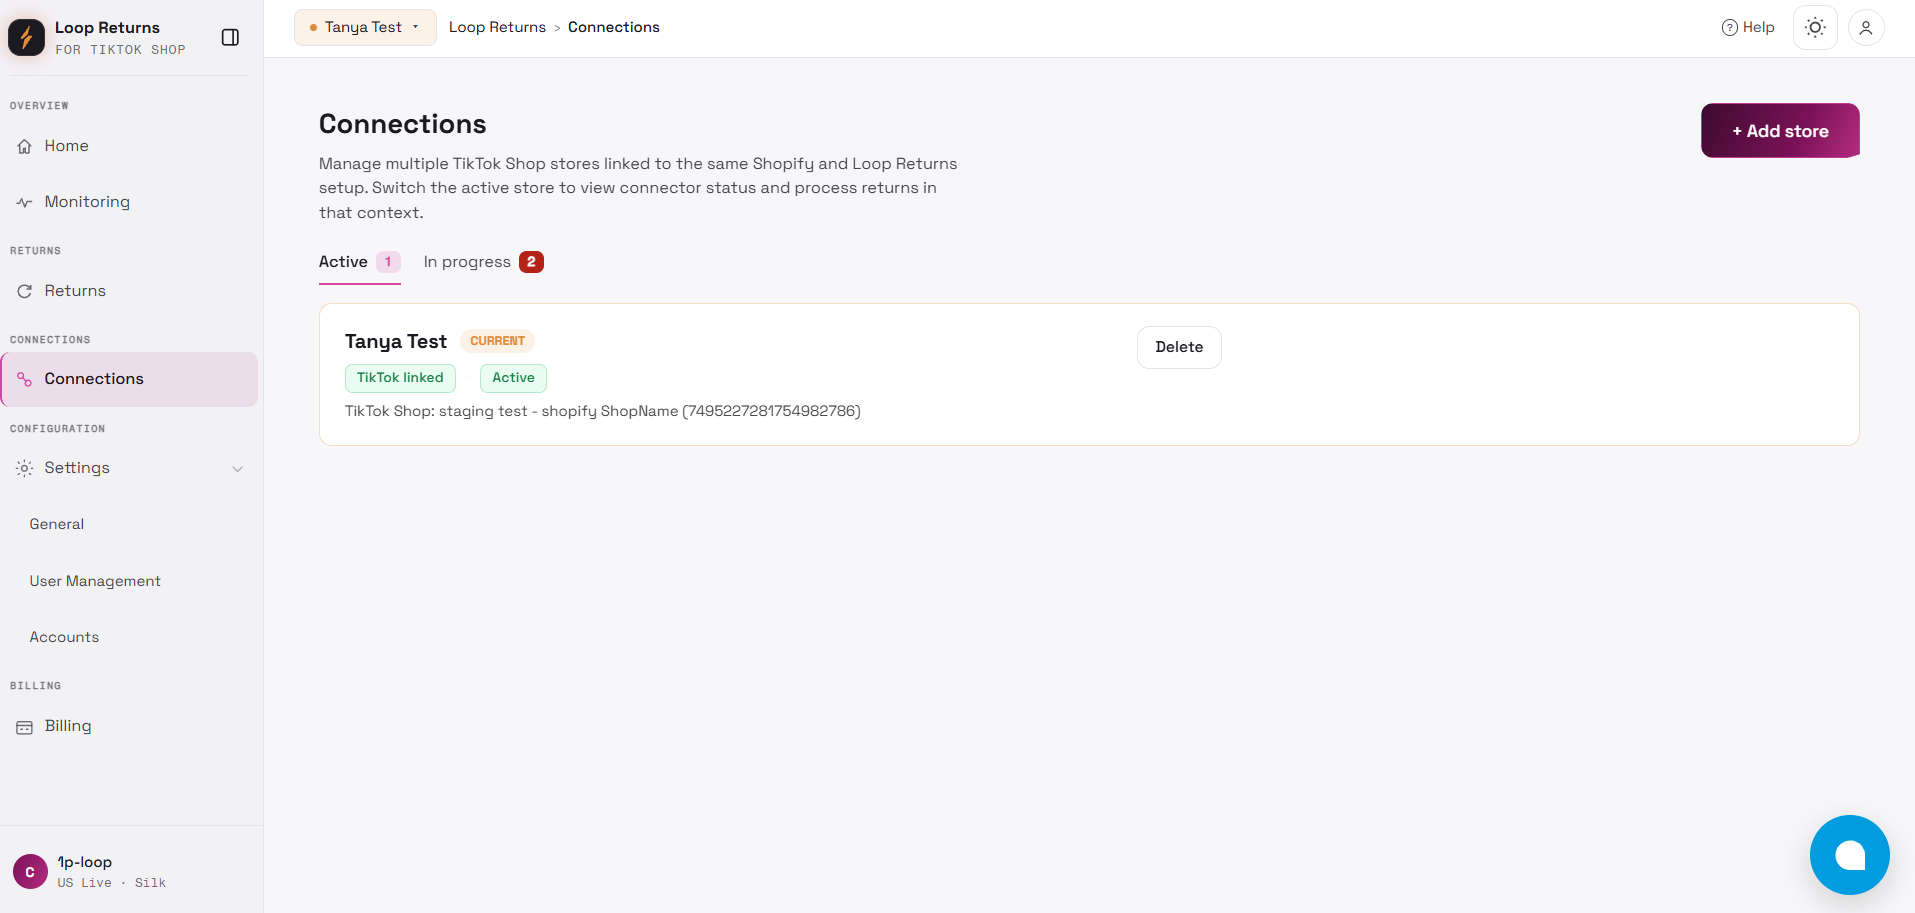
The Connections page includes:
-
Active: Stores that have completed TikTok Shop authorization.
-
In progress: Stores that have been created but have not completed TikTok Shop authorization.
-
Store card: Displays the store name, connection status, TikTok Shop information, and available actions.
-
Current store indicator: Shows which store is currently selected.
-
+ Add store: Used to create a new TikTok Shop store connection.
-
Connection switcher: The current store is also shown at the top of the page. Merchants can use it to confirm or switch the working context.
Each merchant can create up to 5 TikTok Shop store connections.
Add a New TikTok Shop Connection
To add a new TikTok Shop store:
-
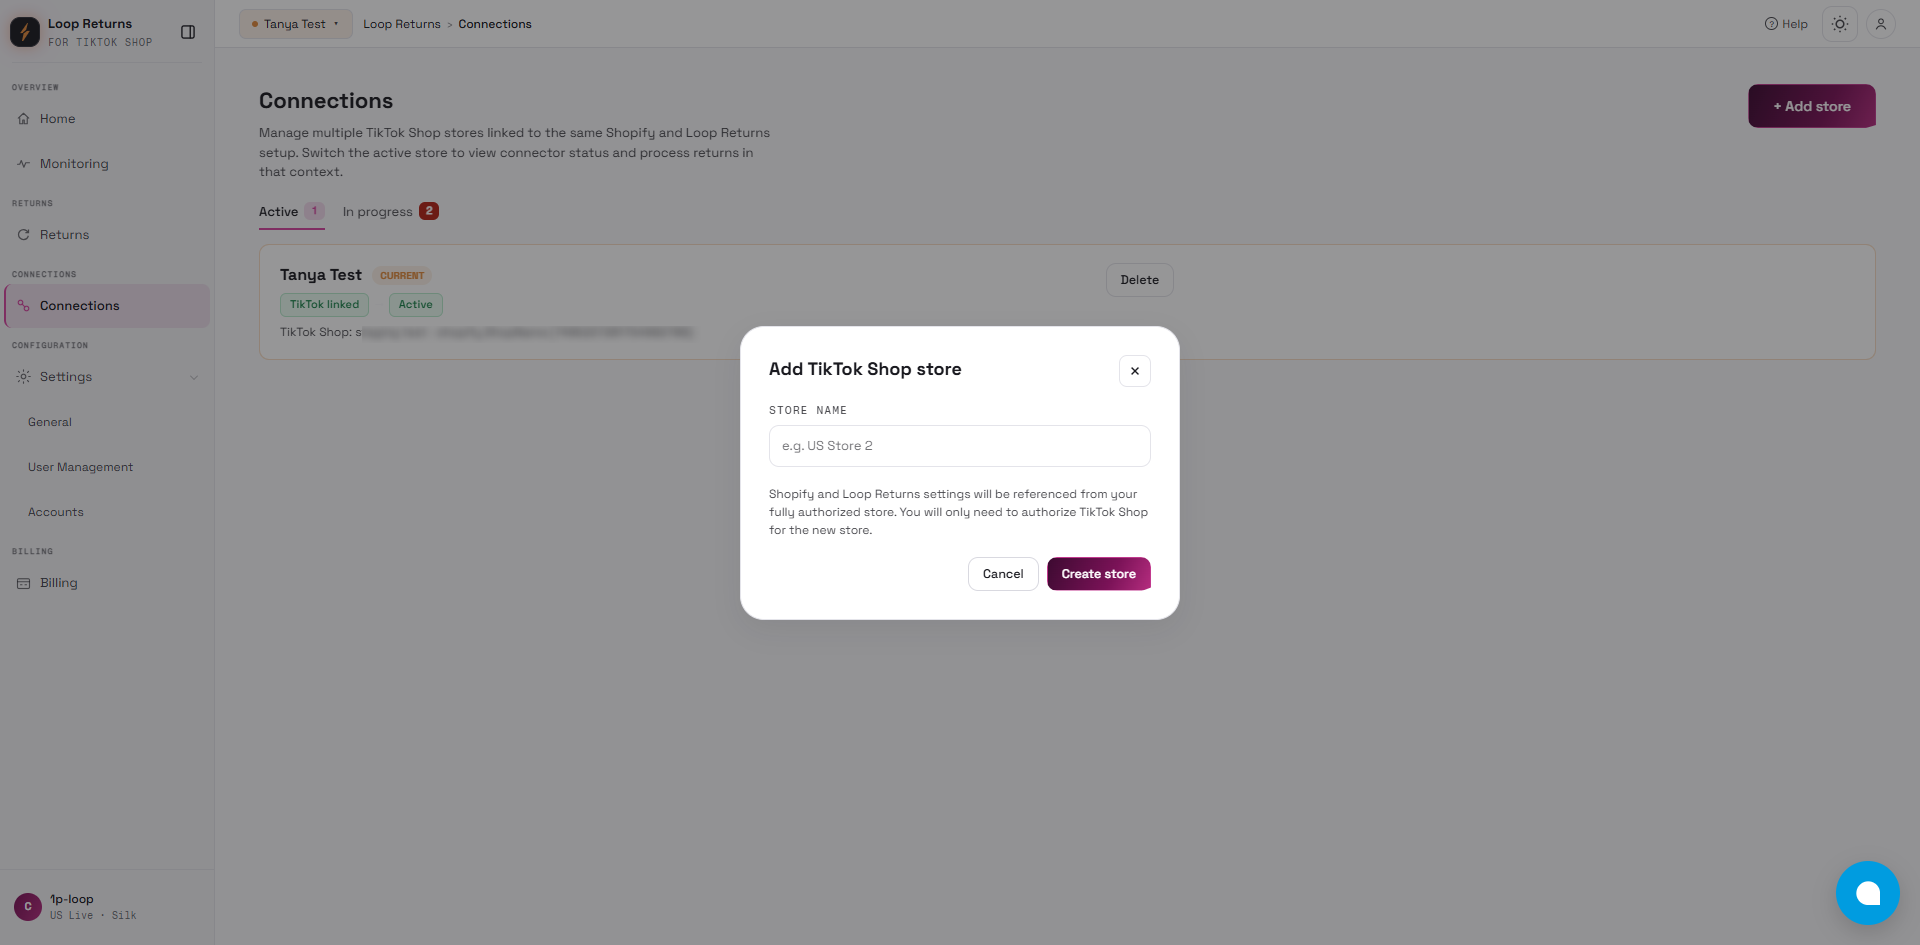
Go to the Connections page.
-
Click + Add store.
-
Enter a clear and recognizable Store name.
-
Click Create store.
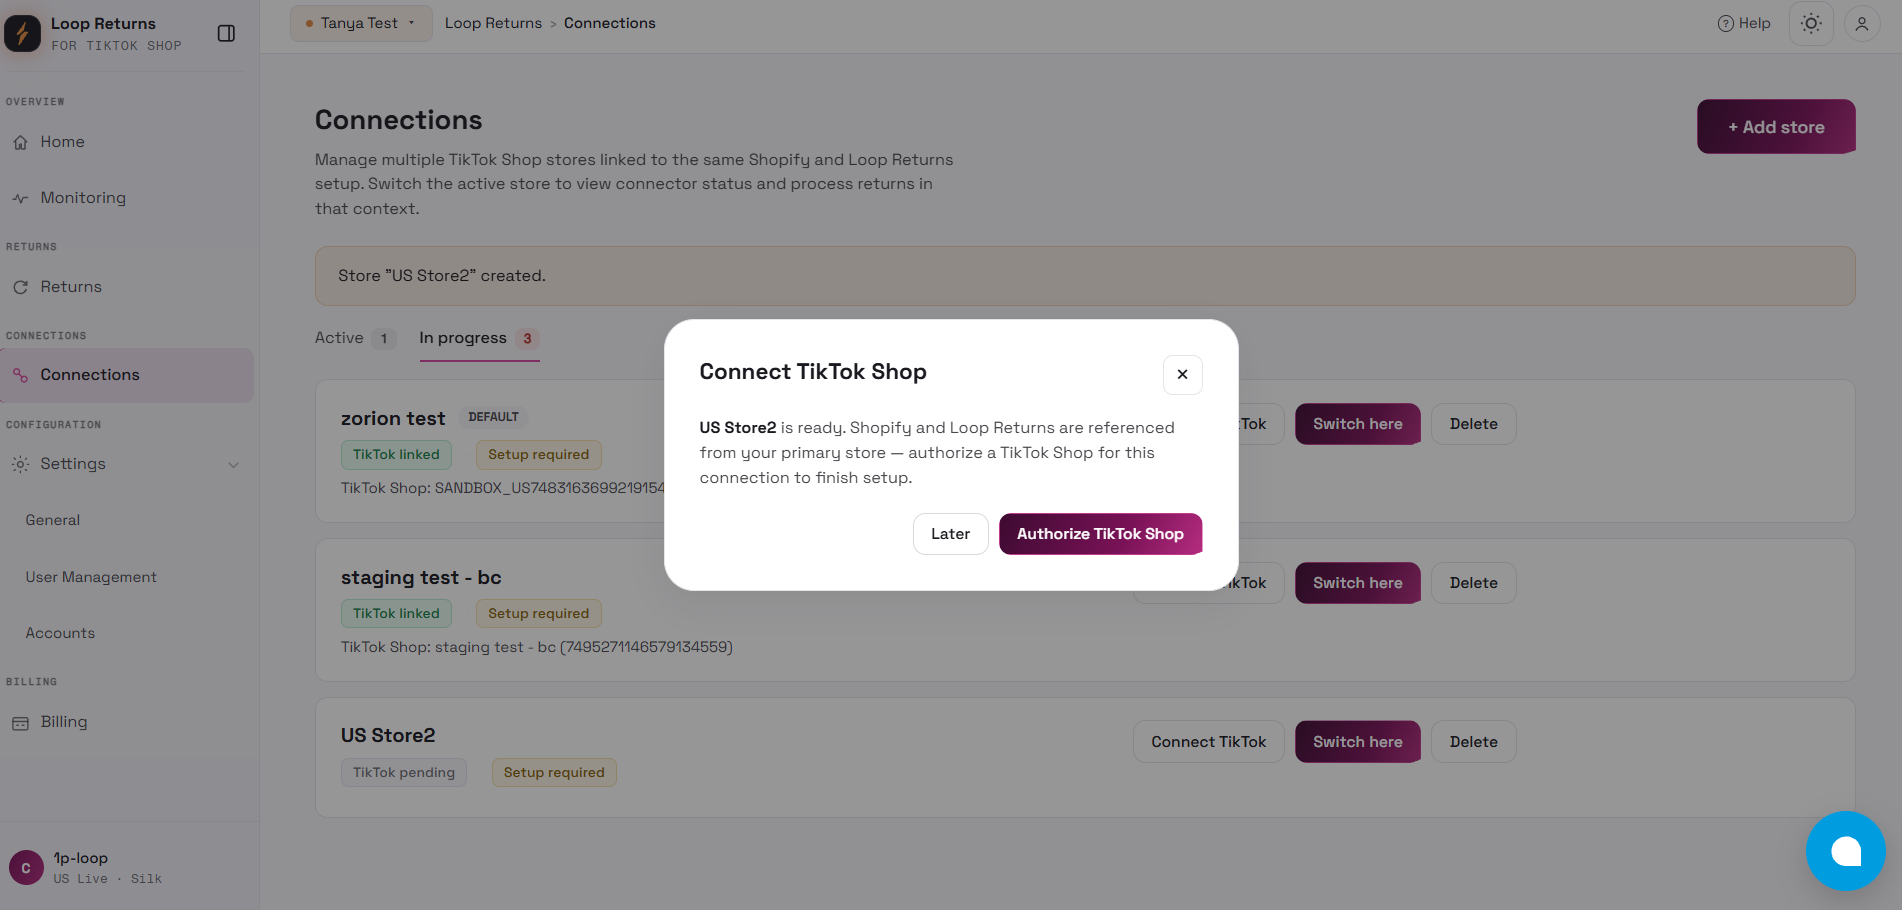
After the store is created, the system will show a TikTok Shop authorization prompt.
-
Click Authorize TikTok Shop to continue authorization.
-
Complete the TikTok Shop authorization flow.
If the merchant does not want to authorize immediately, they can click Later. The store will be listed under In progress with the status Setup required.
After authorization is completed, the store status will change from In progress to Active, and the system will start syncing return data for the authorized TikTok Shop store.
Important: Each Connection should authorize a different TikTok Shop store. Authorizing the same TikTok Shop store for multiple Connections may cause duplicated return data or connection relationship confusion.
Switch Stores
Merchants can switch between different TikTok Shop stores from the Connections page.
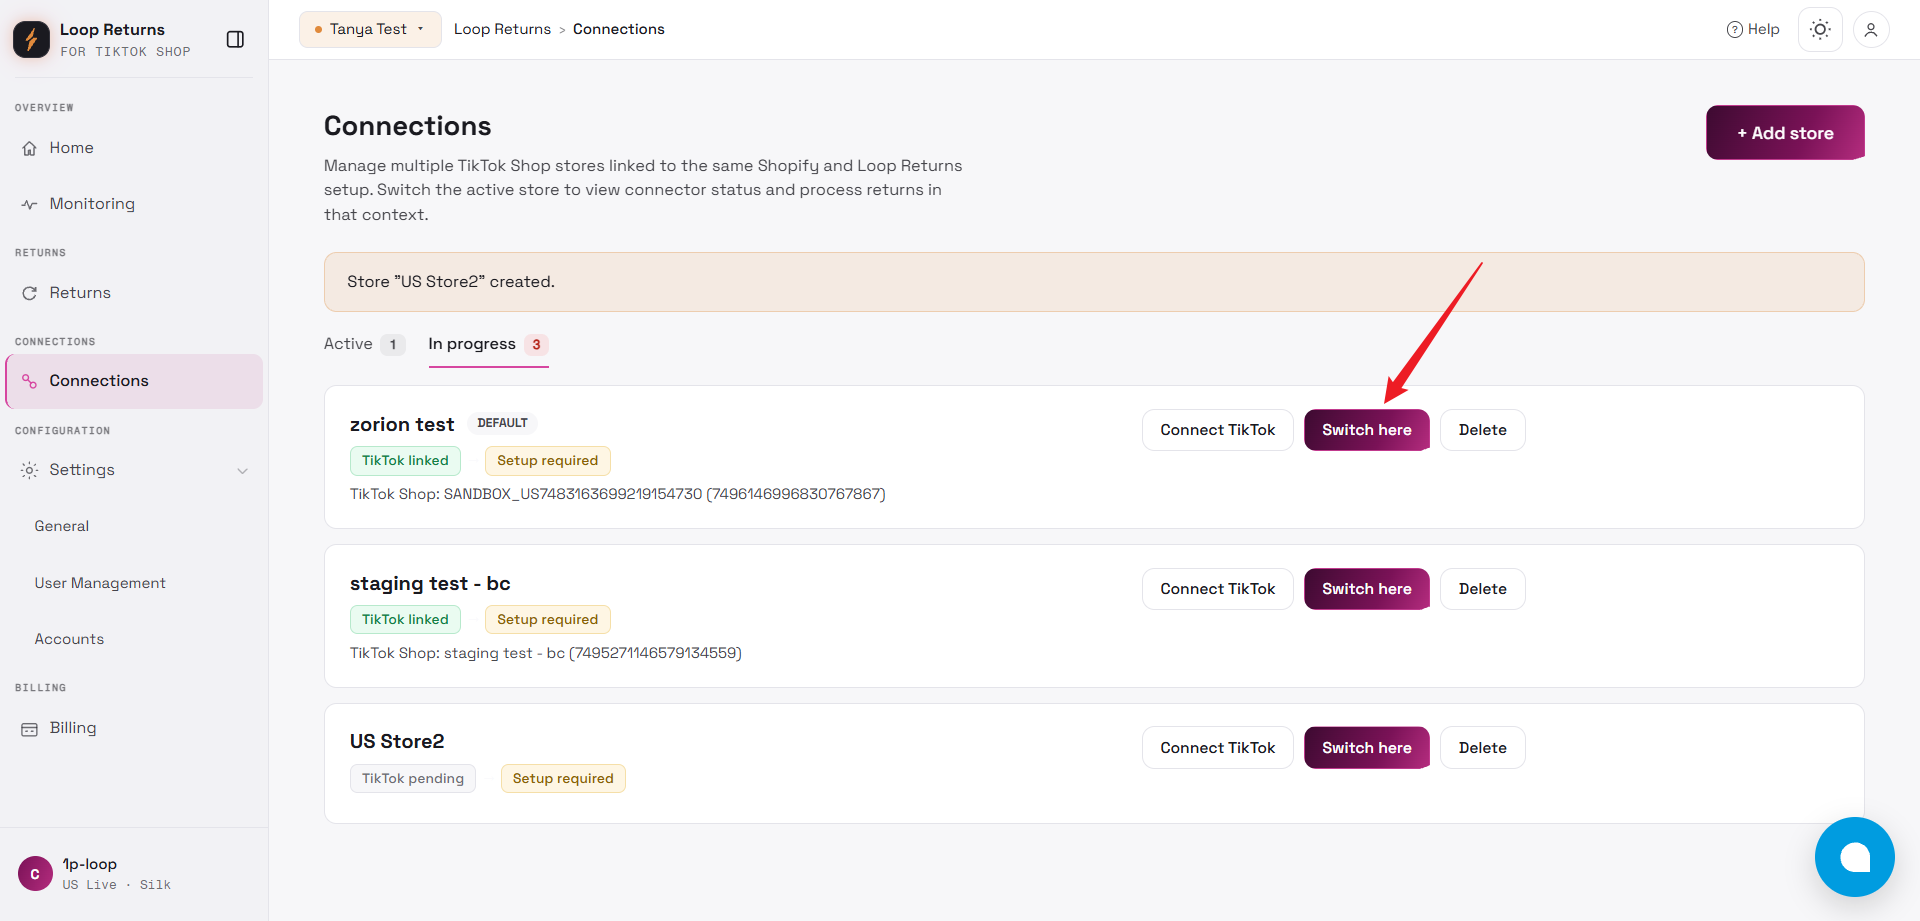
To switch stores:
-
Go to the Connections page.
-
Find the store that needs to be used.
-
Click Switch here.
After switching stores:
-
The selected store becomes the current working store.
-
The store name at the top of the page will update.
-
Home, Monitoring, Returns, Settings, and related pages will display data based on the selected store.
-
If the selected store has not completed TikTok Shop authorization, the system will show the setup or authorization status for that store.
Before processing returns, merchants should always confirm that they are working under the correct store.
Return Data Isolation
Return data is isolated by Connection.
For example:
-
Connection A is connected to TikTok Shop A.
-
Connection B is connected to TikTok Shop B.
In this case:
-
Connection A only displays return data from TikTok Shop A.
-
Connection B only displays return data from TikTok Shop B.
-
Return data from different TikTok Shop stores will not be mixed.
-
Home metrics, return lists, and settings will reload based on the currently selected Connection.
Delete a Connection
Merchants can delete TikTok Shop store connections that are no longer needed.
To delete a store connection:
-
Go to the Connections page.
-
Find the store connection that needs to be deleted.
-
Click Delete on the store card.
-
Review the deletion notice in the confirmation pop-up.
-
Confirm the deletion.
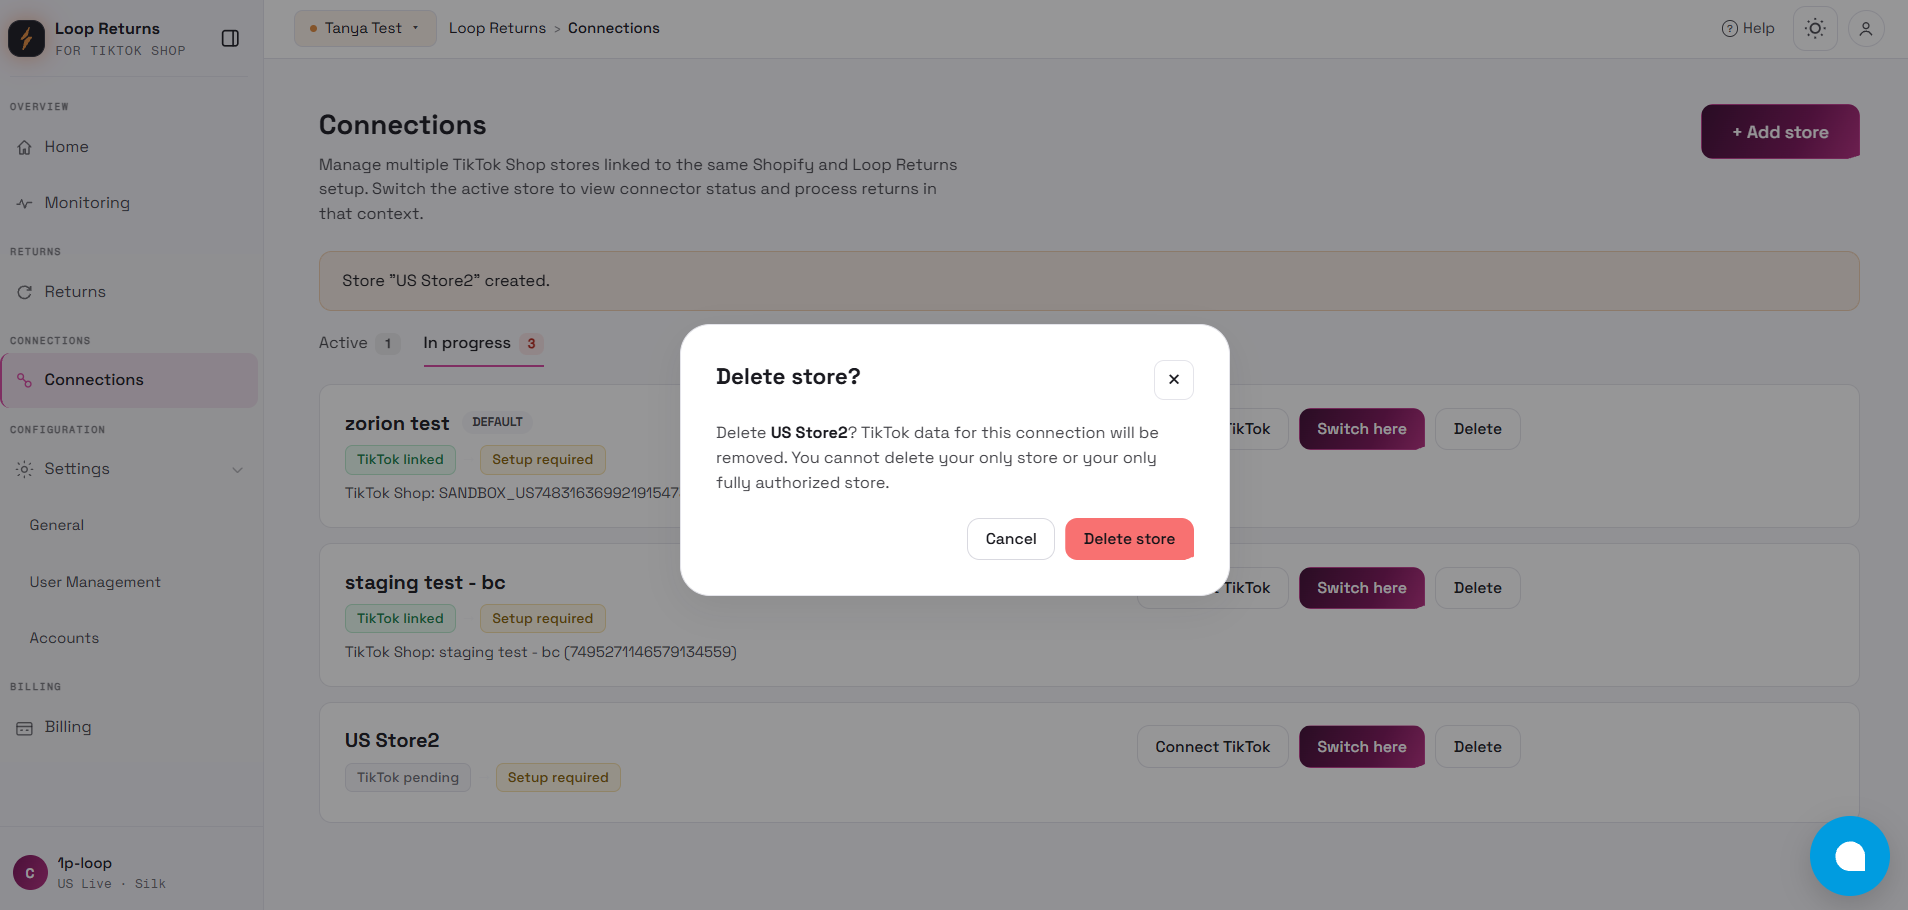
After deletion:
-
The TikTok Shop binding relationship for this store connection will be removed.
-
Return data for this TikTok Shop store will no longer be accessible through this connection in Loop Returns Integration.
-
Shopify and Loop Returns authorizations will not be affected.
-
Other store connections will not be affected.
-
The connection count will be updated.
-
A new TikTok Shop store can be added if the limit has not been reached.
Note: Please make sure the store connection is no longer needed before deleting it. Once deleted, data associated with this connection may no longer be accessible through this connection.
Using the App Dashboard
Section titled “Using the App Dashboard”After completing the required setup, you will land on the Home Dashboard - your central hub for monitoring returns, tracking sync status, and accessing app features.
Recommended Initial Setup
Section titled “Recommended Initial Setup”Upon your first login, a configuration reminder may appear.
Before processing production returns, we recommend completing the following checks:
-
Confirm Shopify, Loop Returns, and TikTok Shop are connected.
-
Confirm the subscription status allows protected operations.
-
Verify SKU consistency between TikTok Shop and Shopify.
-
Configure default return reason mapping.
-
Configure category templates for category-based reason mapping when needed.
-
Configure default reject reason.
-
Review auto-create shipping label behavior.
-
Decide whether to override Shopify order name when creating Loop returns.
-
Prepare the external connector return/refund sync setting for production cutover; do not disable it early.
-
Process a controlled test return before broader rollout.
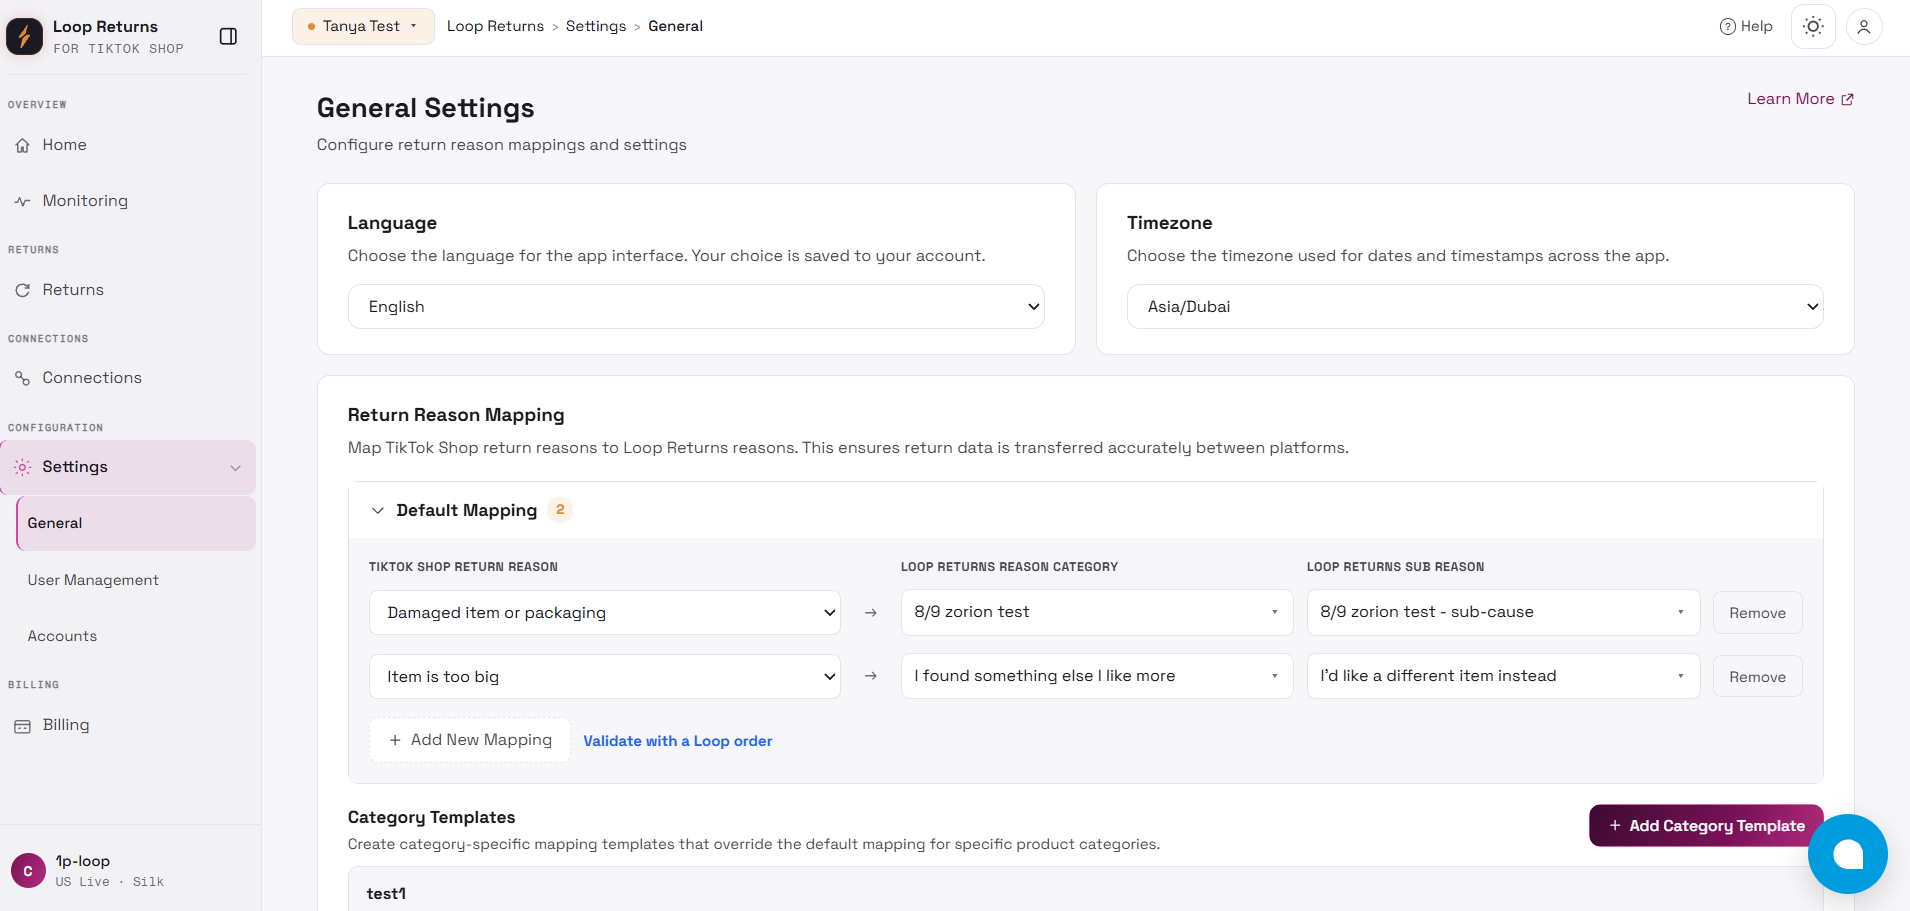
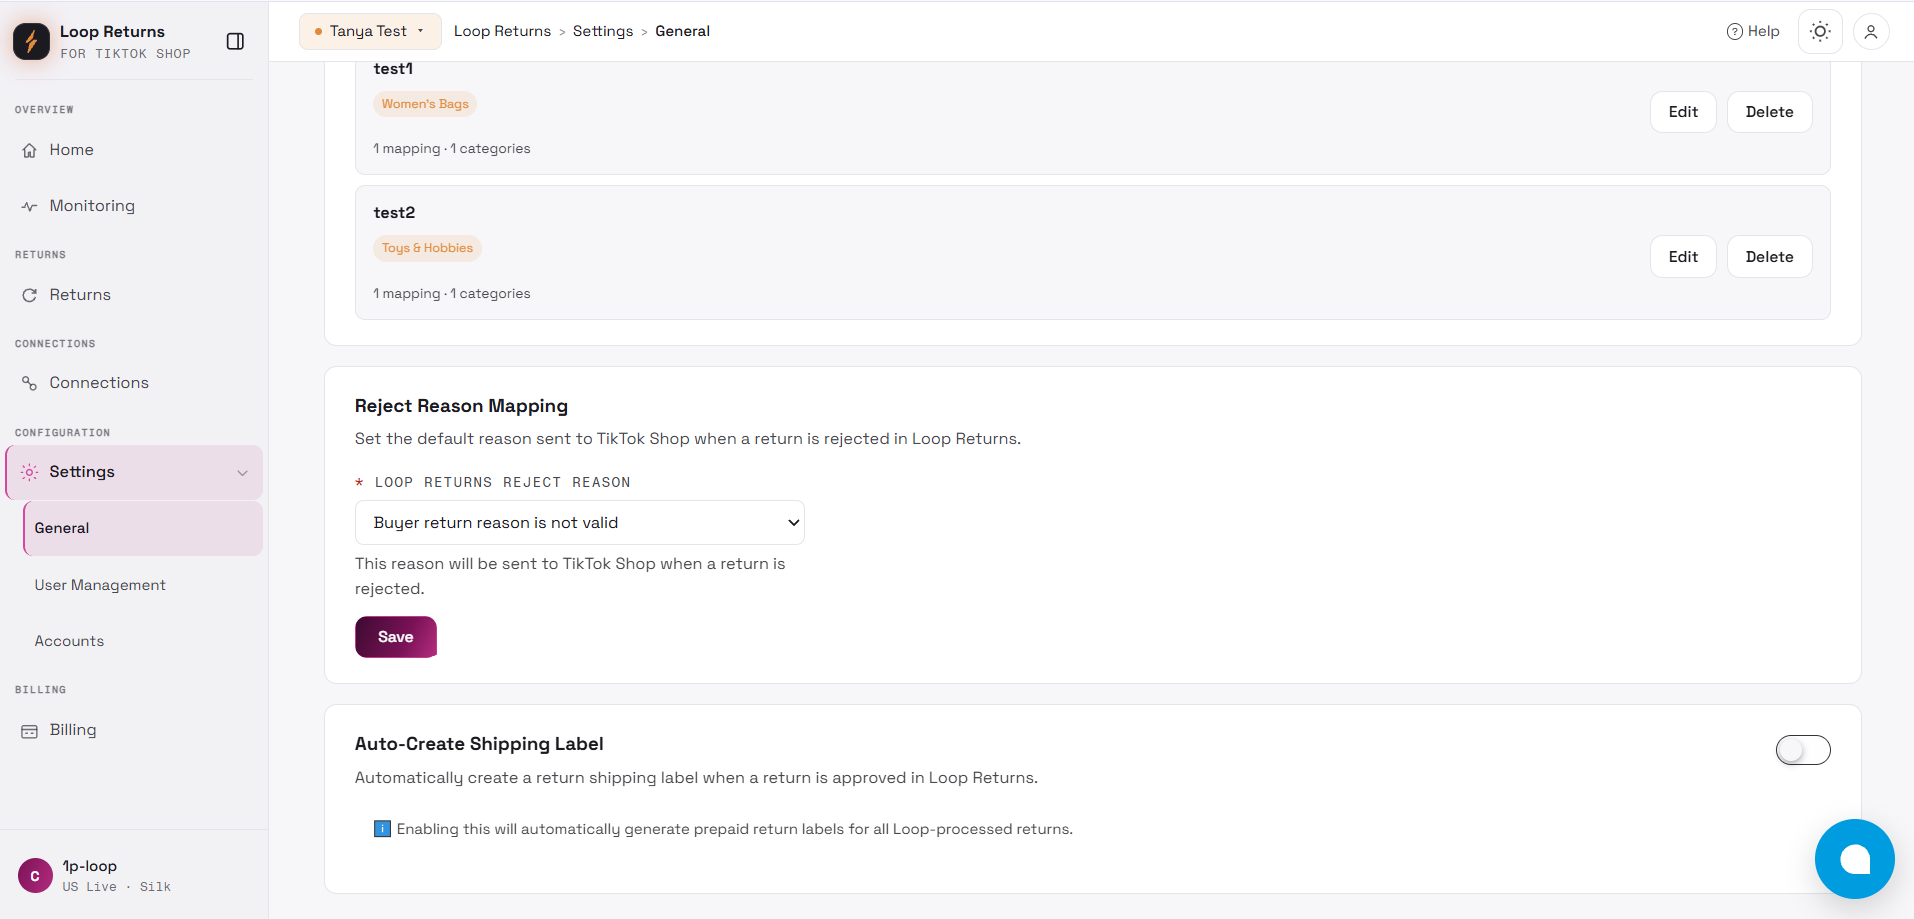
Home Dashboard
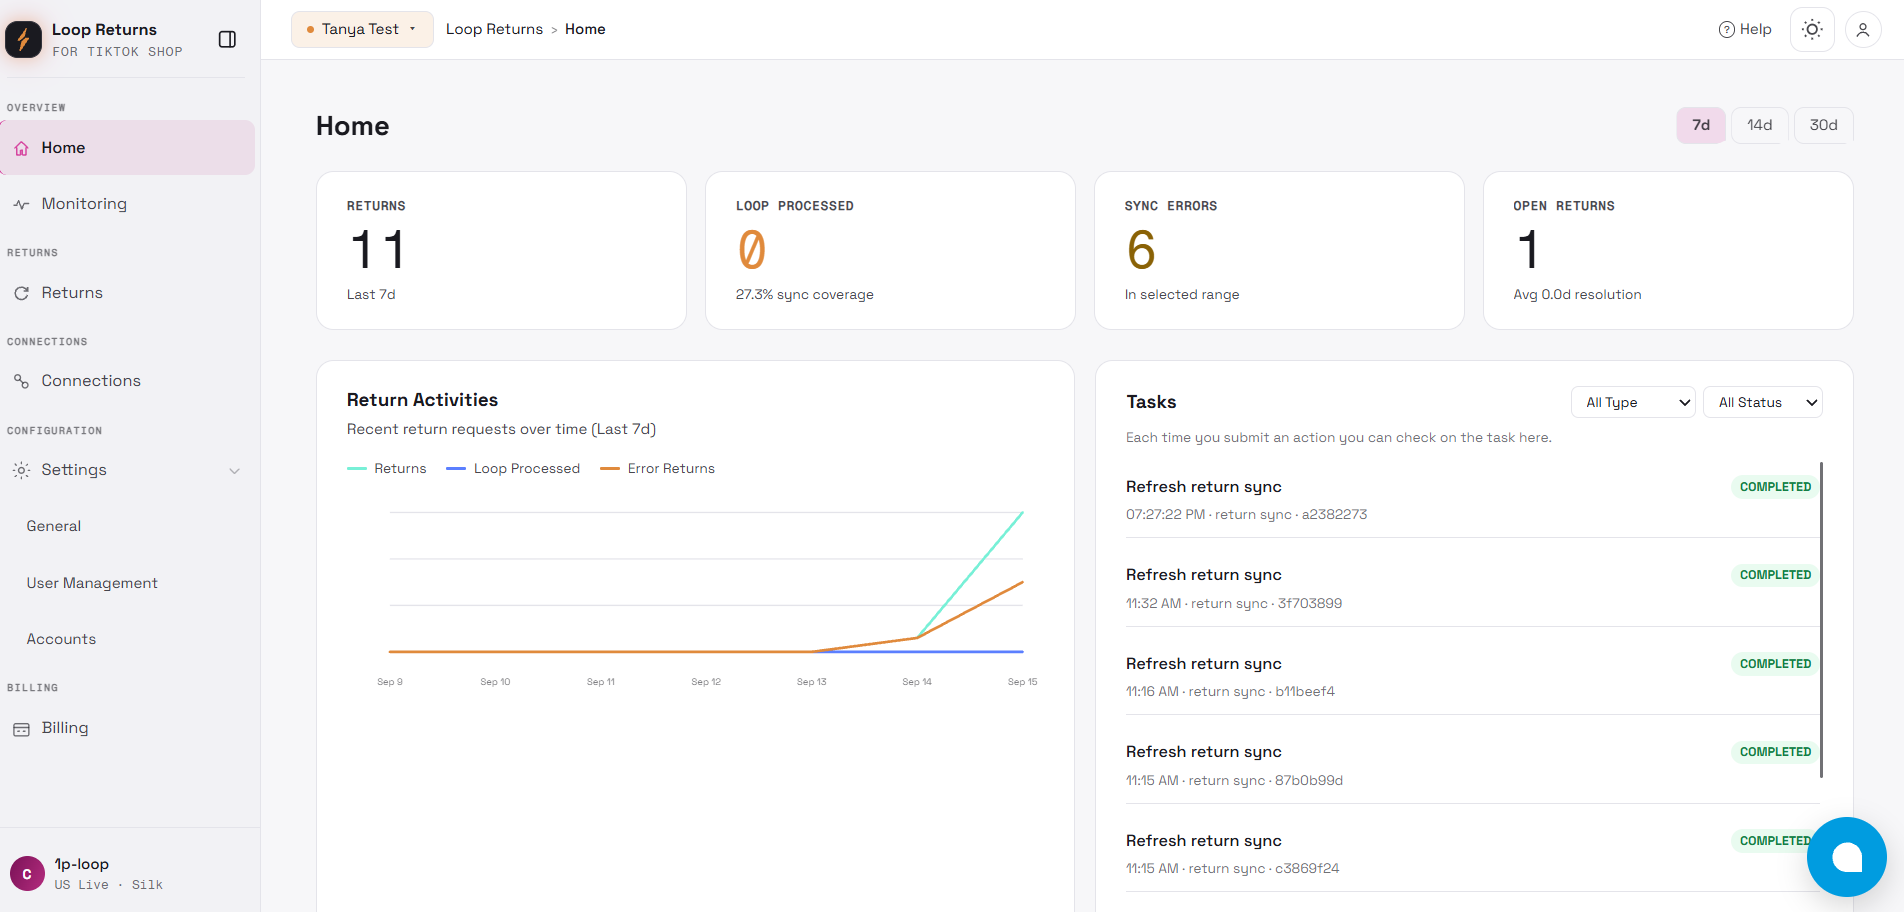
Section titled “Home Dashboard”The Home Dashboard provides a real‑time overview of your integration health and return activity.
-
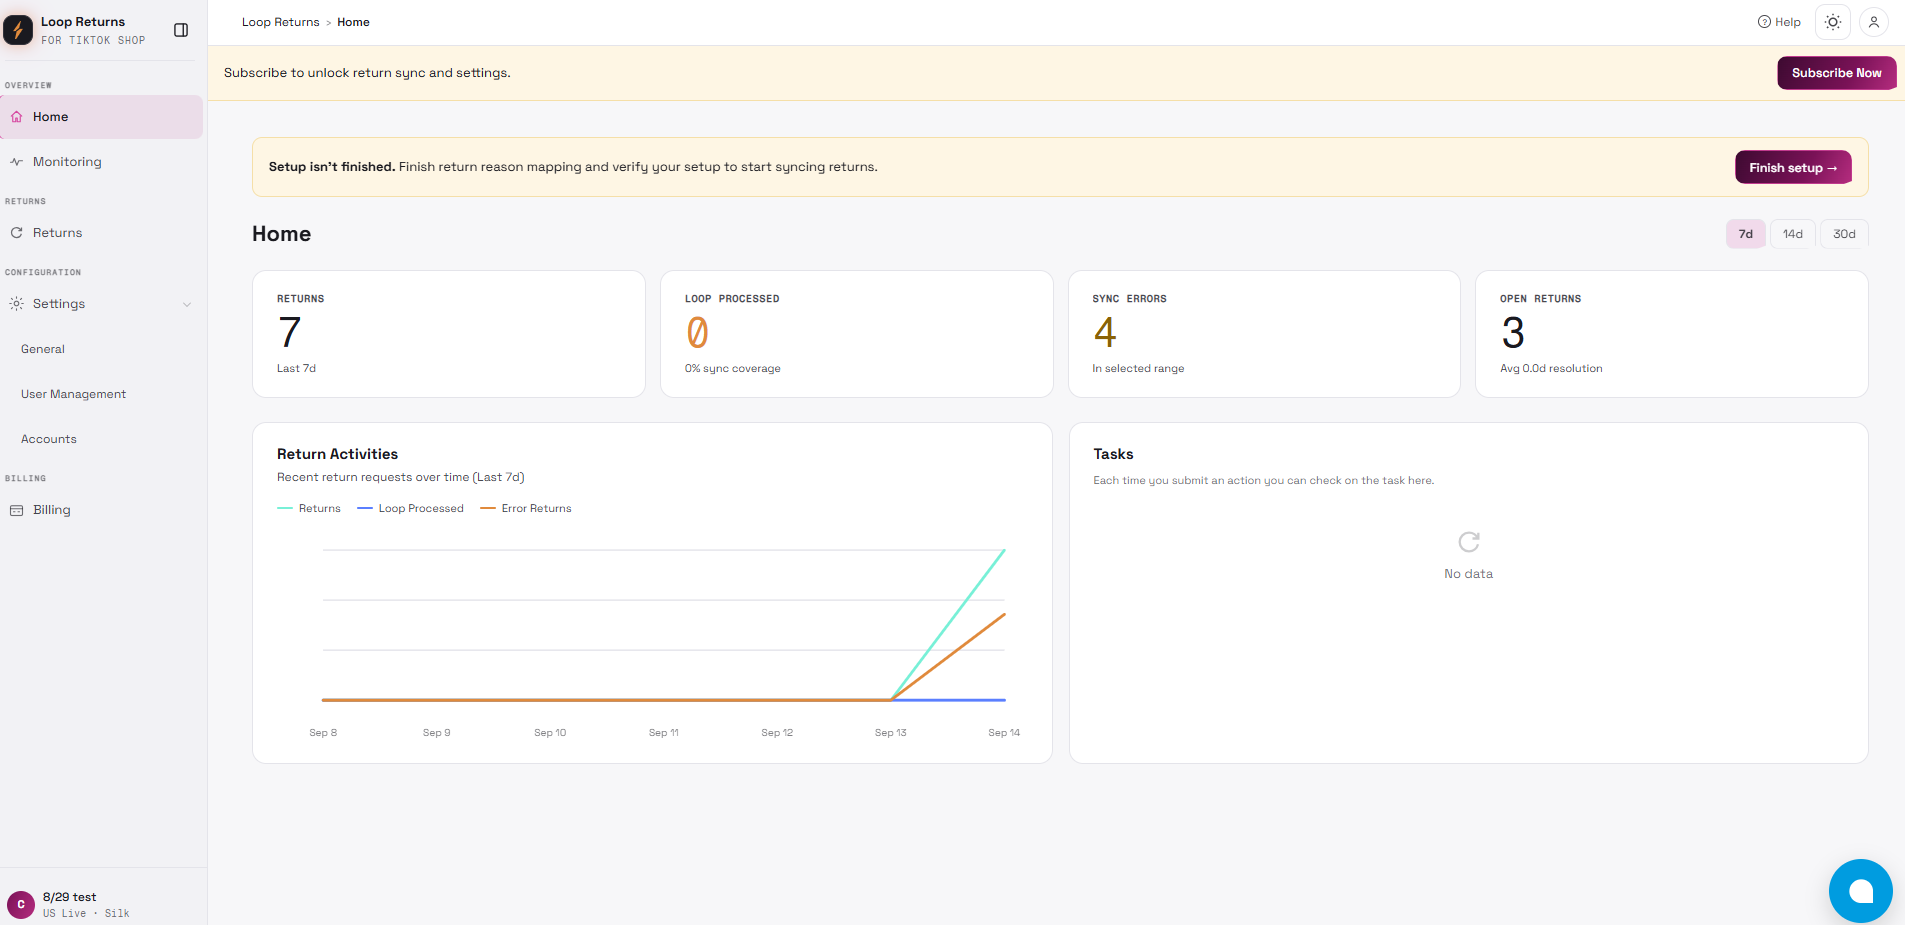
Global Time Filter: Located at the top right of the page, use this filter to set a unified time range (Last 7/14/30 days) for all data displayed on the dashboard. This ensures all charts and metrics are synchronized for a consistent view of the selected period.
-
Key Performance Indicators (KPIs): Four summary cards provide an at-a-glance view:
-
Total Orders: The number of orders synced within the selected time range
-
Total Returns: The number of return requests received during the period
-
Loop Processed: The count and percentage of returns processed through Loop
-
Error Returns: Immediate visibility into synchronization failures, with one-click access to problem orders
-
-
Return Activities Chart: Below the KPIs, an enhanced line chart visualizes return trends with color-coded data series showing Total Returns, Loop Processed, and Failed Returns over time.
-
Tasks Module: A centralized area for real-time monitoring of background jobs,filter tasks by type and status.
Monitoring Page
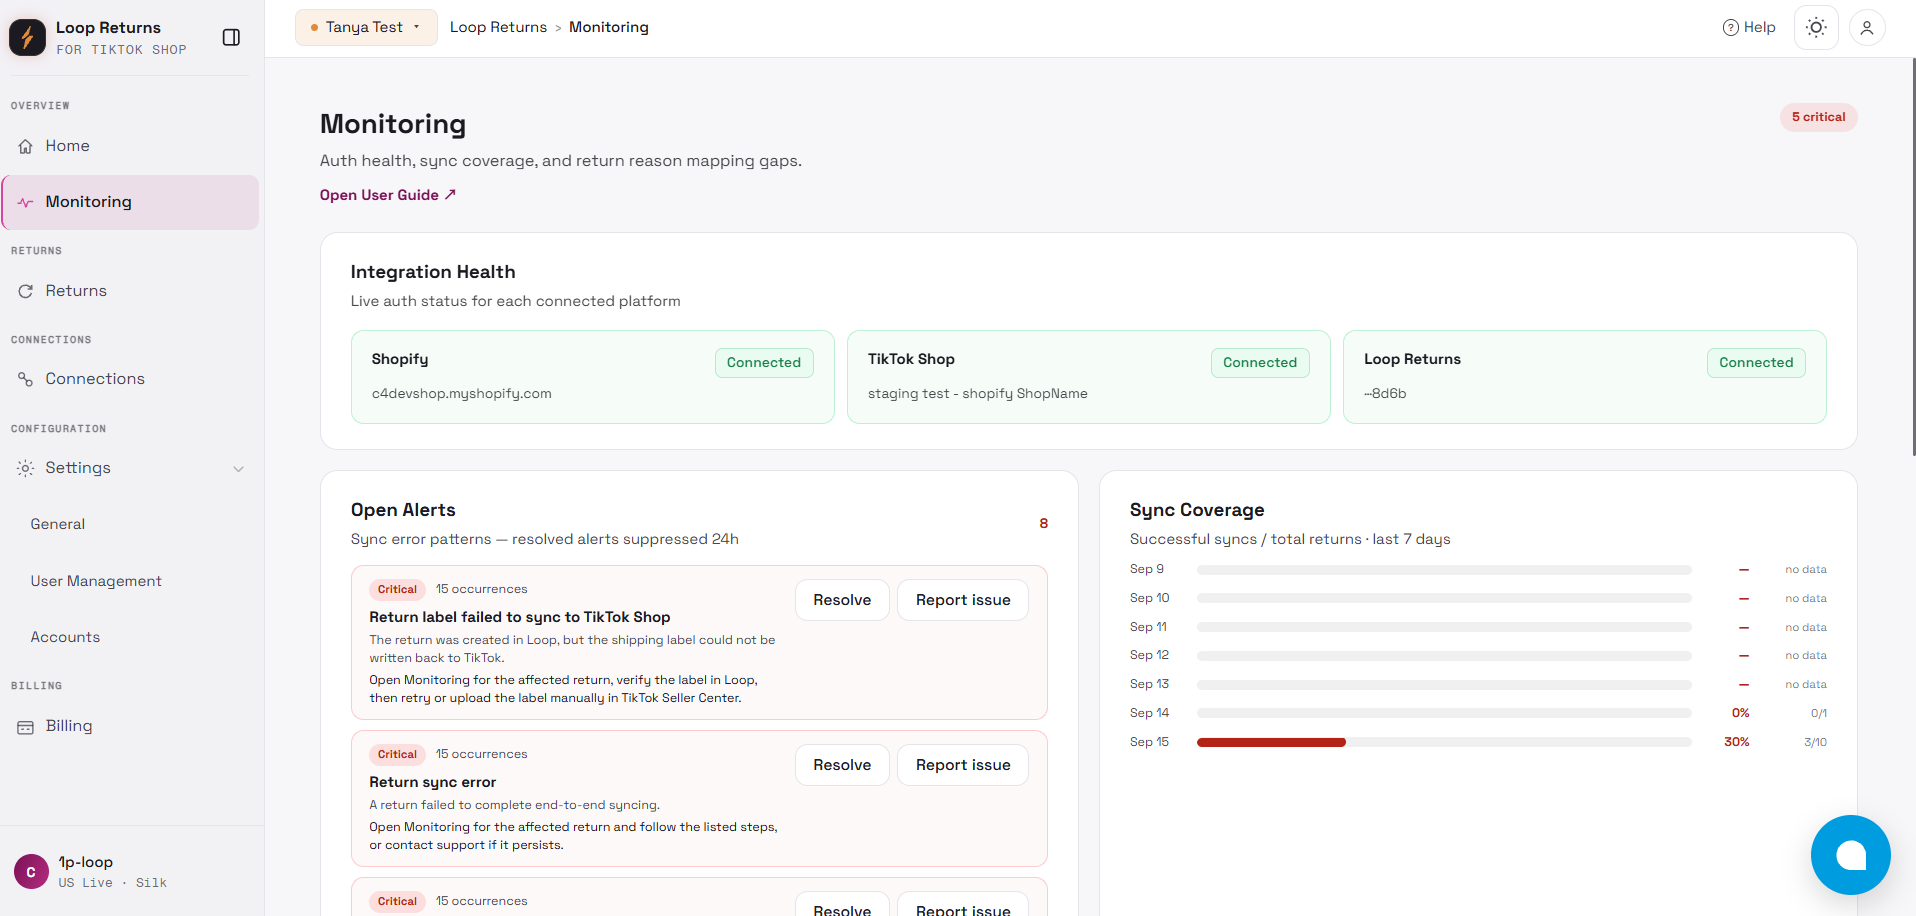
Section titled “Monitoring Page”The Monitoring page provides an operational view of integration health, sync performance, active alerts, and return reason mapping gaps.
It includes:
-
Integration Health: Shows the live connection status of Shopify, TikTok Shop, and Loop Returns.
-
Open Alerts: Displays repeated sync error patterns, severity level, occurrence count, error details, and Resolve action.
-
Sync Coverage: Shows successful syncs compared with total returns over the recent period.
-
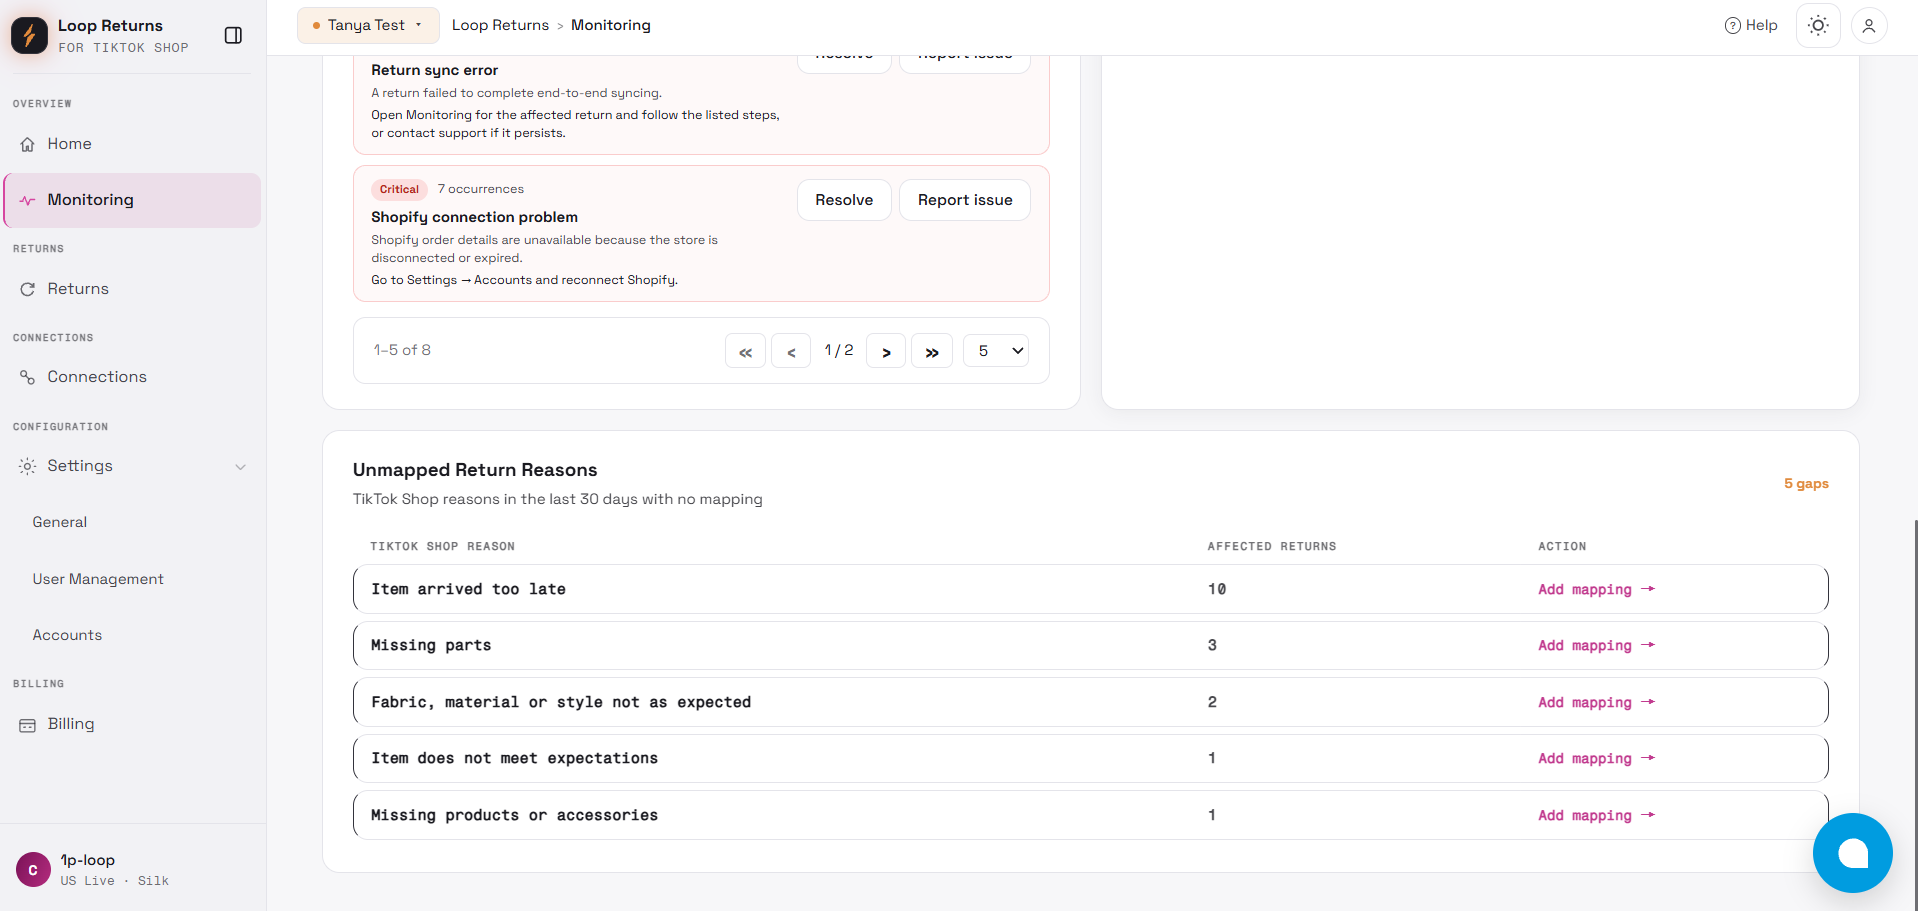
Unmapped Return Reasons: Lists TikTok Shop return reasons that have not been mapped to Loop Returns reasons, including affected return counts and an Add Mapping action.
Use this page to quickly identify disconnected platforms, recurring sync failures, low sync success rates, and missing return reason mappings. Completing missing mappings and resolving alerts helps improve return sync accuracy and reduce operational issues.
Returns Page
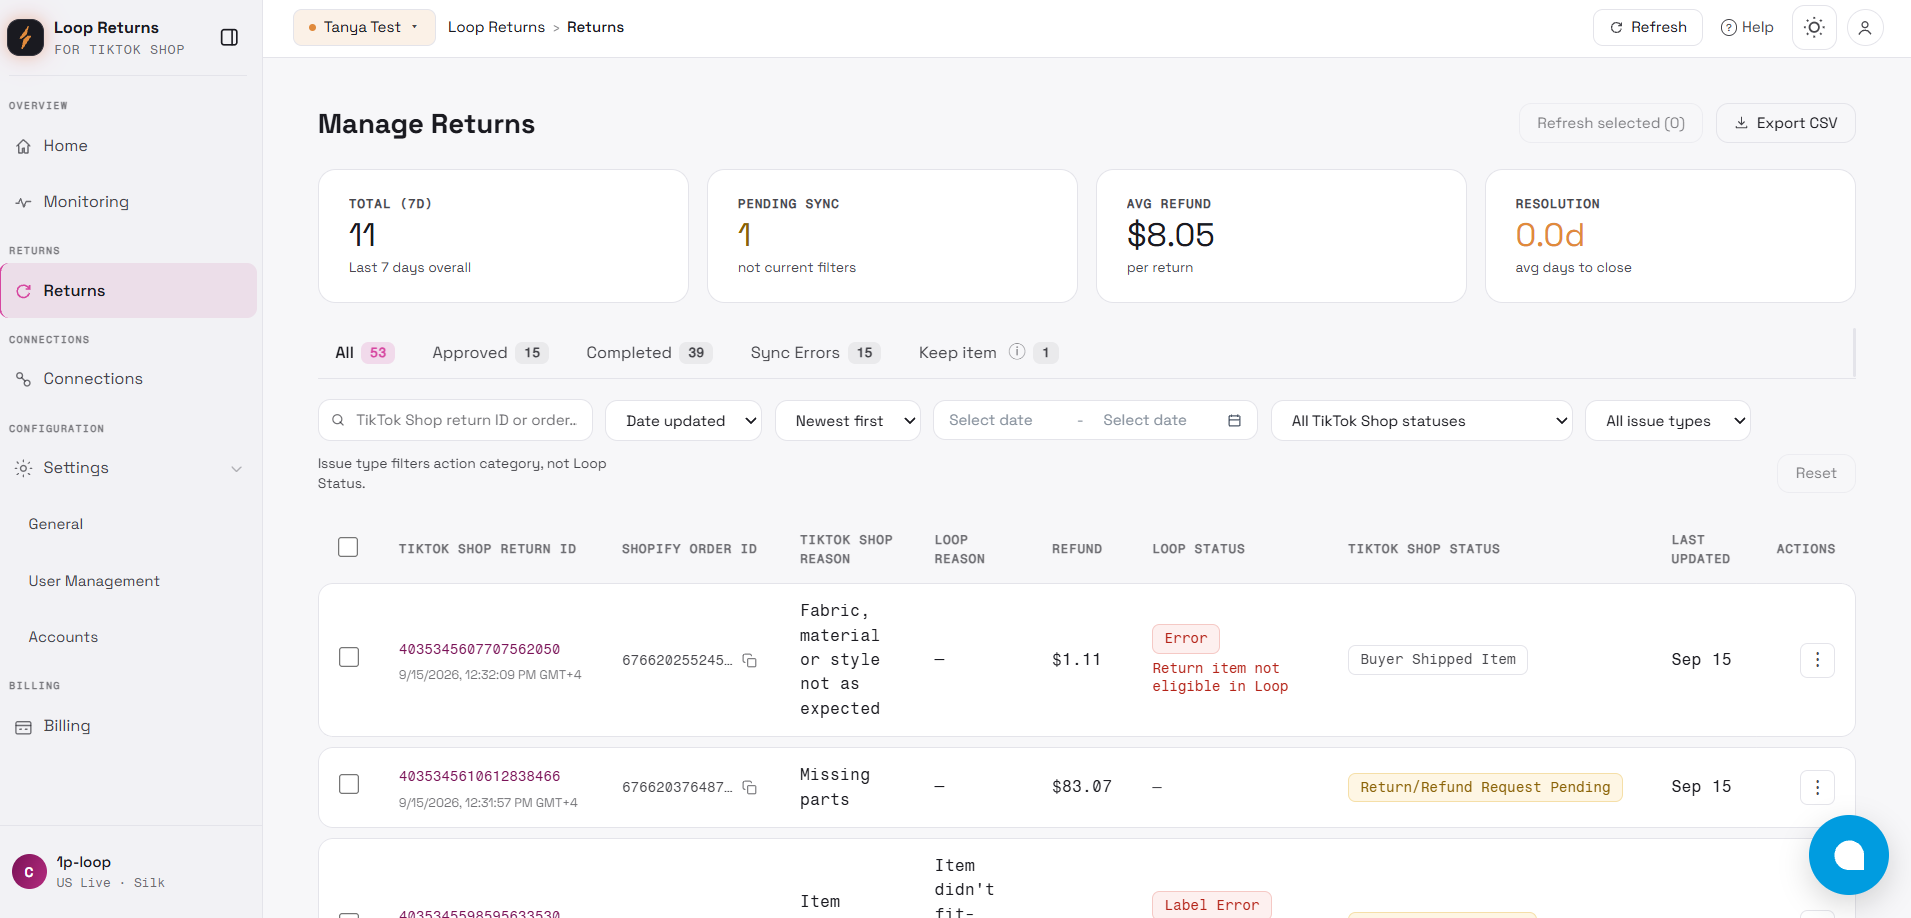
Section titled “Returns Page”The Returns page is your central dashboard for managing all TikTok Shop returns synced with Loop Returns. Here you can search, filter, sort, export, and view detailed information for every return record.
Return List Columns
Section titled “Return List Columns”| Column | Description |
|---|---|
| TikTok Shop Return ID | The TikTok Shop return identifier. Click to open detailed return information where supported |
| Shopify Order ID | The related Shopify order ID associated with the return. |
| TikTok Shop Reason | The return reason submitted by the buyer in TikTok Shop. |
| Loop Reason | The mapped Loop Returns reason used for return creation and processing. If no mapping is available, this field may be empty. |
| Refund | The refund amount associated with the return. |
| Loop Status | The current processing status in Loop Returns. This column may also show sync messages, review notes, label errors, or other return processing details. |
| TikTok Shop Status | The current return/refund status in TikTok Shop. |
| Last Updated | The latest update date for the return record. |
| Actions | Opens the available actions menu for the return, such as refreshing |
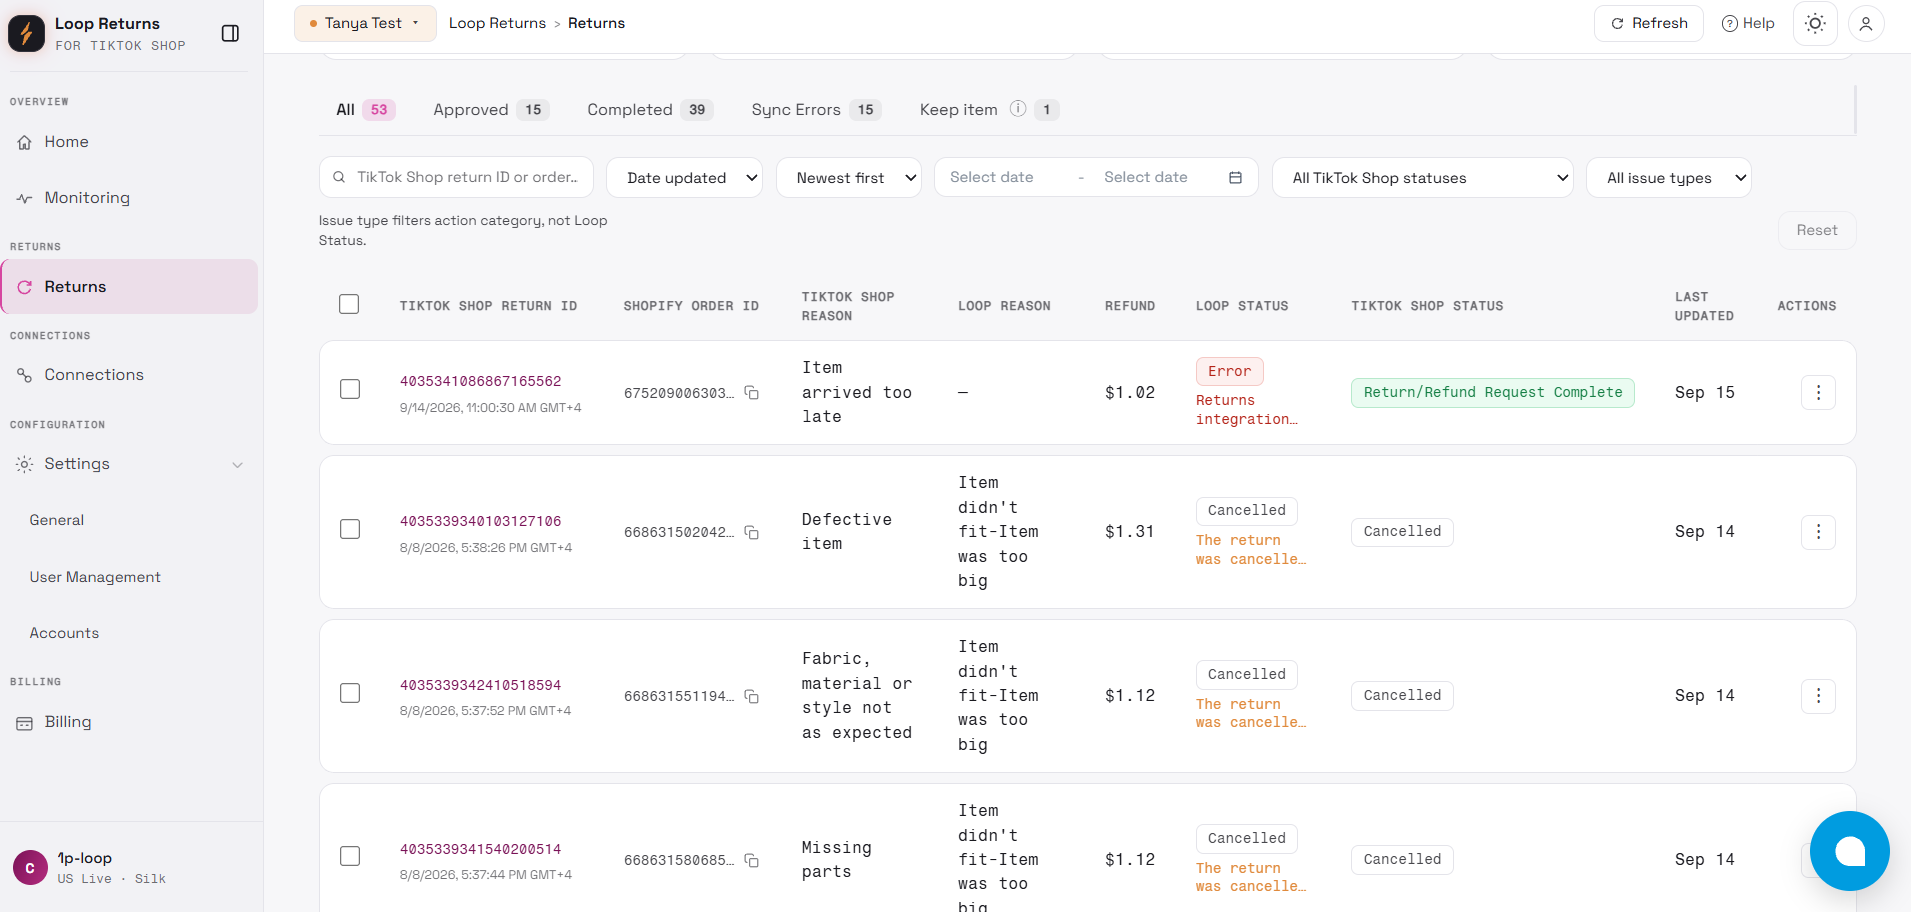
Note: This app displays return-level data synchronized from TikTok Shop and Loop Returns. Original order data is not stored.
Search, Filters, and Sorting
Section titled “Search, Filters, and Sorting”Supported list operations include:
-
Search by return ID or order ID.
-
Filter by tab/status, sync state, issue type, fulfillment type, keep-item/refund-only tab, and date range.
-
Sort by supported return fields, including updated time, created time, refund total, and TikTok Shop order ID.
-
Paginate through results.
Manual Refresh and Retry
Section titled “Manual Refresh and Retry”Users can manually refresh returns and retry failed records through supported actions.
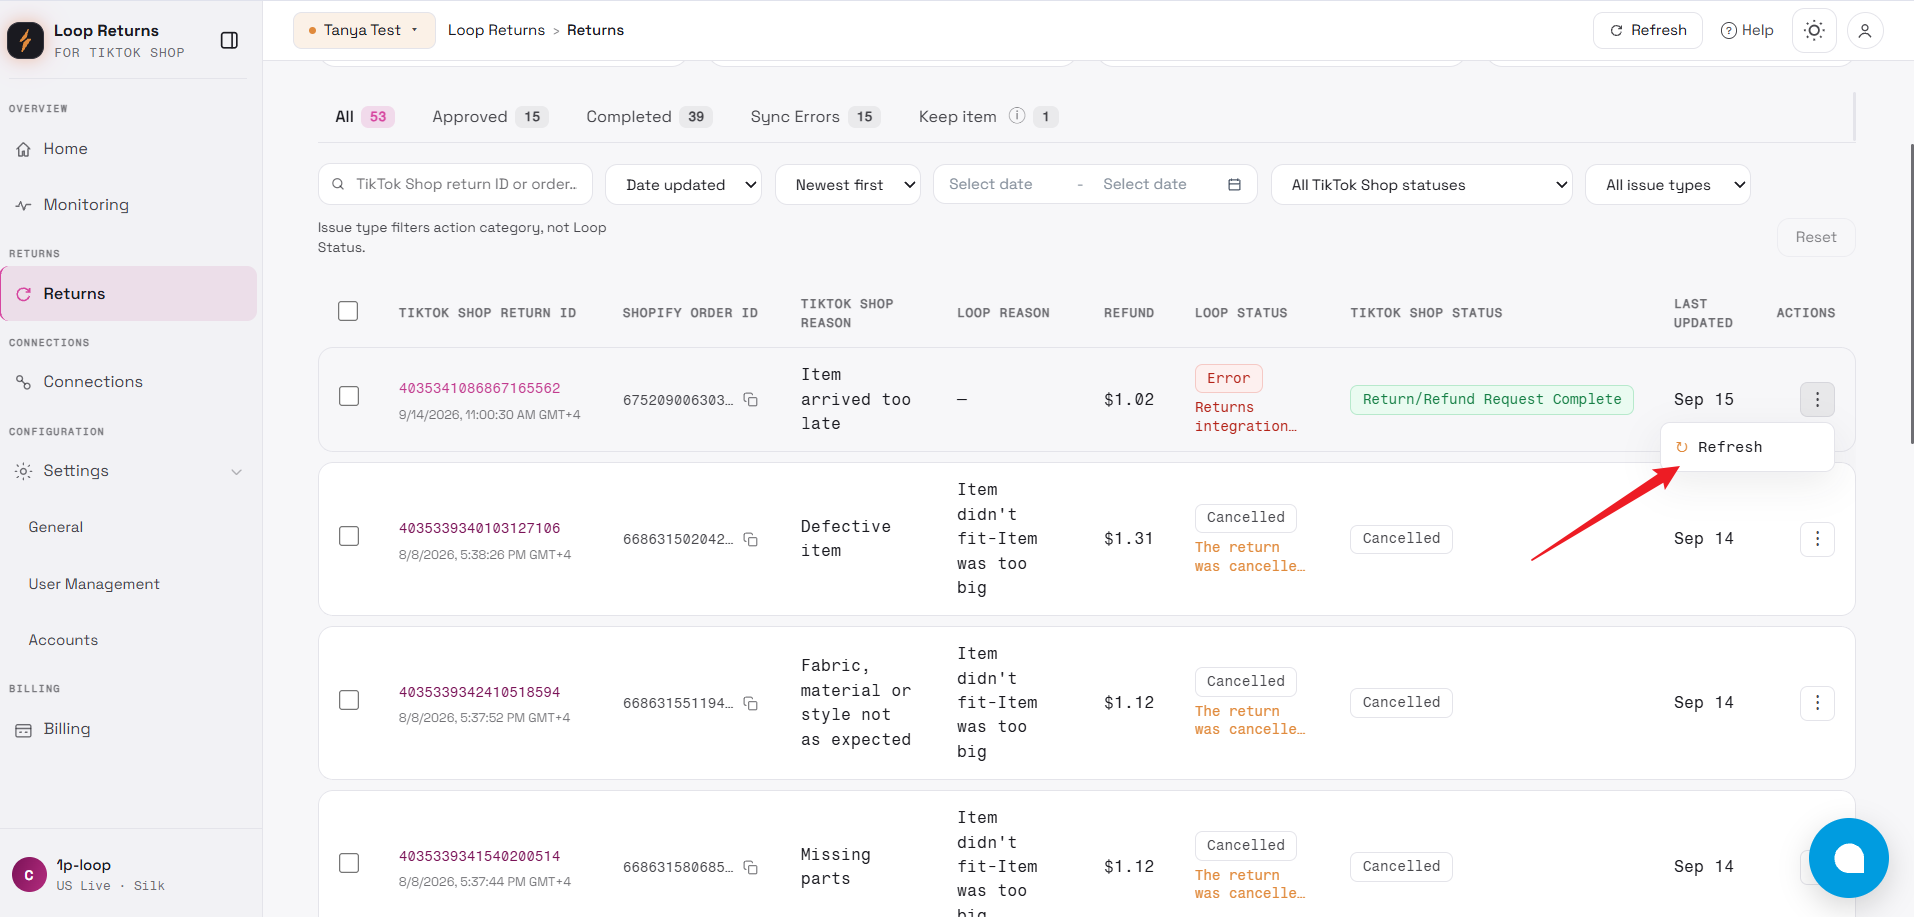
Important:
-
Refresh is intended to queue recovery work for eligible failed local return records.
-
Refresh should not be treated as a full import of all new orders or all returns.
-
Queued does not mean the sync has already completed.
-
Protected refresh/retry actions may be blocked if the subscription status does not allow protected operations.
Export CSV
Section titled “Export CSV”Users can export return data for reporting.
The export flow:
-
The user starts a return export.
-
The app creates an export job.
-
A worker generates the CSV file.
-
The user can monitor export status.
-
The user downloads the file when ready.
-
Email notification can be sent when configured.
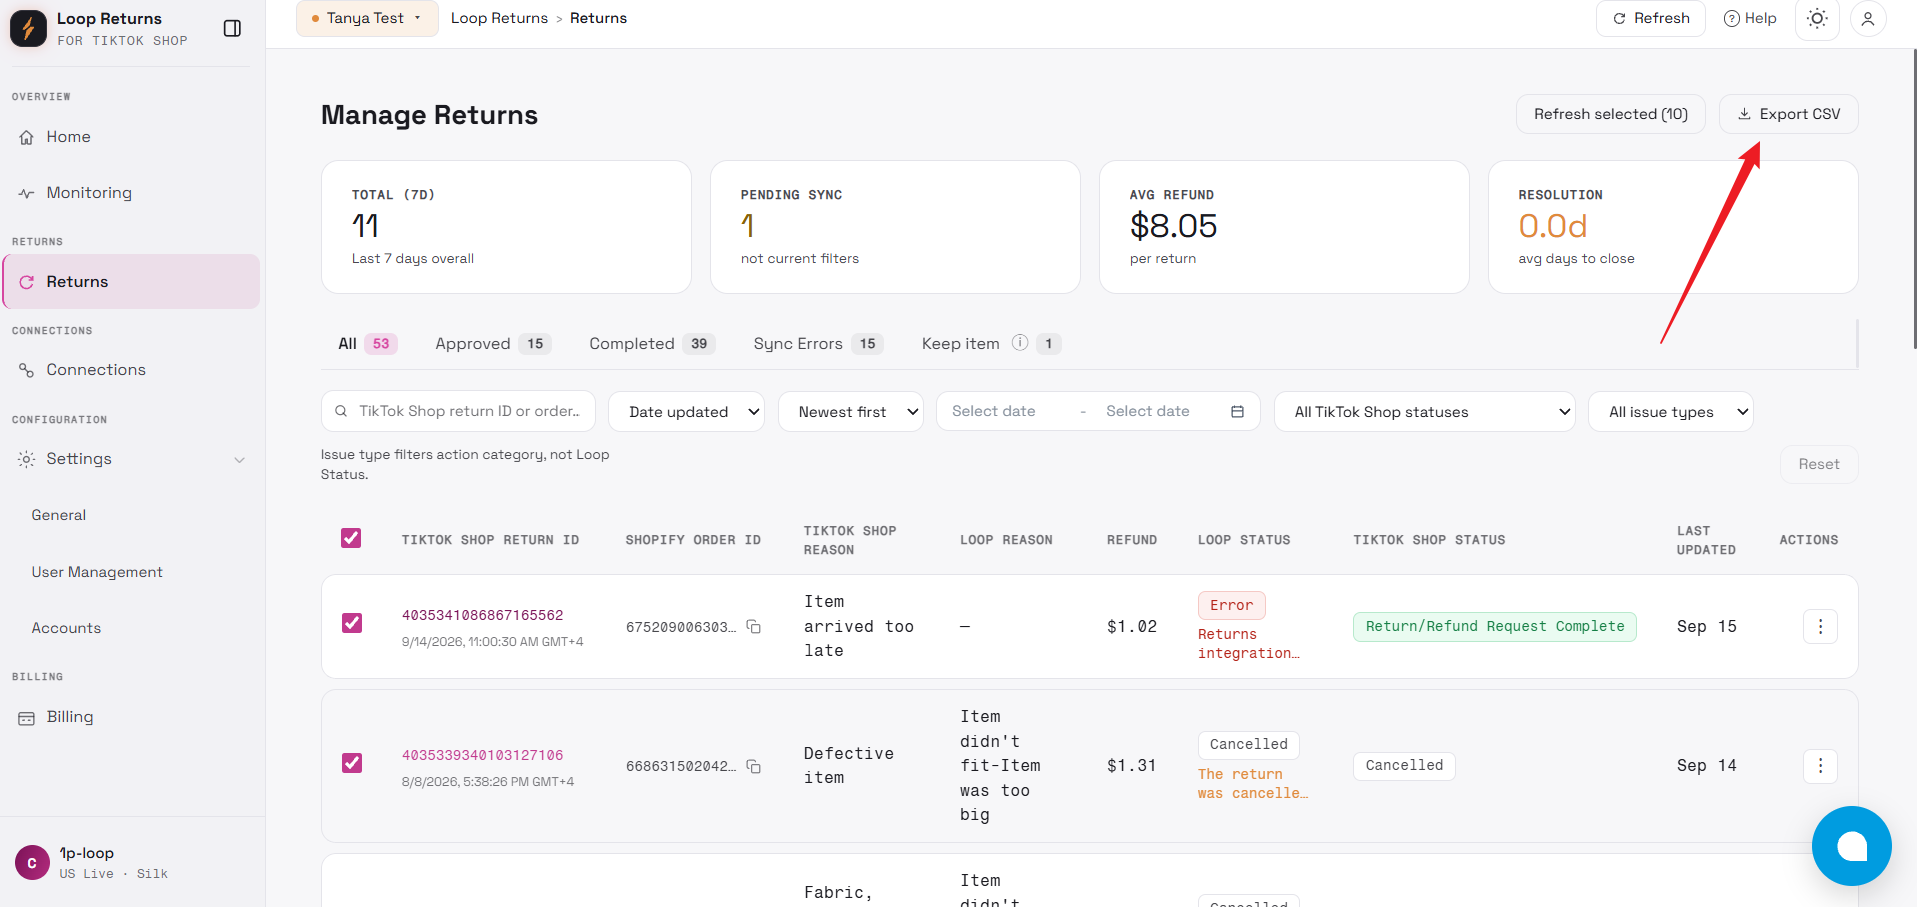
Note: Export creation may be blocked if the subscription does not allow protected operations.
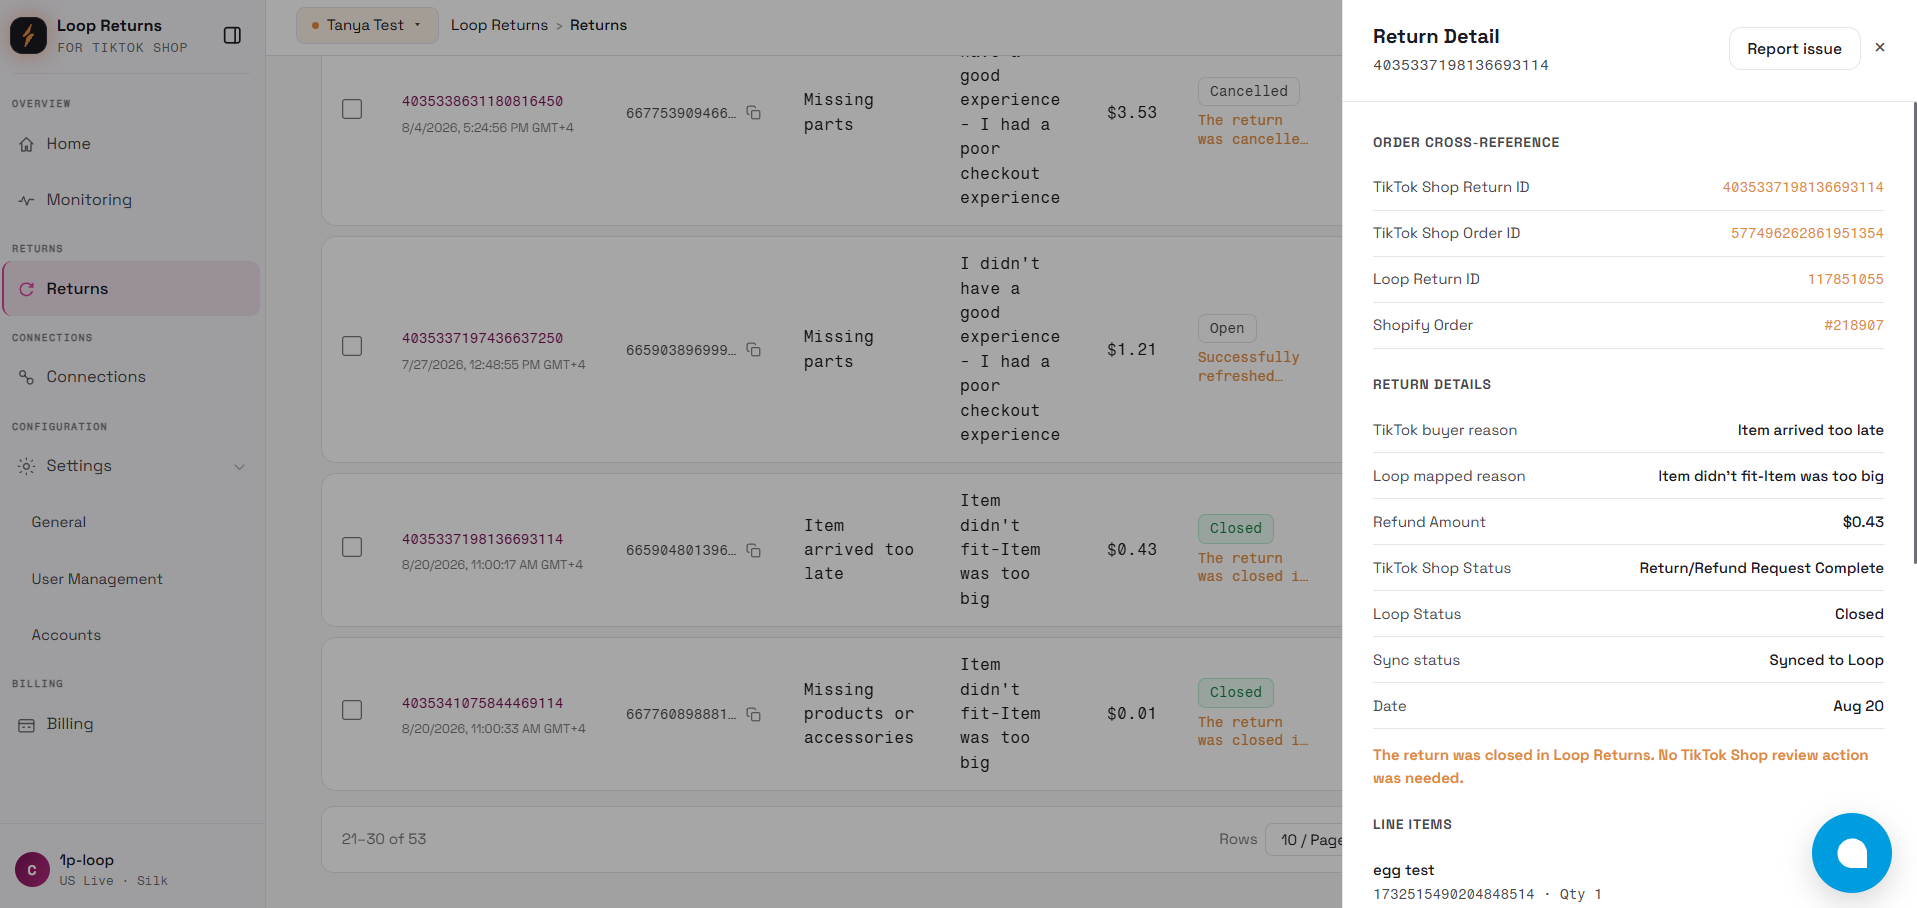
Return Details
Section titled “Return Details”Click any TikTok Shop Return ID to open the Return Details view, which includes:
Overview:
-
TikTok Shop Order ID
-
TikTok Shop Return ID
-
Loop Return ID
-
Creation time
-
Total amount
Platform Comparison:
-
TikTok Shop return status, reason, and identifiers
-
Loop Returns status, reason, and identifiers
Return Items:
-
Item name
-
SKU
-
Quantity
-
Return amount where available
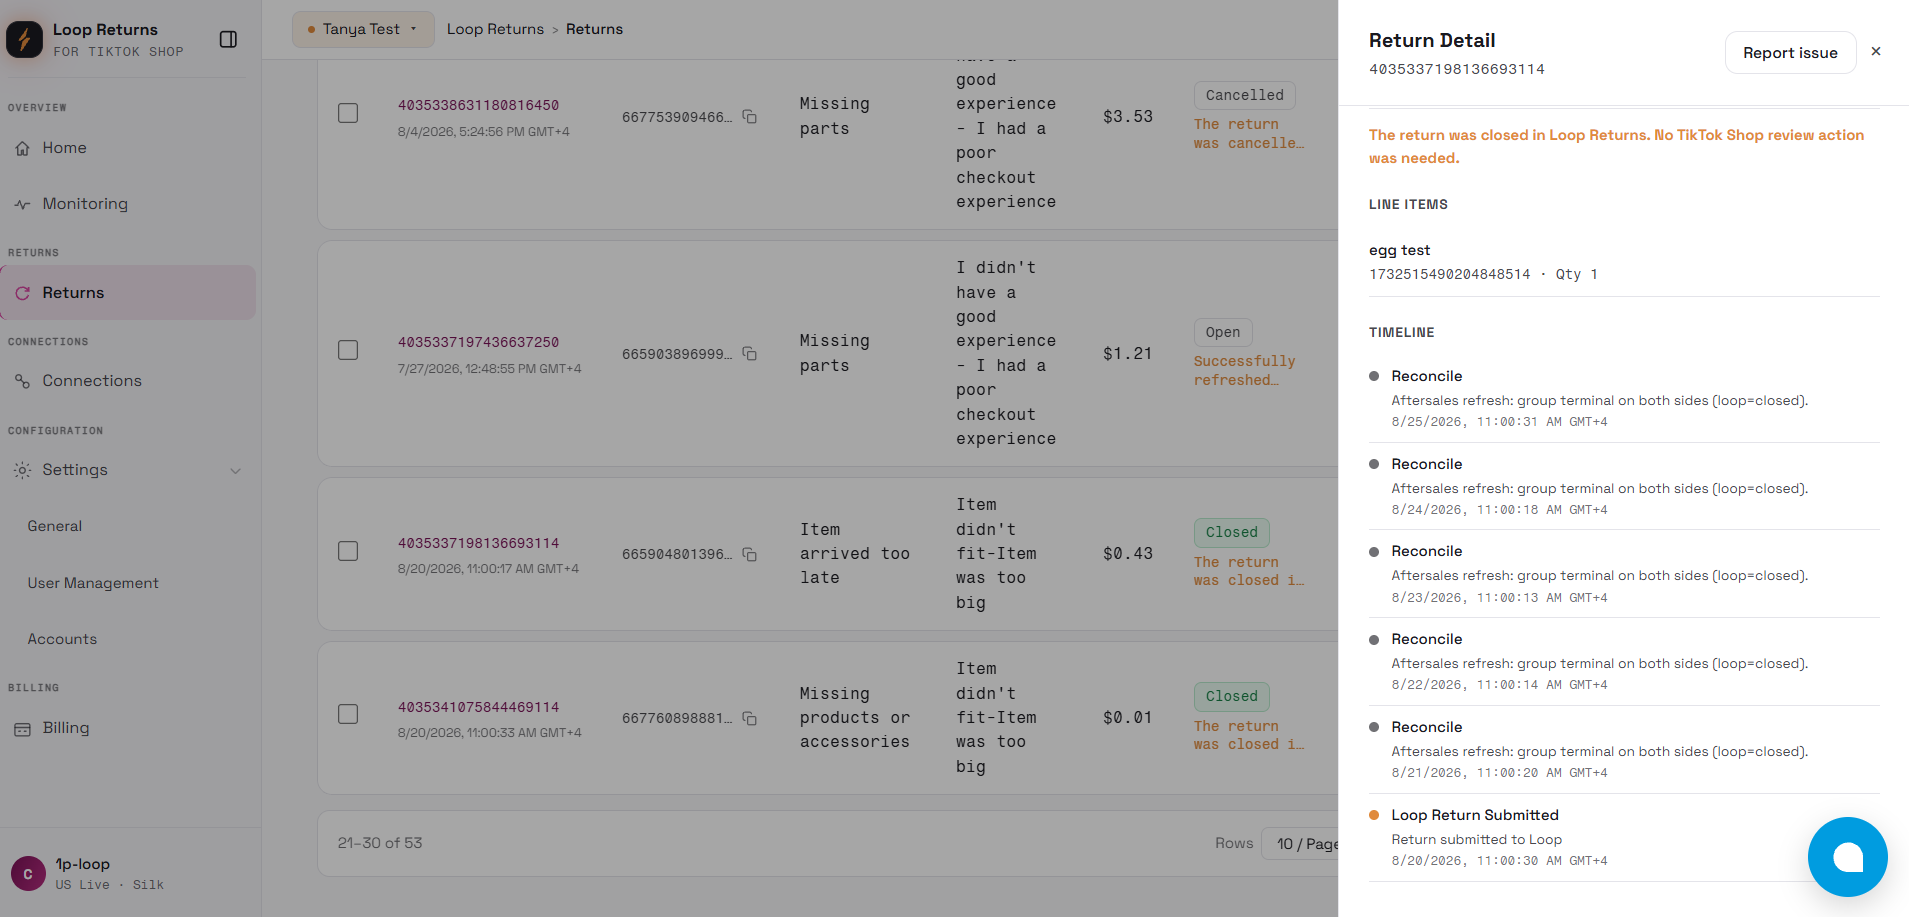
Return Timeline:
-
Key events in reverse chronological order
-
Status title
-
Description
-
Timestamp
-
Error messages and recovery context where applicable
Settings Page
Section titled “Settings Page”The Settings page allows you to configure synchronization logic between TikTok Shop and Loop Returns, as well as manage your account and team access.
Settings are divided into:
-
General Settings
-
User Management
-
Accounts
General Settings
Section titled “General Settings”General Settings control how return data is synchronized between TikTok Shop and Loop Returns.
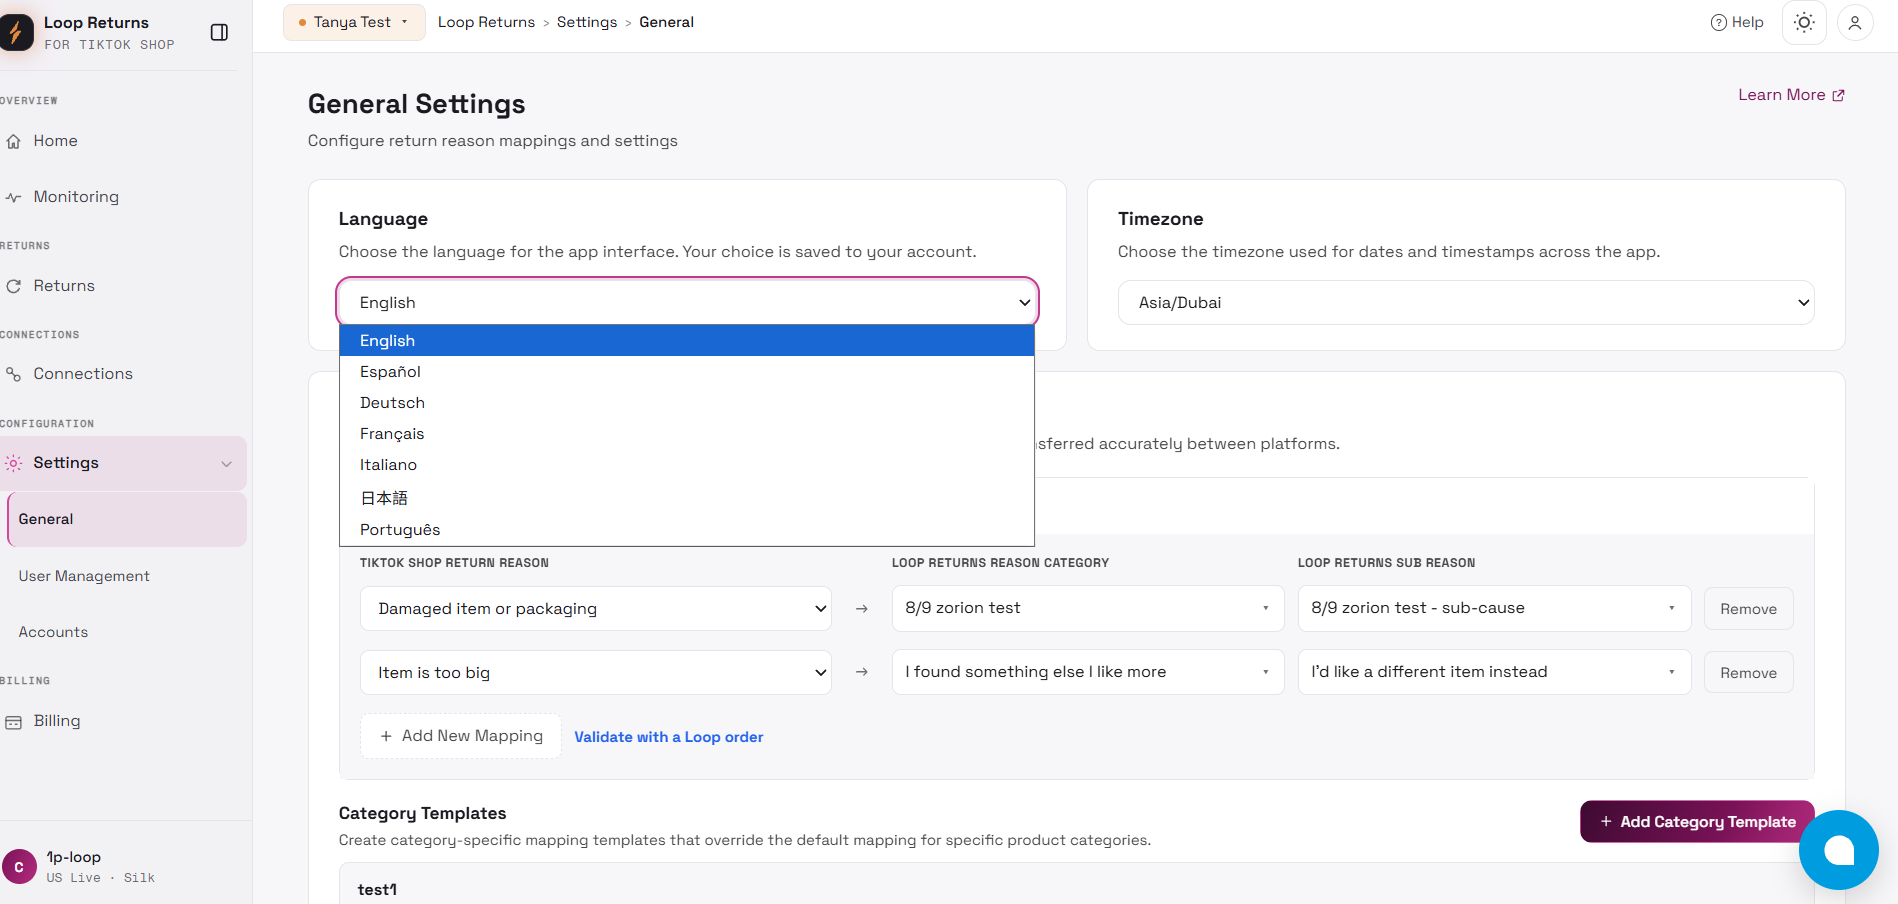
Language and Timezone
Section titled “Language and Timezone”The app supports language and timezone preferences for the merchant workspace.
The English language pack is the primary baseline. Other supported language packs can fall back to English when a newer key has not yet been translated.
Return & Refund Reason Mapping
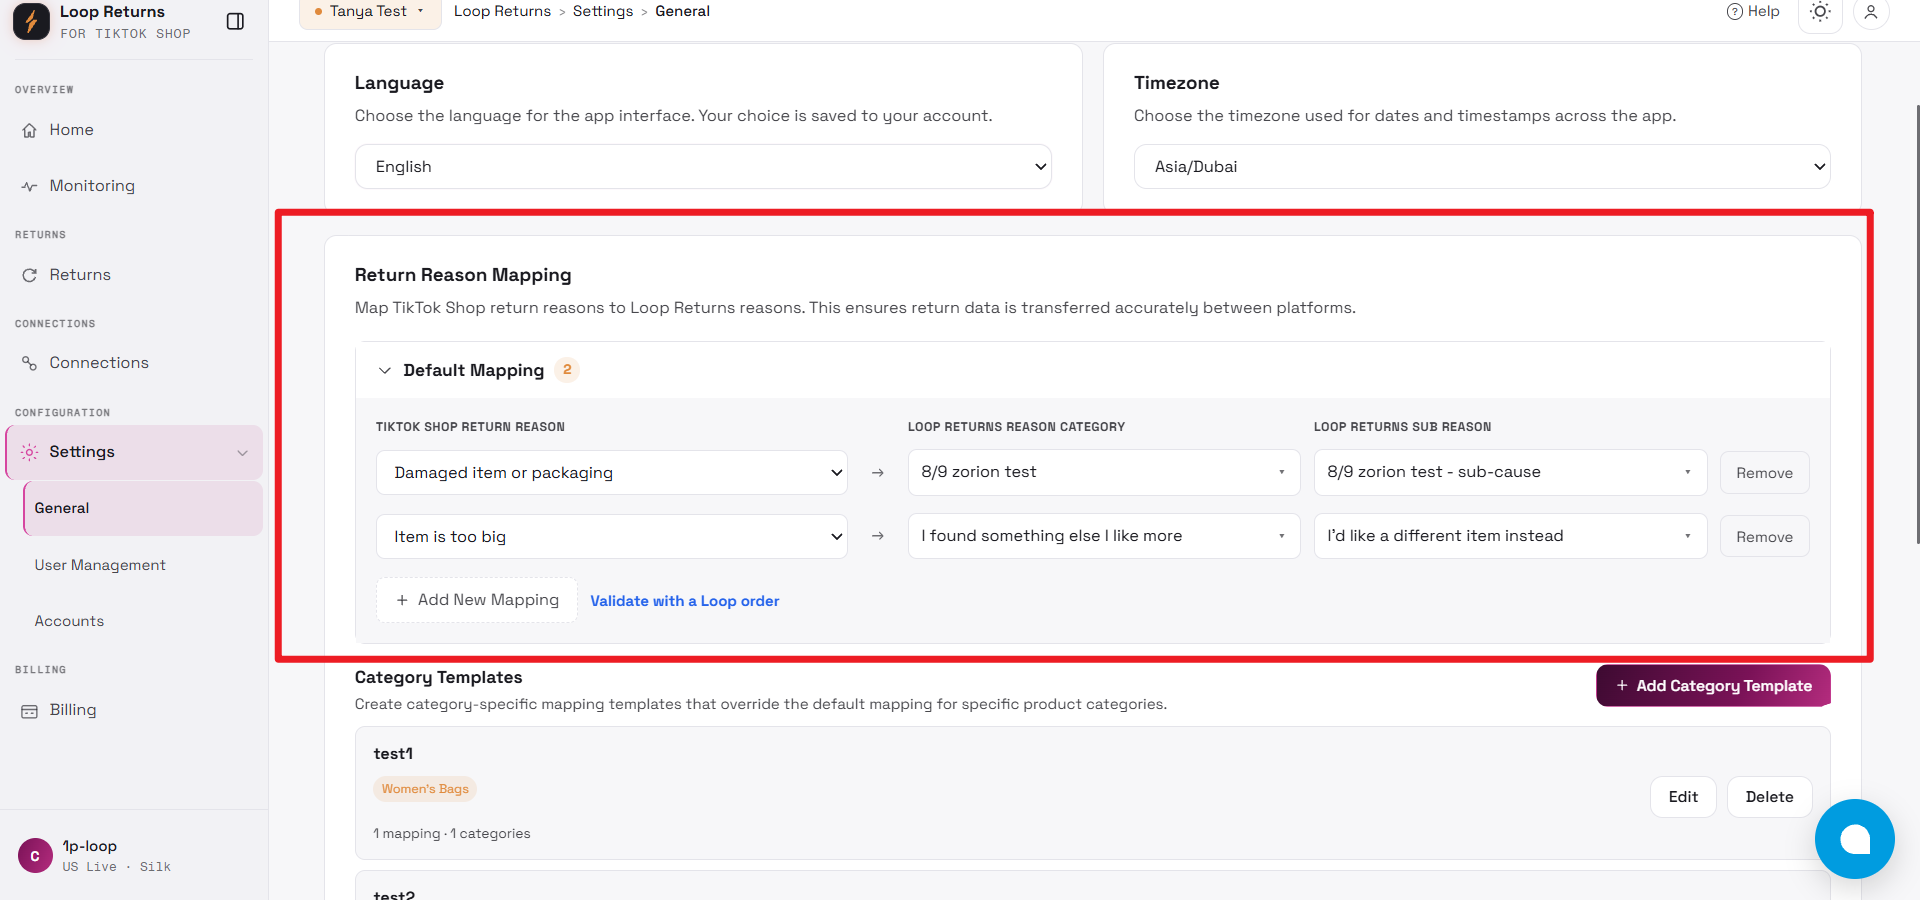
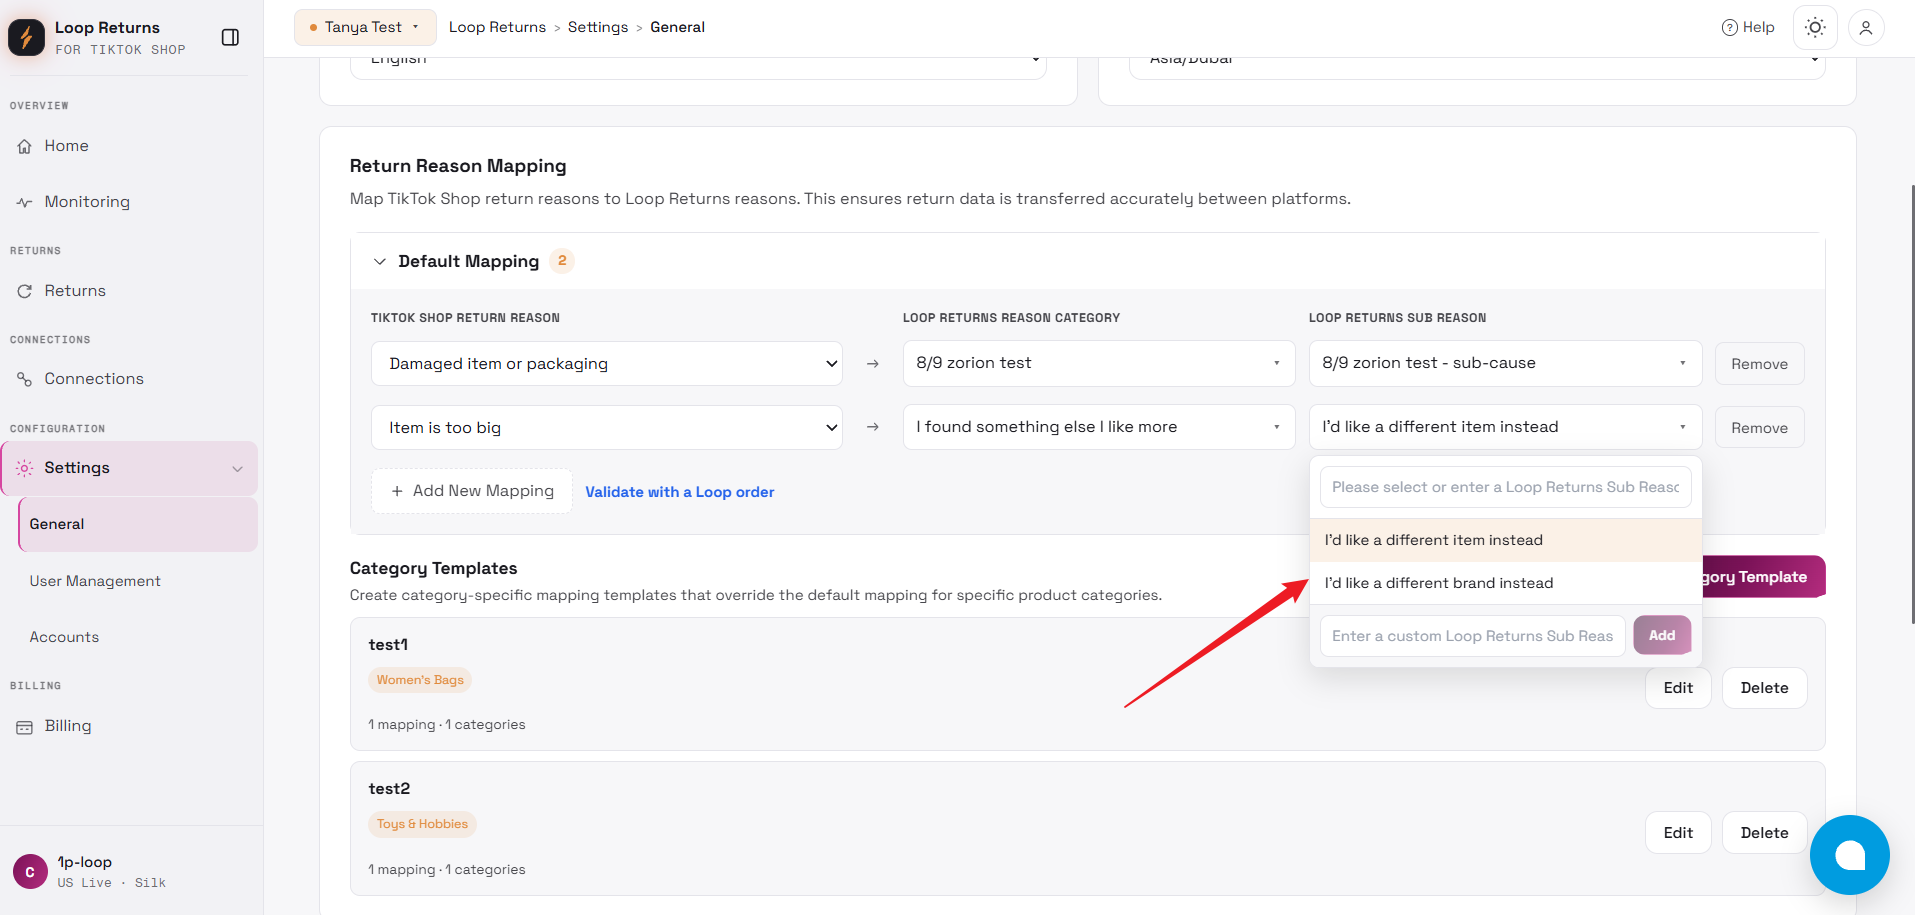
Section titled “Return & Refund Reason Mapping”In Settings, navigate to the Reason Mapping section. This section allows you to map TikTok Shop return reasons to Loop Returns reasons, so return and refund information can be translated correctly between the two platforms.
The app supports Loop Returns’ hierarchical reason structure. Each mapping follows this format:
TikTok Shop Reason → Loop Parent Reason → Loop Child Reason
Default Mapping
The Default Mapping section acts as the fallback mapping for all products.
-
It applies when no Category Template mapping is matched.
-
The section is collapsible and expanded by default.
-
A badge shows the total number of configured mappings.
-
By default, no mappings are configured. You need to set them up manually.
Mapping Rules
When configuring a mapping:
-
Parent Reason must be selected first.
-
Child Reason options depend on the selected Parent Reason.
-
If the Parent Reason changes, the Child Reason will be cleared automatically.
-
You can select existing Loop reasons from the dropdown list.
-
You can also enter custom Parent or Child reasons in the Customize input box and click Add to create a custom reason.
-
Custom reason input is case-sensitive and should match the values configured in Loop Returns.
-
Each TikTok Shop reason can map to only one Loop reason combination within the same mapping scope.
-
Duplicate mappings are not allowed.
Managing Mappings
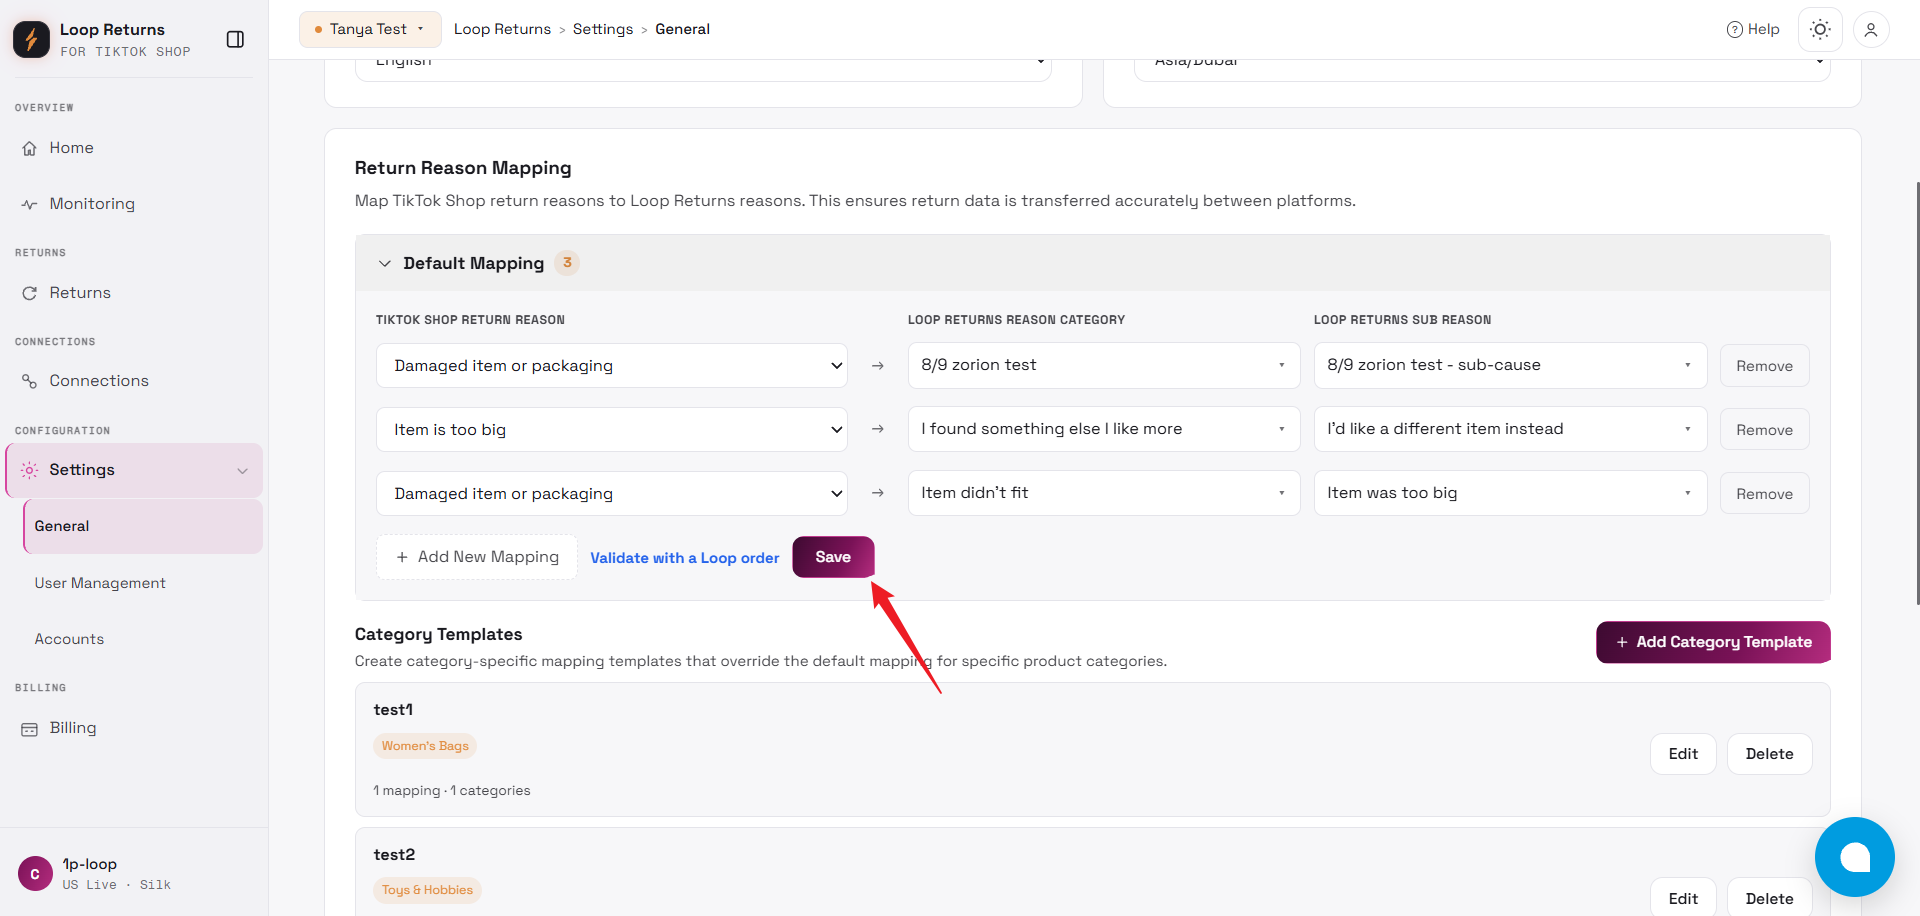
Use the following actions to manage mappings:
-
Add Mapping: Insert a new row to configure an additional mapping.
-
Remove: Delete an existing mapping row.
-
Save: Save your configured mappings.
After saving, the mappings will be applied to return sync logic. Proper mapping helps reduce sync failures caused by missing or inconsistent return reasons.
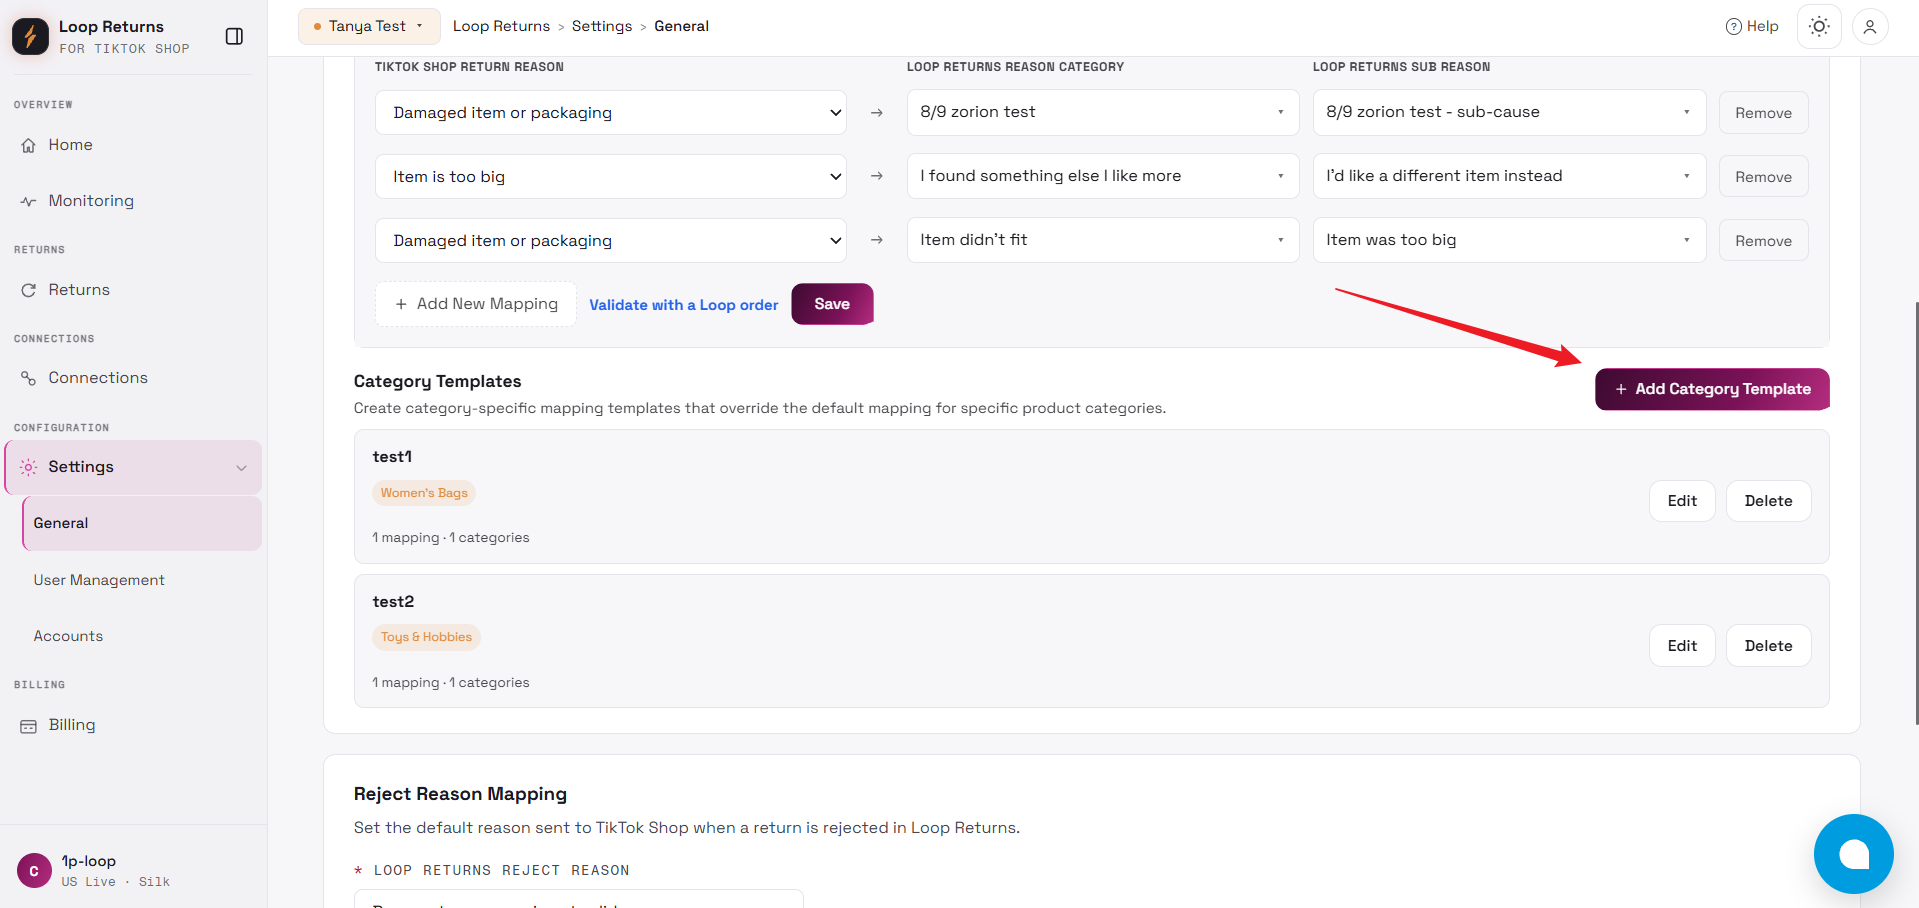
Category Templates
Section titled “Category Templates”Below the Default Mapping section, you will find Category Templates.
Category Templates allow you to define different reason mapping rules based on product categories. Use this feature when different product categories need to use different Loop Returns reasons.
This allows you to define different mapping rules based on product categories.
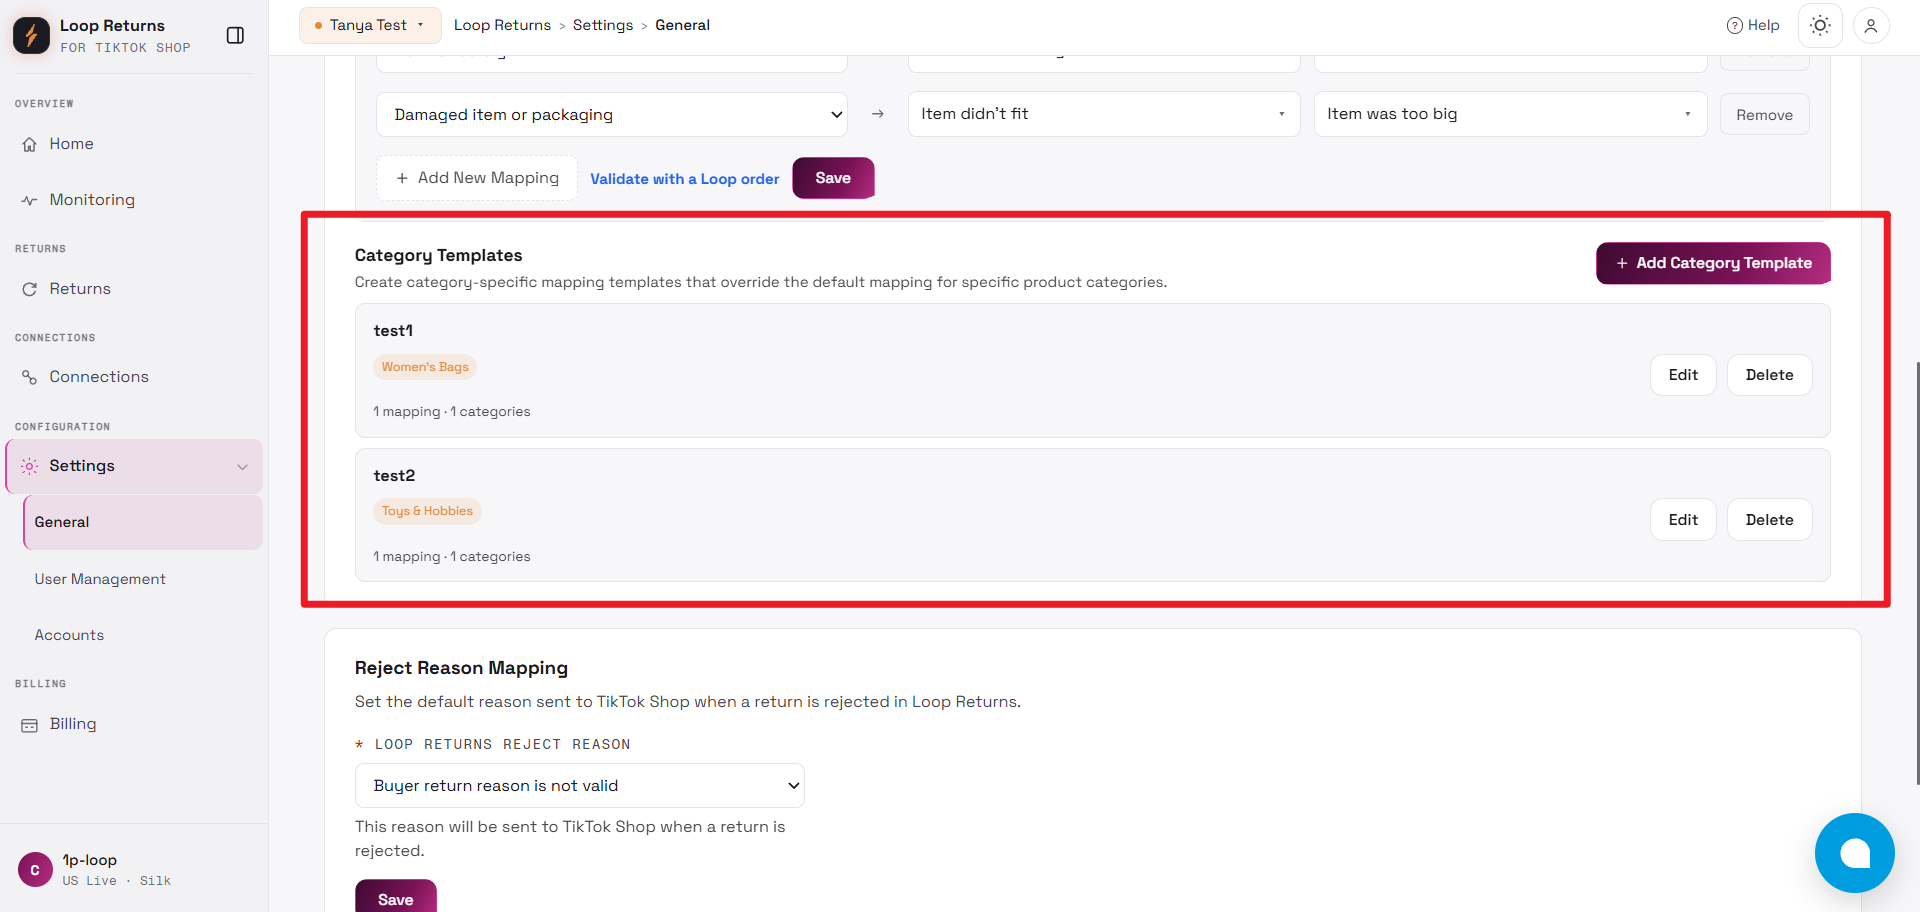
Each template includes:
-
Template Name
-
Selected Categories
-
Configured Reason Mappings
Template Rules
-
One template can be assigned to multiple categories.
-
Each category can only belong to one template at a time.
-
If a category is already assigned to one template, it cannot be selected in another template.
-
Template mappings follow the same mapping structure: TikTok Shop Reason → Loop Parent Reason → Loop Child Reason
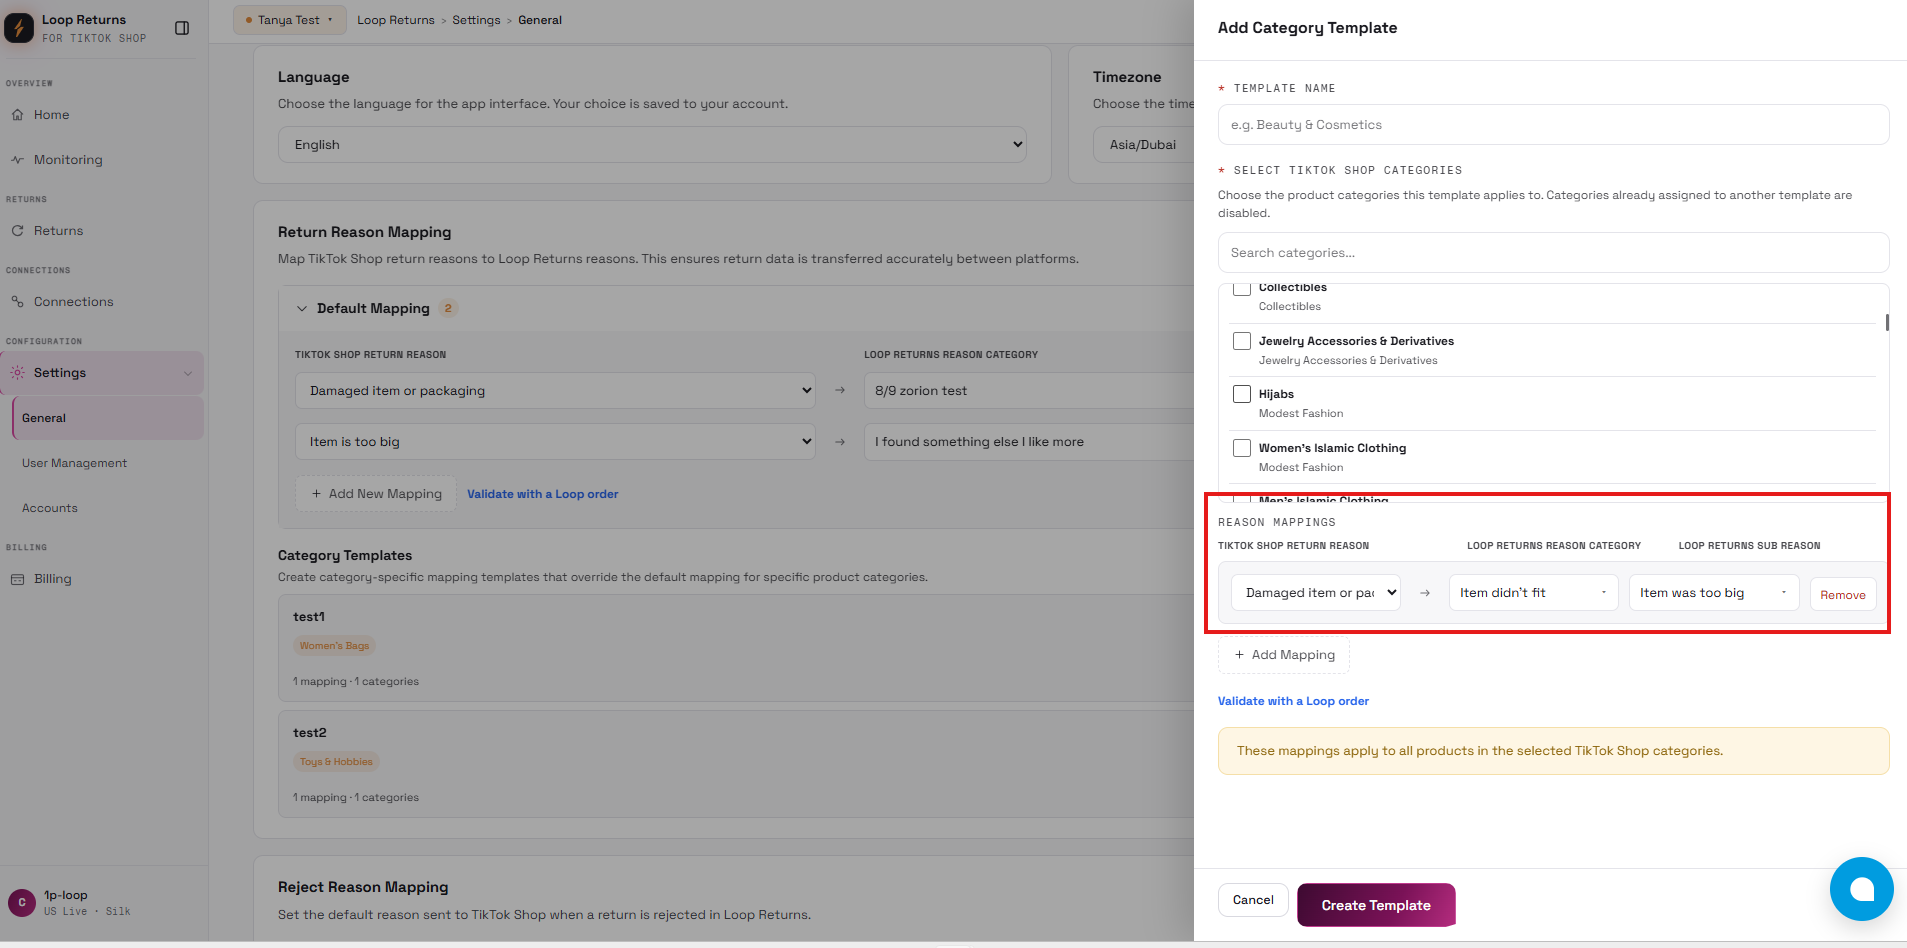
Creating a Template
To create a new template:
- Click** Add Category Template**
-
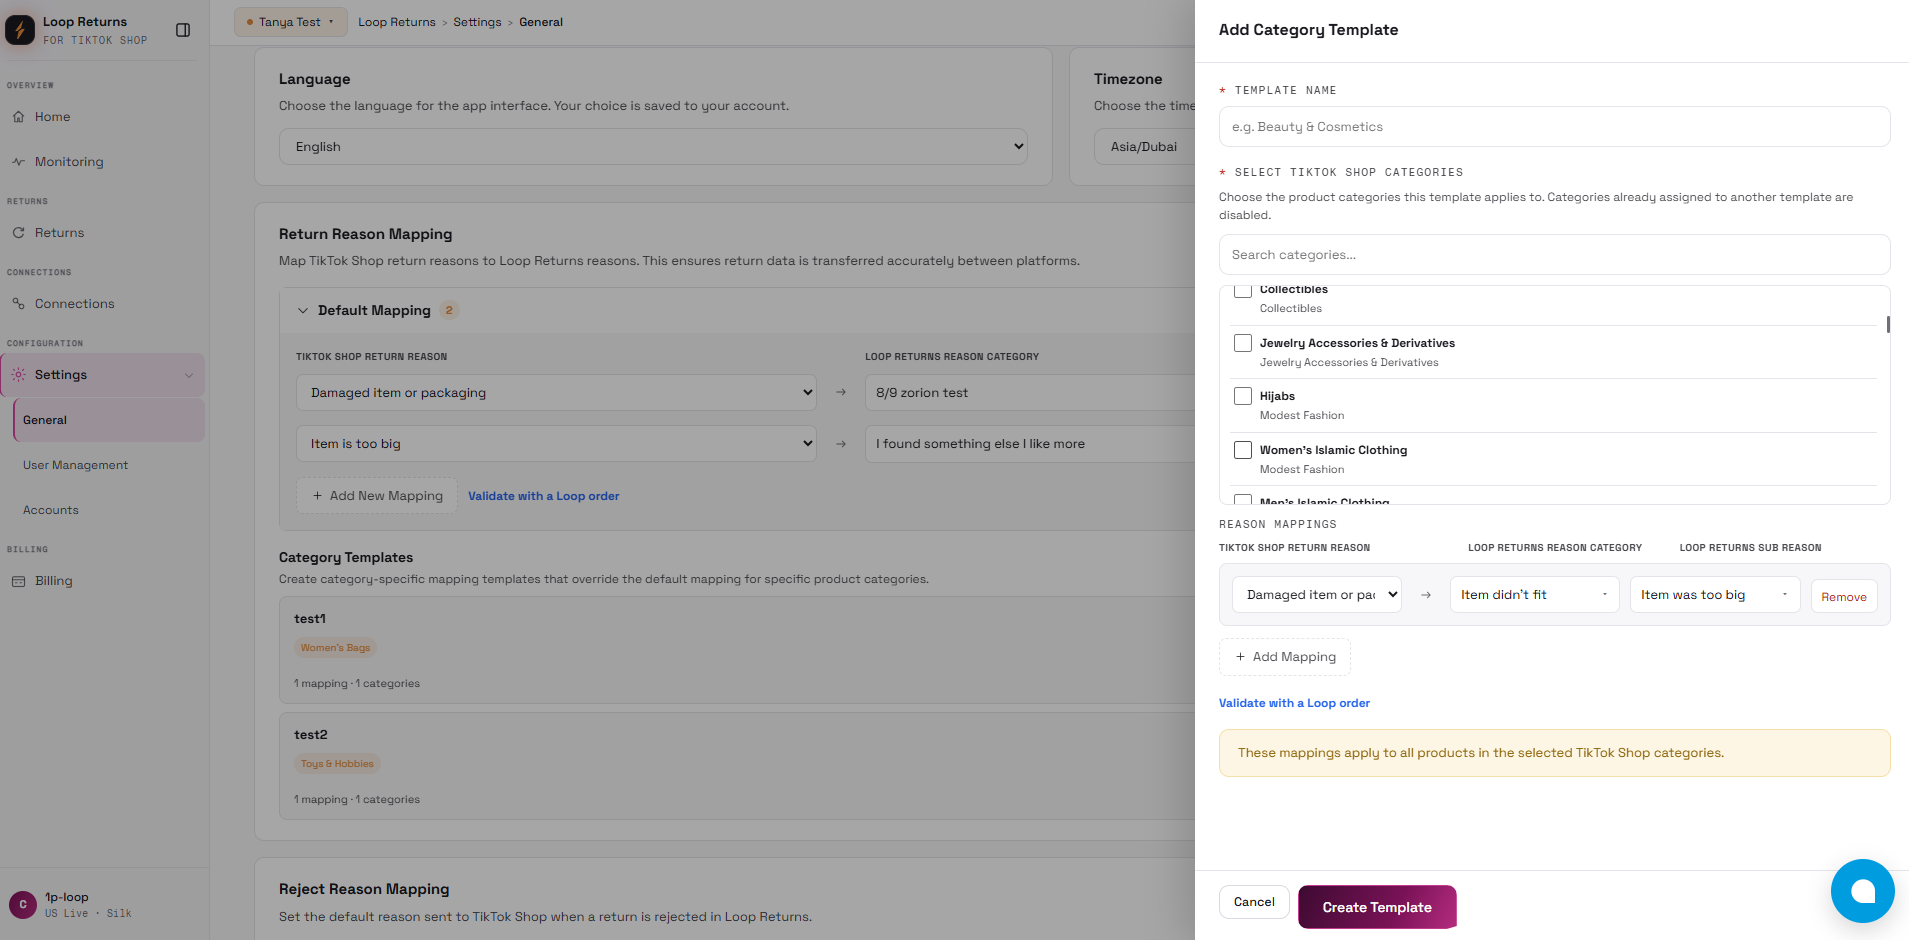
A Side Drawer will open from the right
-
Fill in the required configuration:
-
Template Name (required)
-
Categories (multi-select supported with search)
-
Reason Mappings
-
-
Click Save.
Selected categories will be shown as removable tags.
Editing a Template
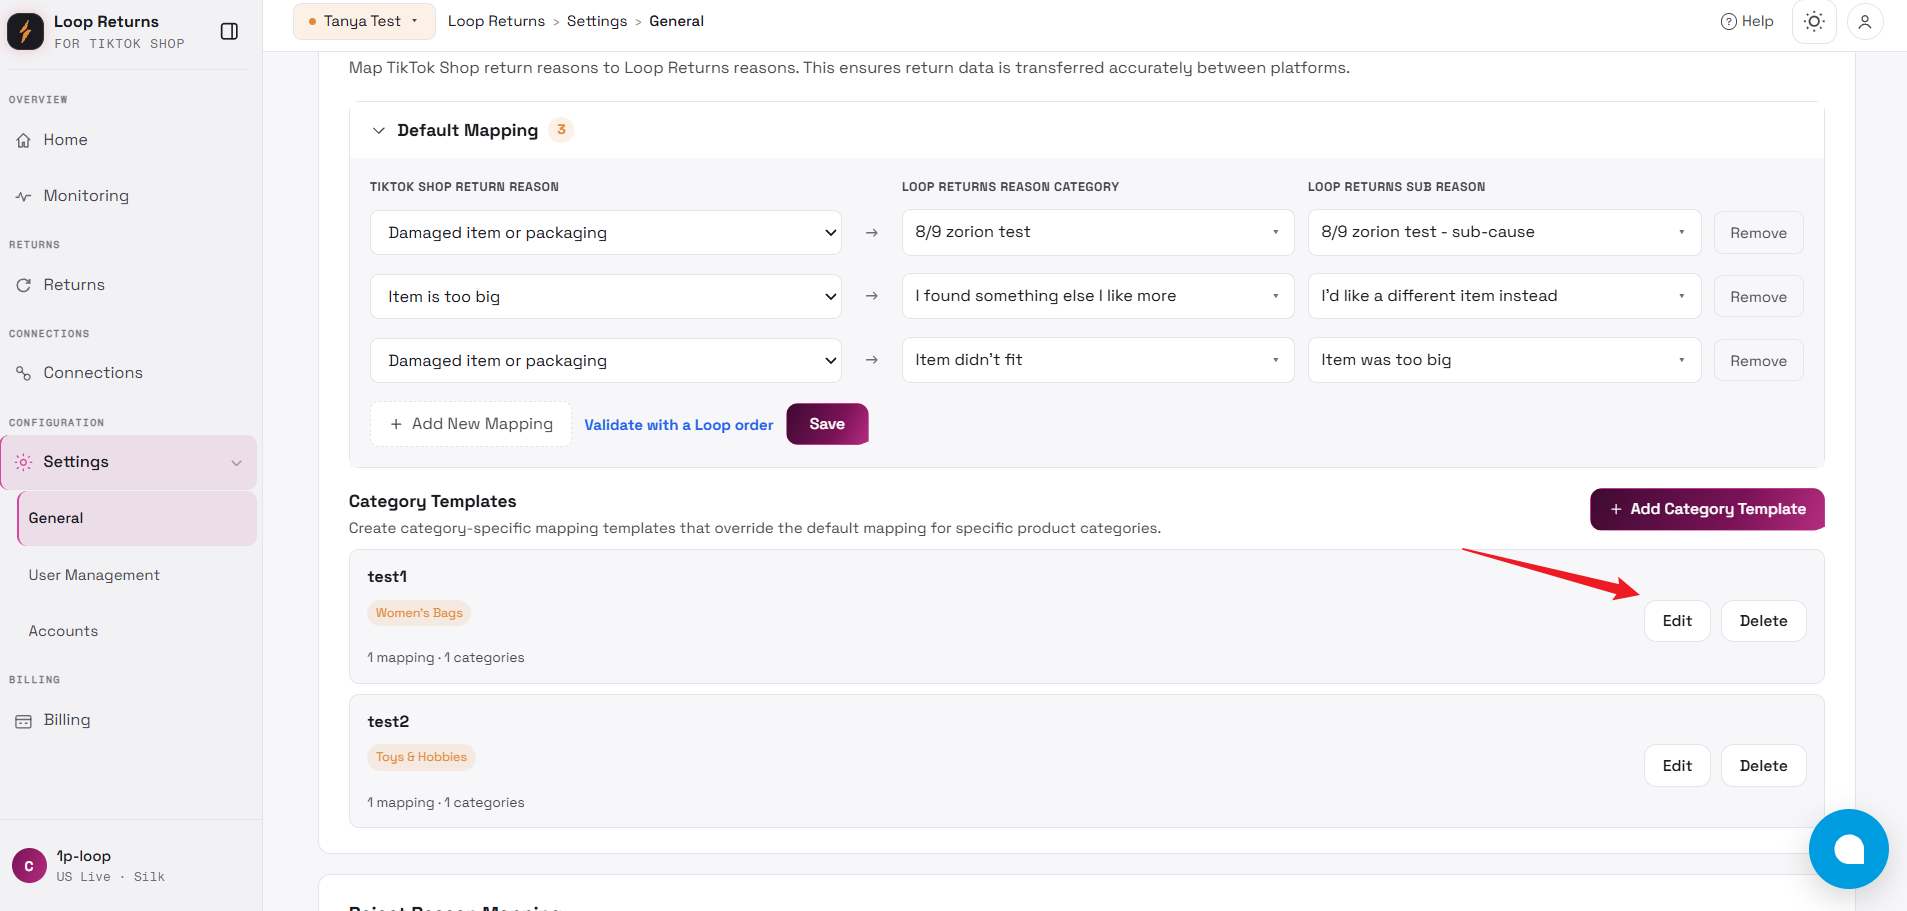
-
Click Edit icon on an existing template
-
The same Side Drawer will open with pre-filled data
-
You can update:
-
Template name
-
Categories
-
Reason mappings
-
Mapping Priority
When processing a return, the system applies reason mappings in the following order:
-
Category Template Mapping
-
Default Mapping
If no mapping is found, the return sync may fail or require manual review.
Reject Reason Configuration
Section titled “Reject Reason Configuration”-
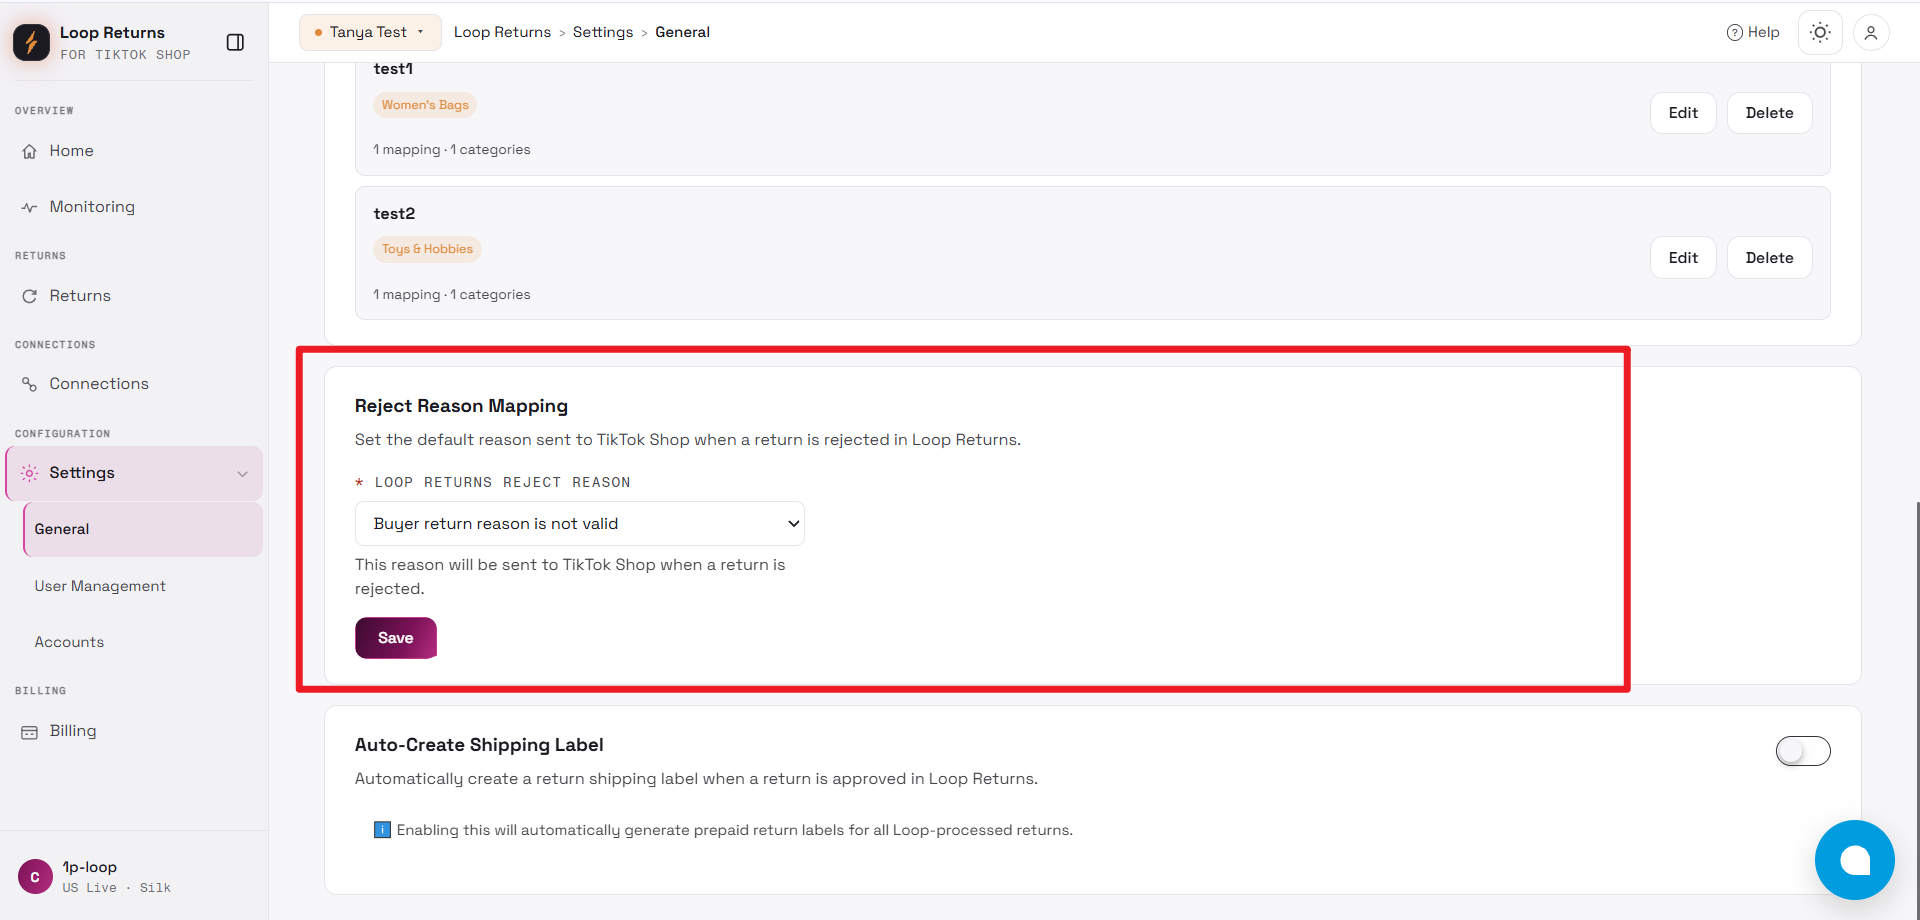
Loop Returns does not support reject reasons.
-
Configure one default TikTok Shop reject reason in the settings.
-
When a return is rejected in Loop Returns, this selected reason will automatically be sent to TikTok Shop.
Auto-Create Shipping Label
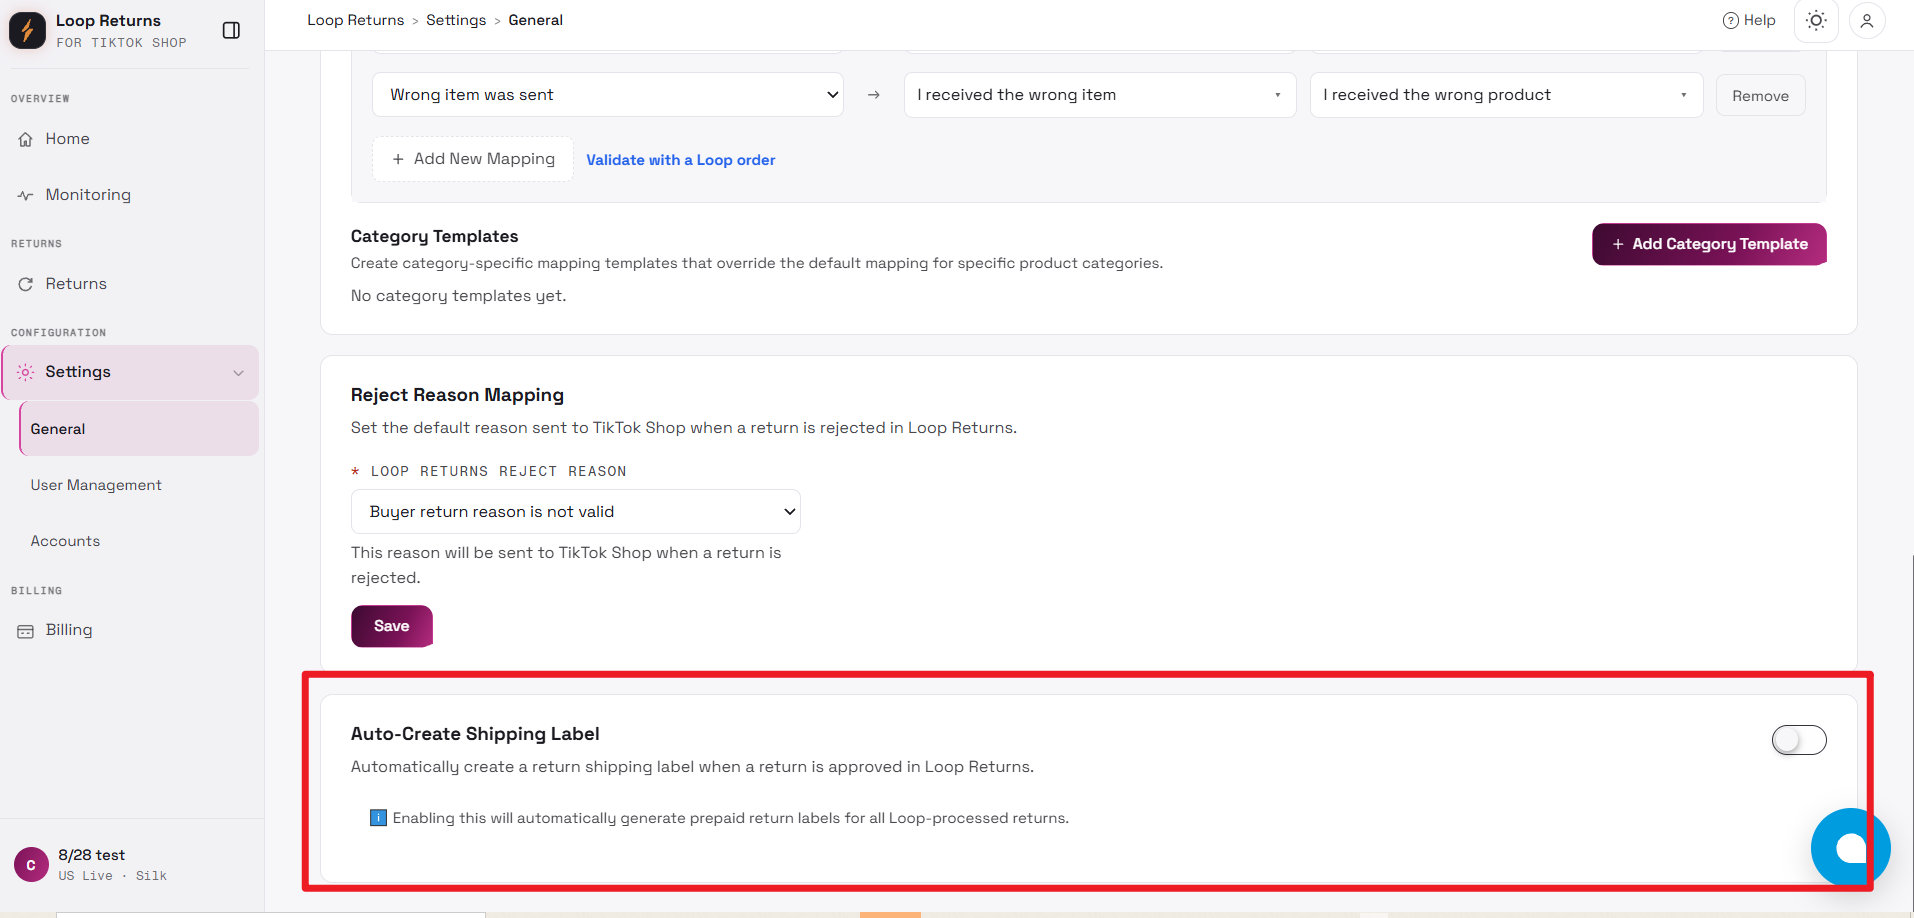
Section titled “Auto-Create Shipping Label”To enable the integration to automatically generate shipping labels for returns, please configure the settings as described below.
- To enable in Silk: In the Settings page, toggle ON the switch labeled “Auto-Create Shipping Label for TikTok Shop Returns”.
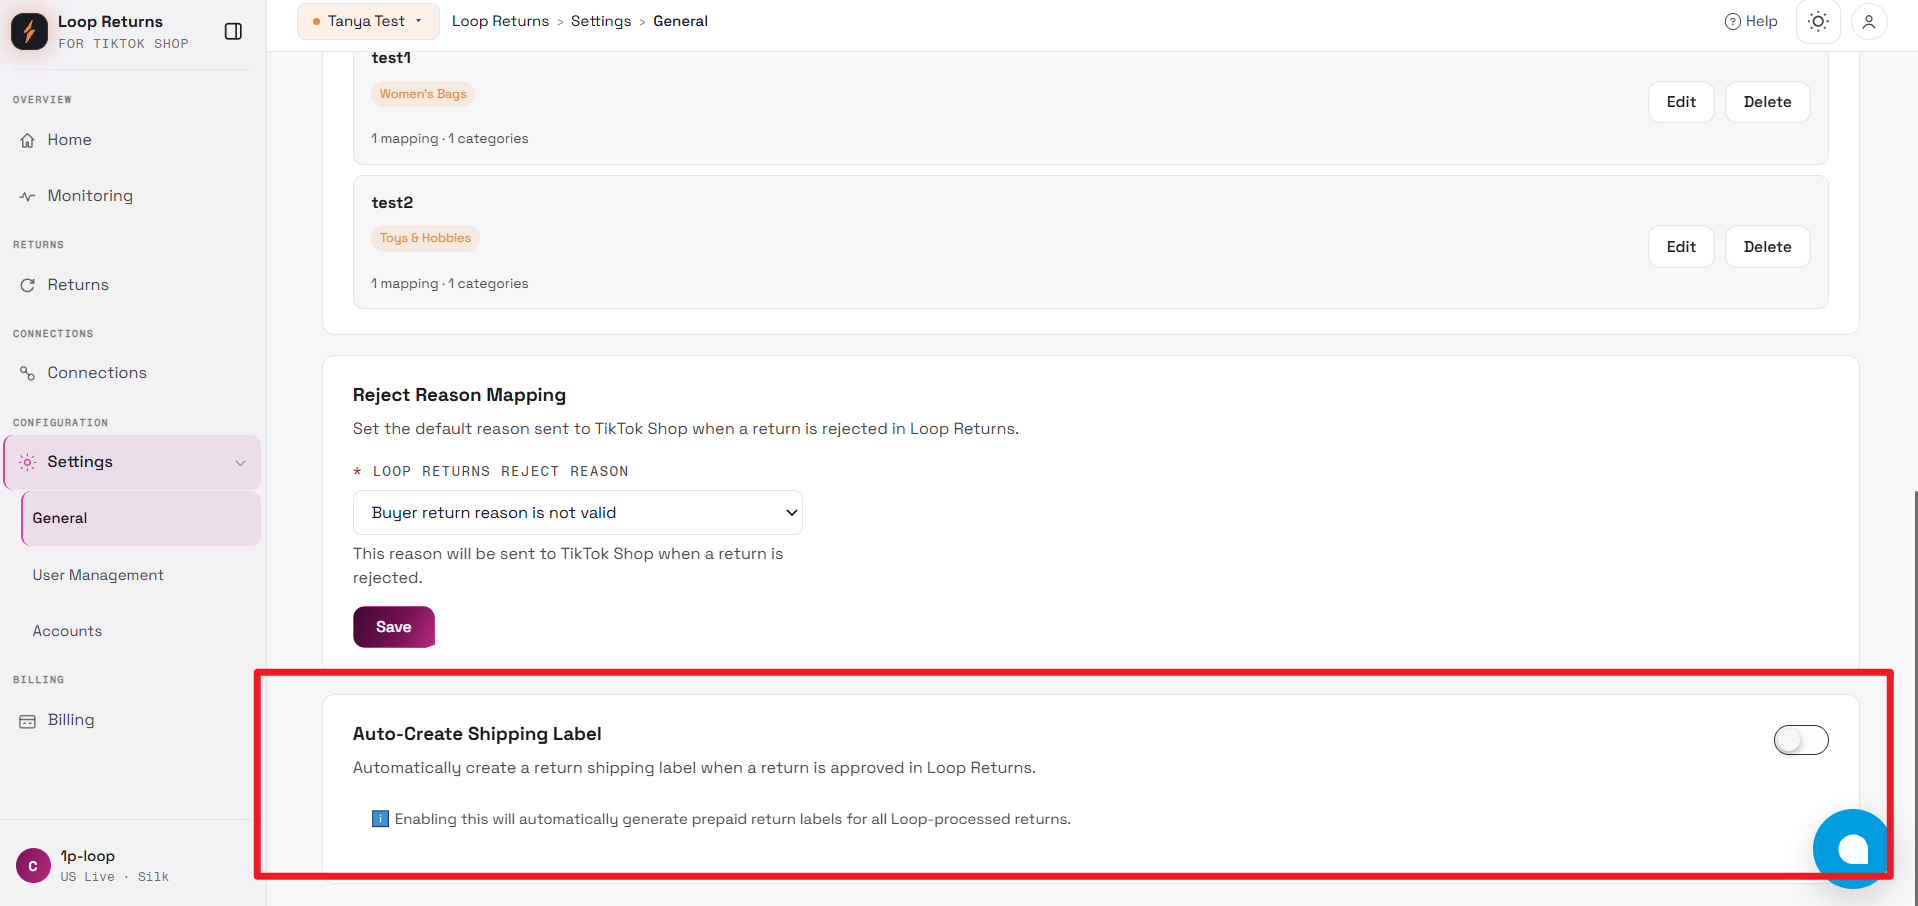
- A pop-up reminder will appear, prompting you to confirm that the “Generate Labels” option is also enabled in your Loop Returns return policy settings.
Only when both the Loop setting and this setting are enabled together will the automatic creation of shipping labels function properly.
Prerequisites (Must be completed before activation):
- Enable in Loop Returns: You must first enable the “Generate Labels” option within your Loop Returns account’s return policy settings. This is the foundational switch that allows any label generation within Loop.
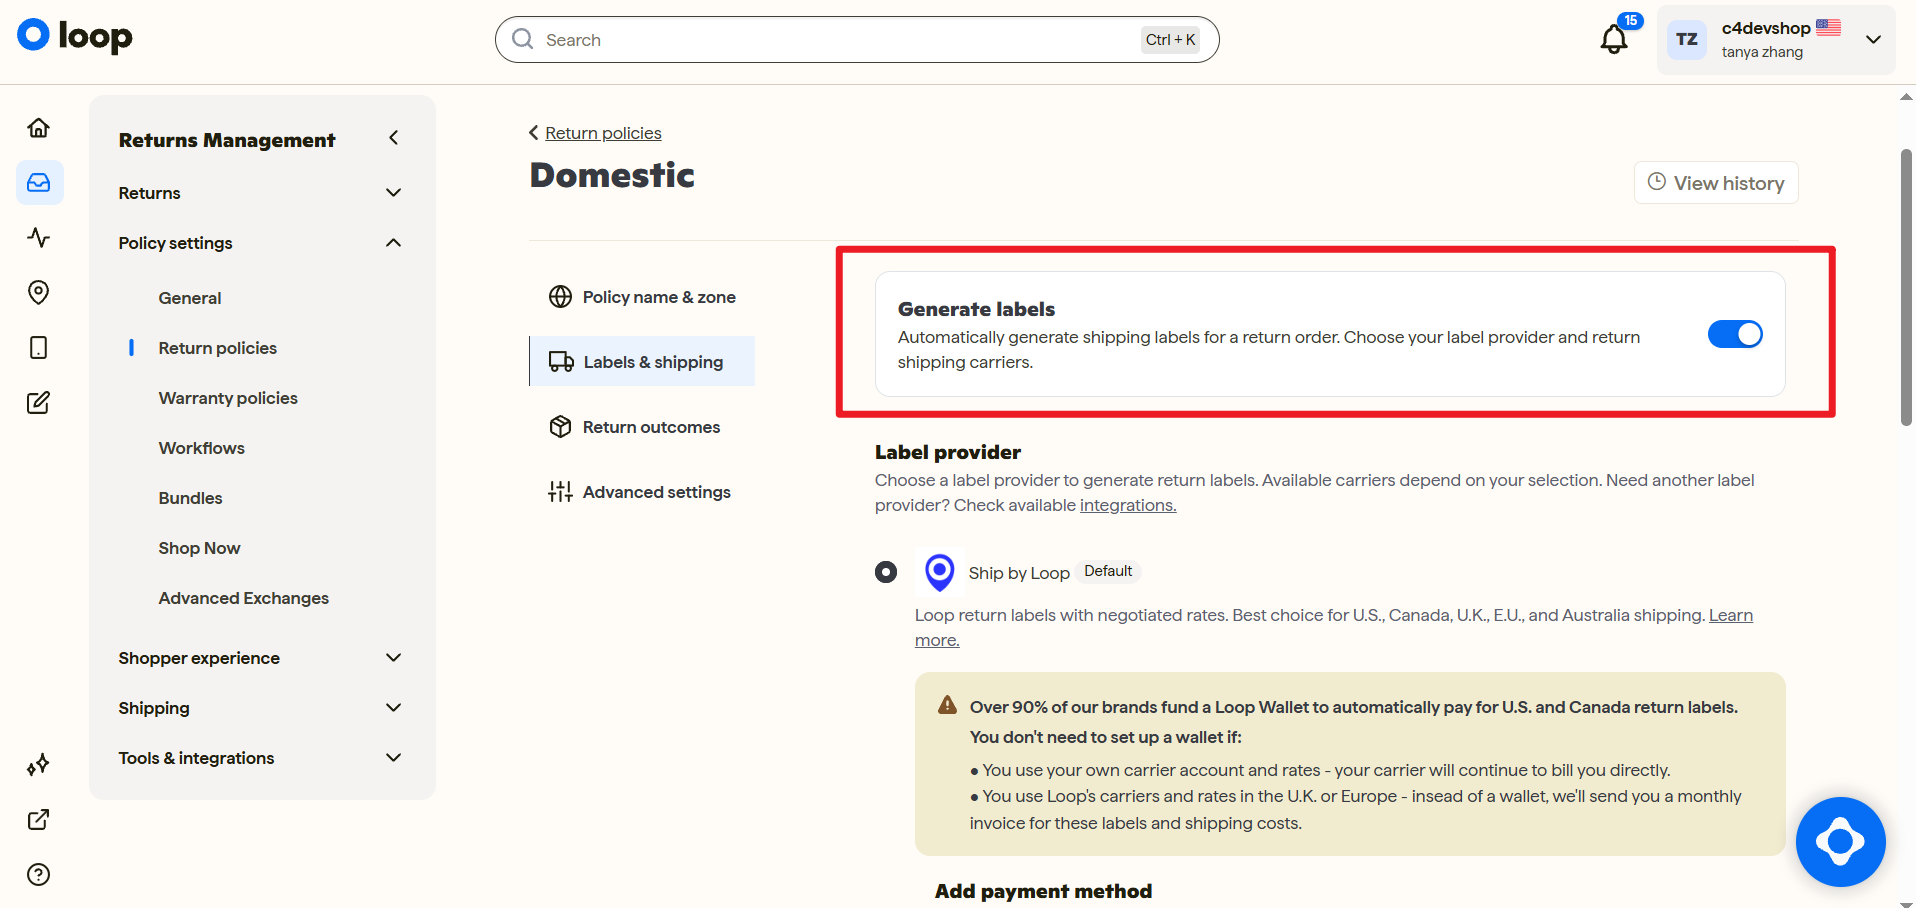
-
Configure Carriers: Ensure shipping carriers and label templates are fully configured in your Loop backend
-
Confirm the selected carrier is supported by TikTok Shop.
-
Understand that label creation in Loop Returns is not the same as confirmed TikTok Shop label upload. Use the return detail timeline or sync status to verify the final state.
Once enabled, the system will automatically generate a shipping label and tracking number for every new return requiring shipment and sync them to TikTok Shop.
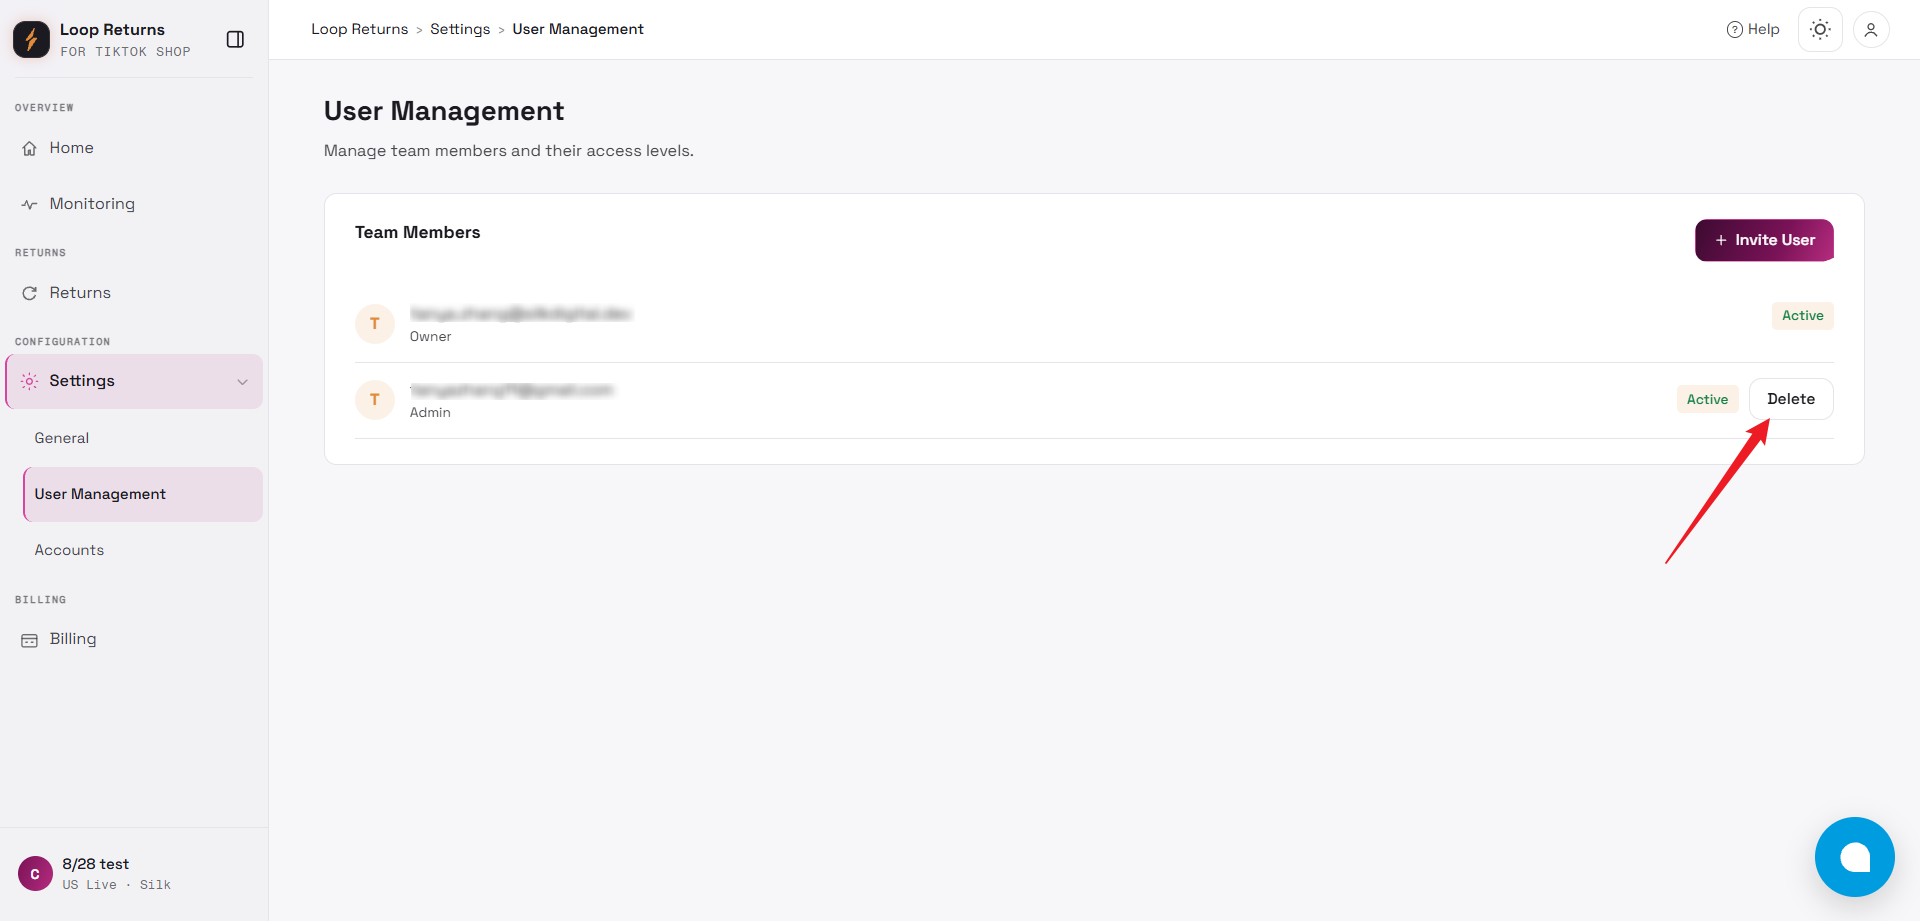
User Management
Section titled “User Management”The User Management section allows account owners to manage team access within the app.
Account Owner
The primary account owner is displayed at the top of the page.
-
The Owner role is fixed and cannot be modified.
-
The owner account cannot be deleted.
-
Owner information is read-only.
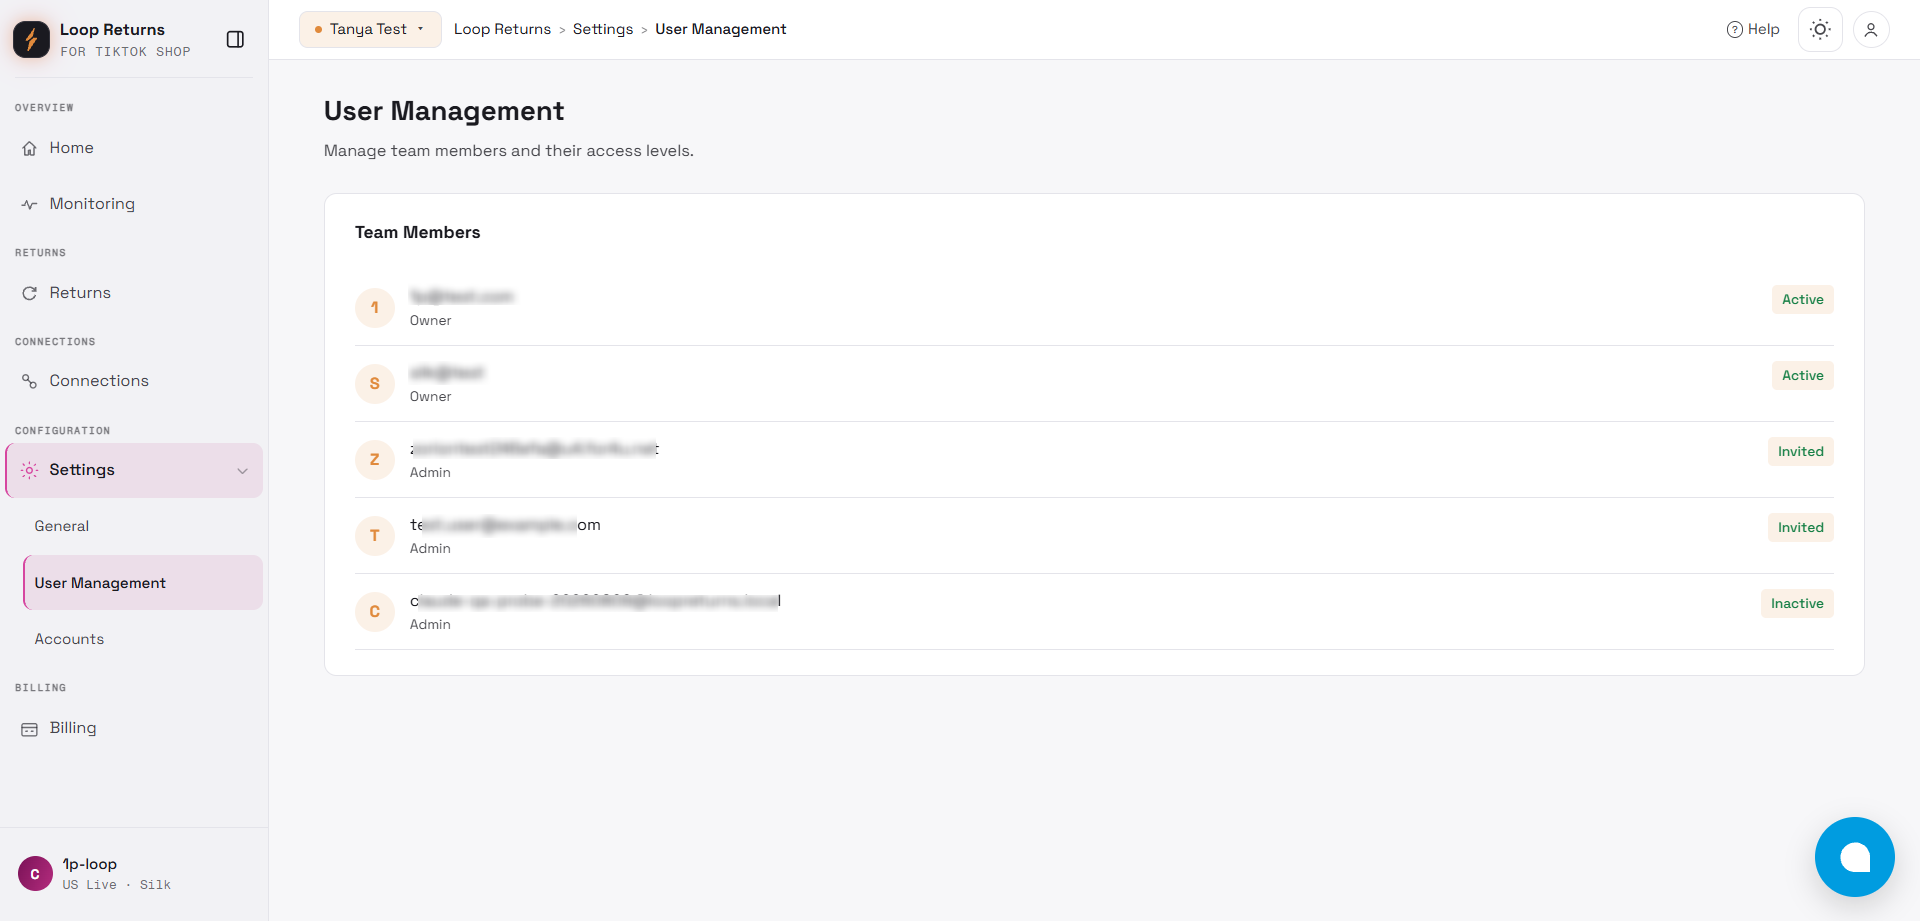
**Team Members **
All invited users are listed in a table with the following fields:
-
User Name
-
Email
-
Role
-
Actions
A search bar is available to quickly locate users by name or email.
Add New User
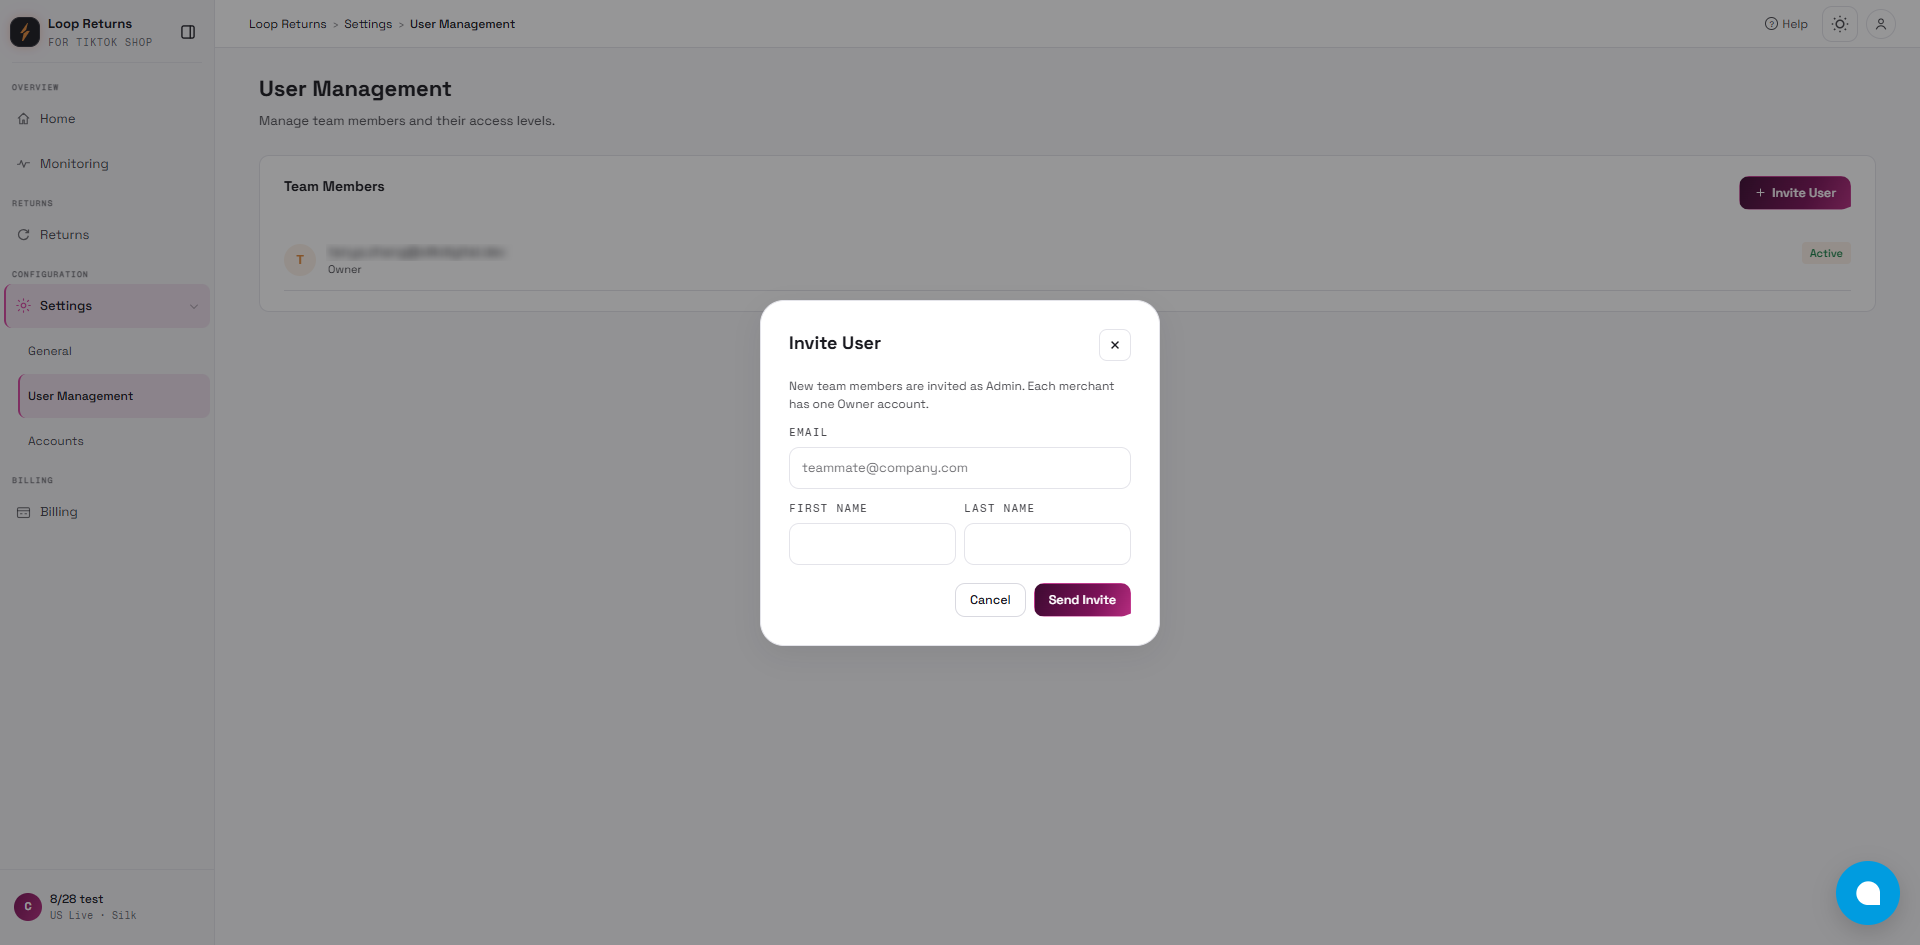
To invite a team member:
-
Click + Invite User.
-
Enter the user’s First Name, Last Name, and Email.
-
Click Add User.
An invitation email will be sent to the provided address. The user must accept the invitation to gain access.
Remove User:
To remove access:
-
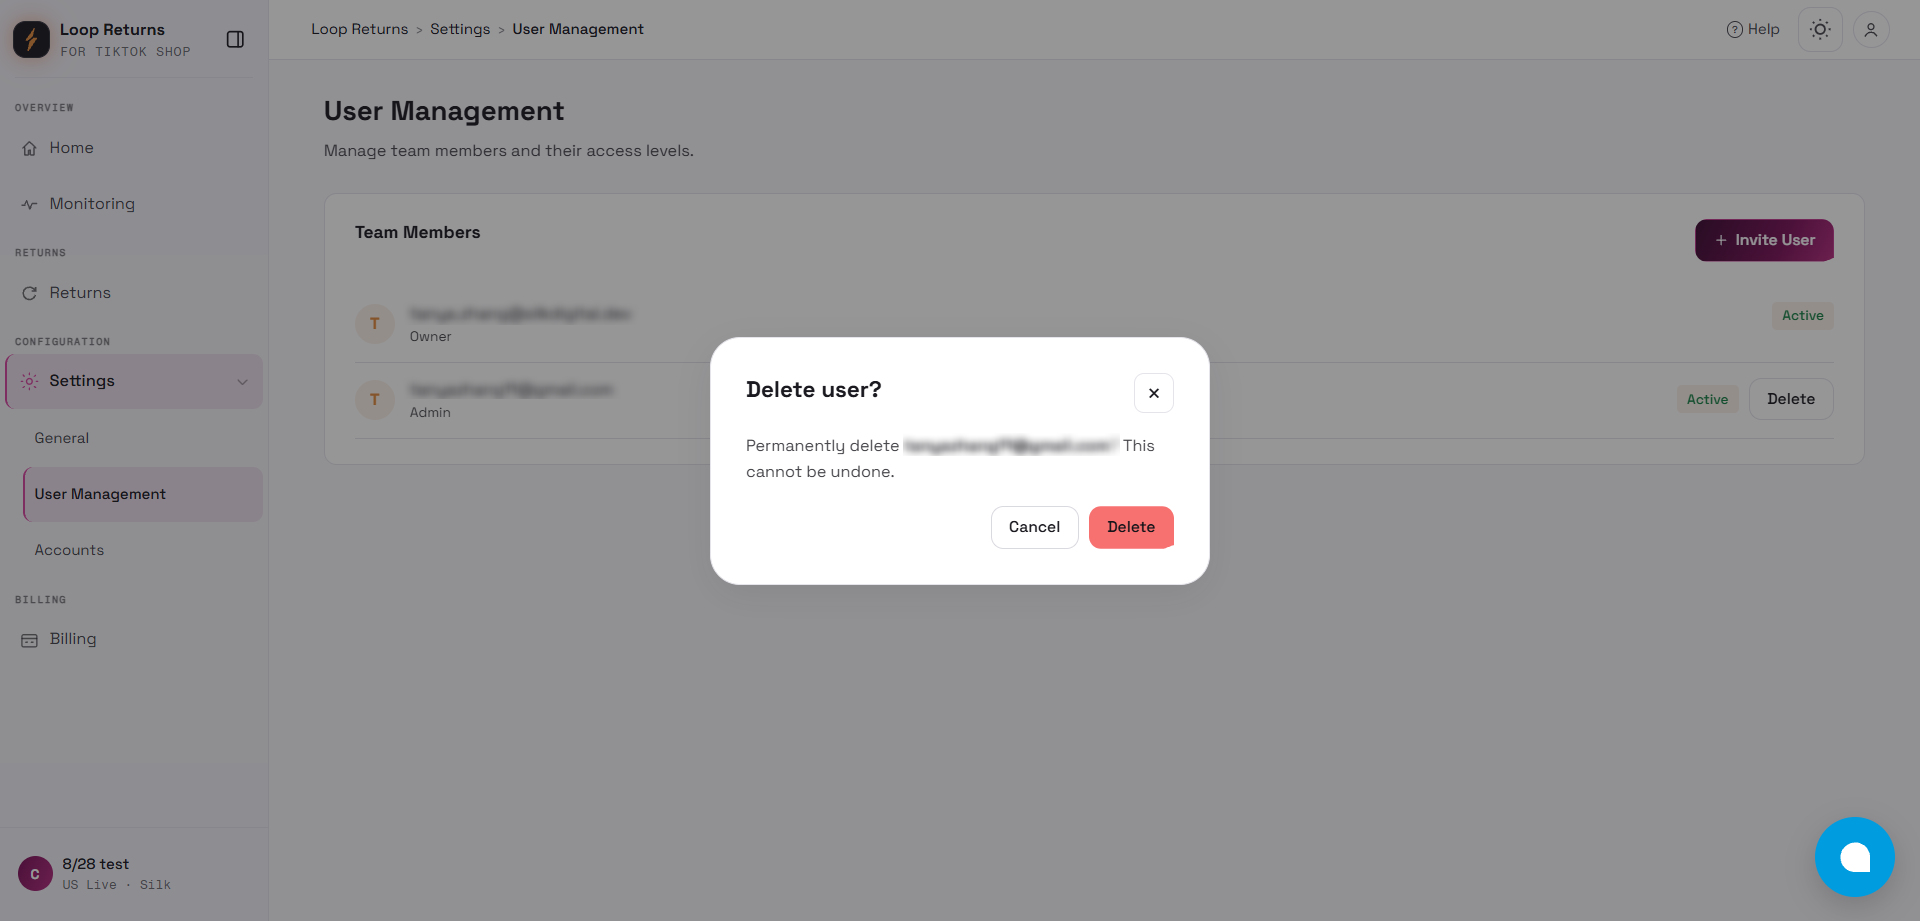
Click the Delete icon.
-
Confirm the action in the dialog.
Deleting a user permanently removes their access. This action cannot be undone.
Account Management
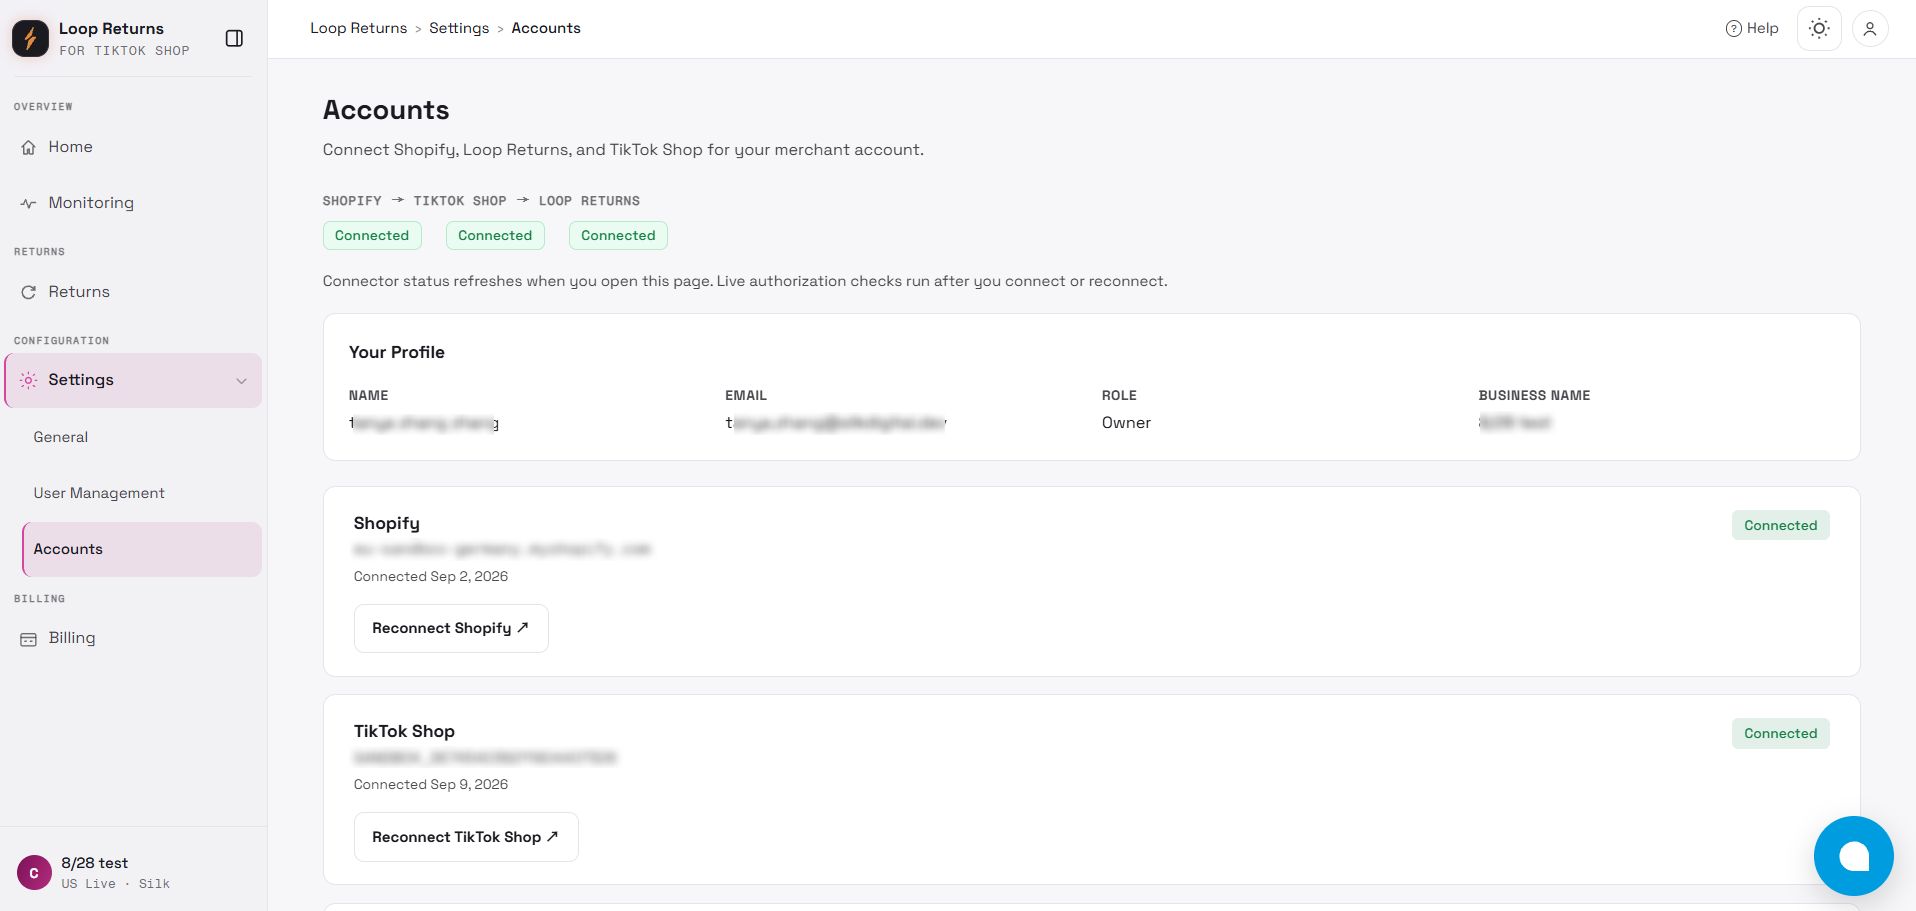
Section titled “Account Management”The Accounts page allows you to manage your connected platforms and account profile in one centralized location.
Connected Platforms
The following integrations are displayed:
-
Shopify
-
Loop Returns
-
TikTok Shop
Each platform card shows:
-
Platform name and icon
-
Current connection status
-
Last connection timestamp
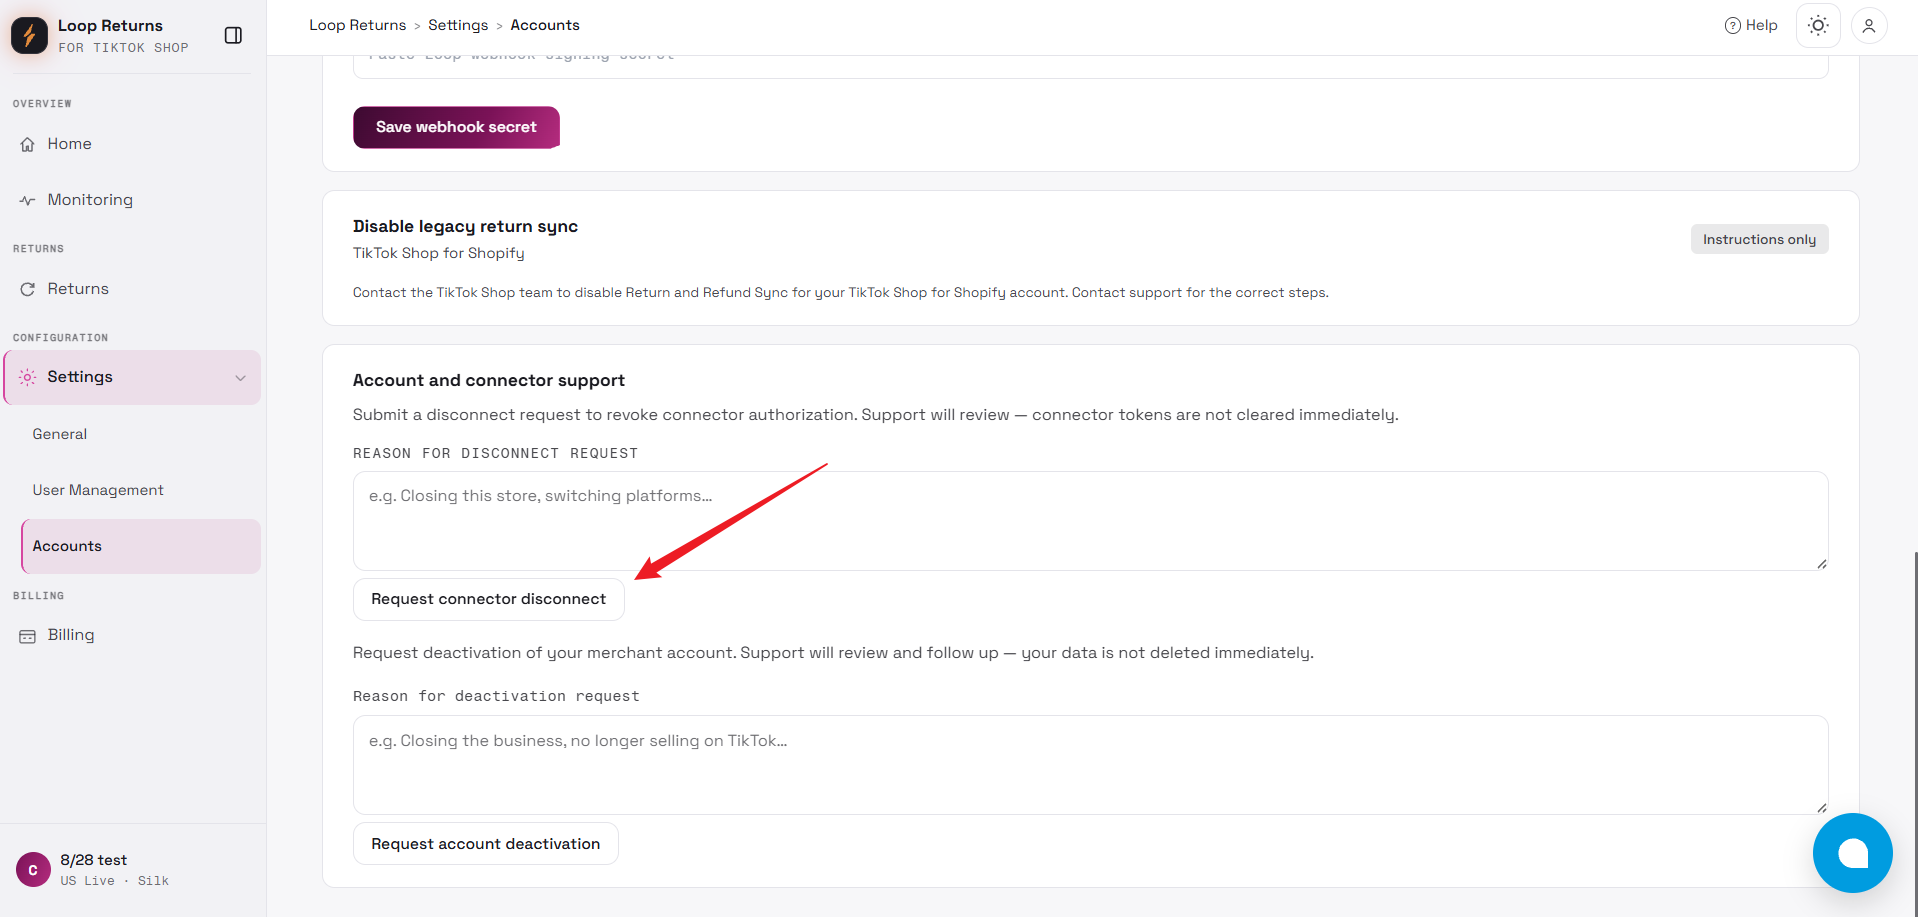
Disconnect All
The Request connector disconnect button does not immediately revoke platform authorizations.
When selected:
-
A confirmation dialog will appear explaining the impact of disconnection.
-
You will be required to submit a disconnection request.
-
Our support team will review and process the request on your behalf.
-
Once completed, you will receive a confirmation email notification.
Please note:
-
Data synchronization will continue until the disconnection is officially processed.
-
After disconnection is completed, all platform authorizations will be removed and return synchronization will stop.
-
If you wish to reconnect in the future, you will need to complete the authorization process again.
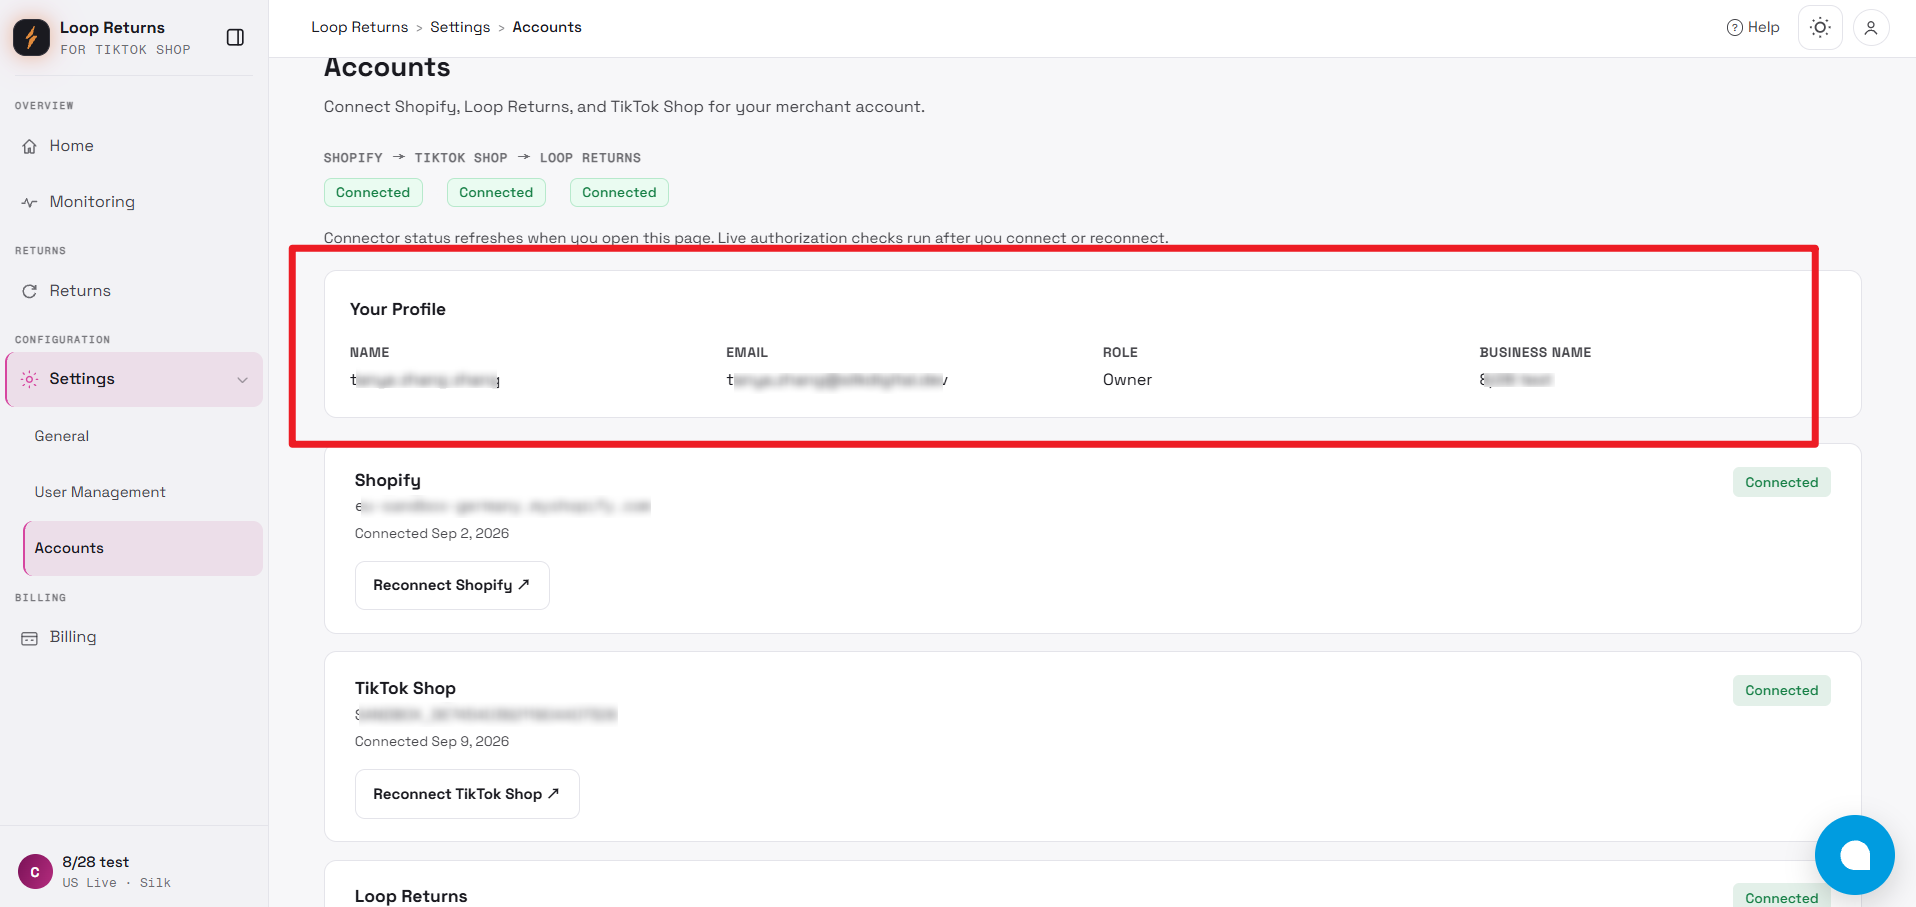
Profile Information
The Profile section displays:
-
Email
-
Name
-
Role
-
Business Name
This information is read-only.
Note: Profile information cannot be edited here. To update your business name or contact details, please contact support.
Delete Merchant Account
Only the Store Owner has permission to request merchant account deletion.
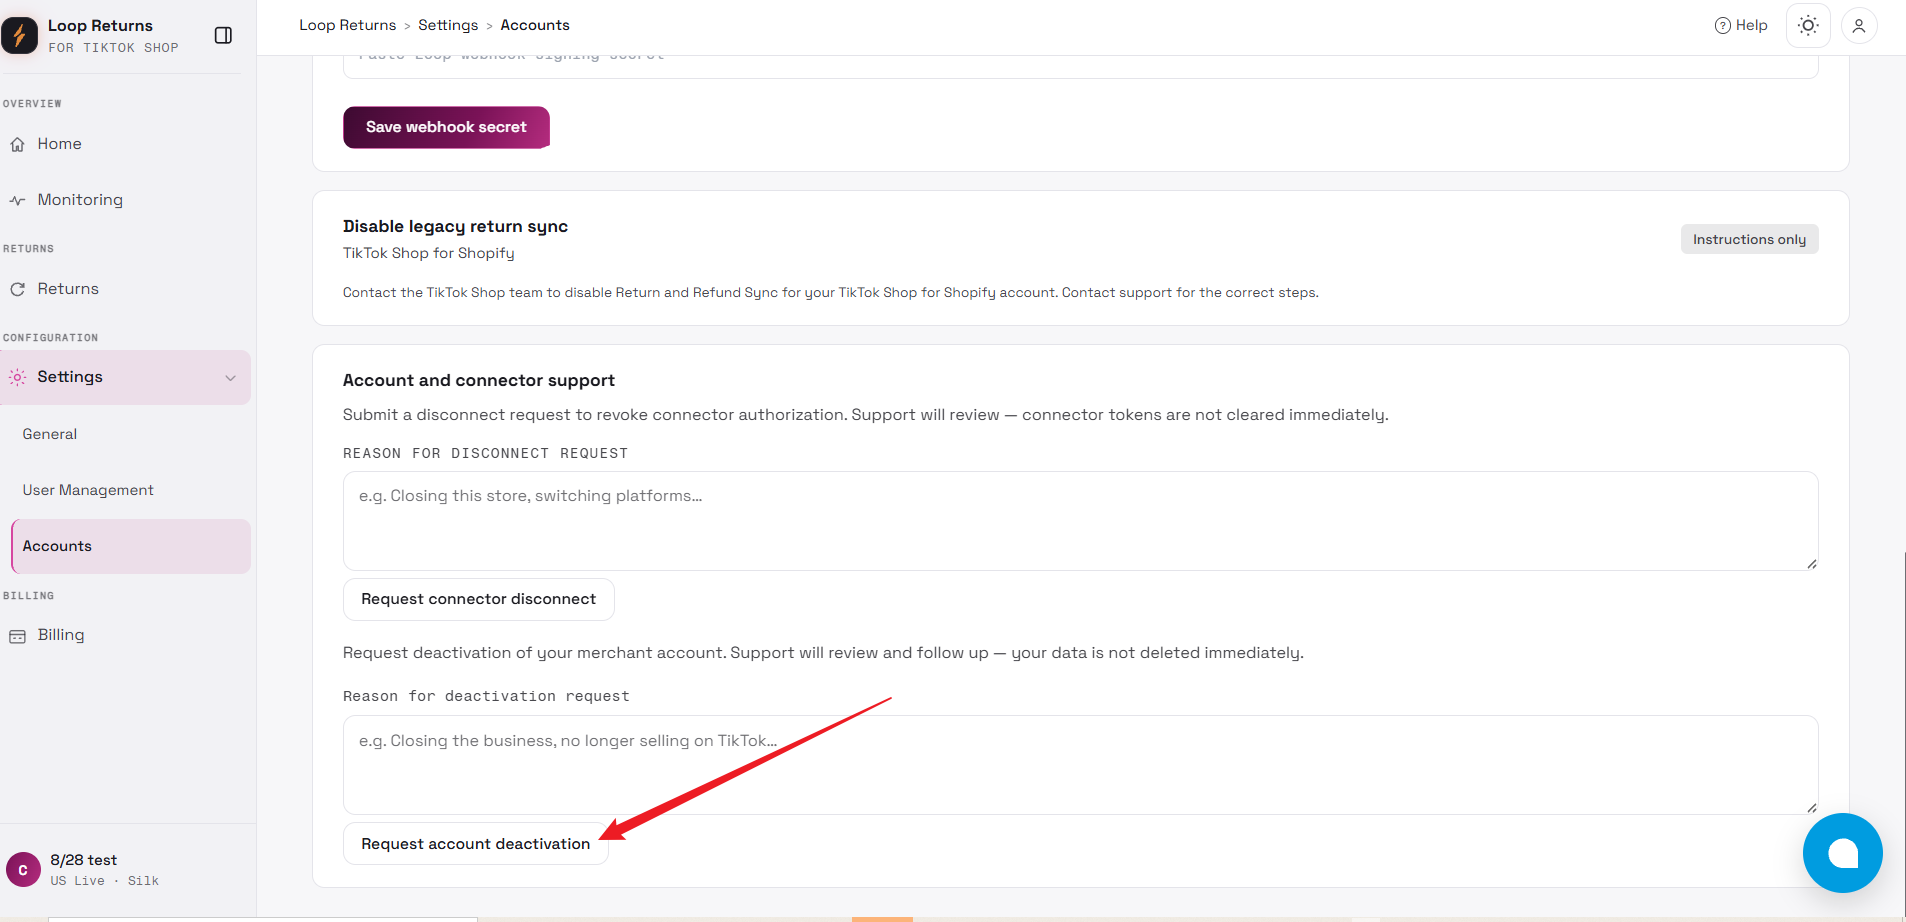
The Request account deactivation option does not immediately remove your account.
When selected:
-
A confirmation dialog will appear outlining the impact of account deletion.
-
The Store Owner will be required to submit a deletion request, including the reason for deletion.
-
Our support team will review and process the request manually.
-
Once completed, a confirmation email will be sent to the registered account email address.
Please note:
-
The merchant account will be deactivated and cannot be accessed after deletion is processed.
-
All platform authorizations associated with the account will be removed.
-
You will no longer be able to log in to the system.
If you need assistance during this process, please contact Silk Support.
Billing Page Features
Section titled “Billing Page Features”Navigation: Sidebar → Billing
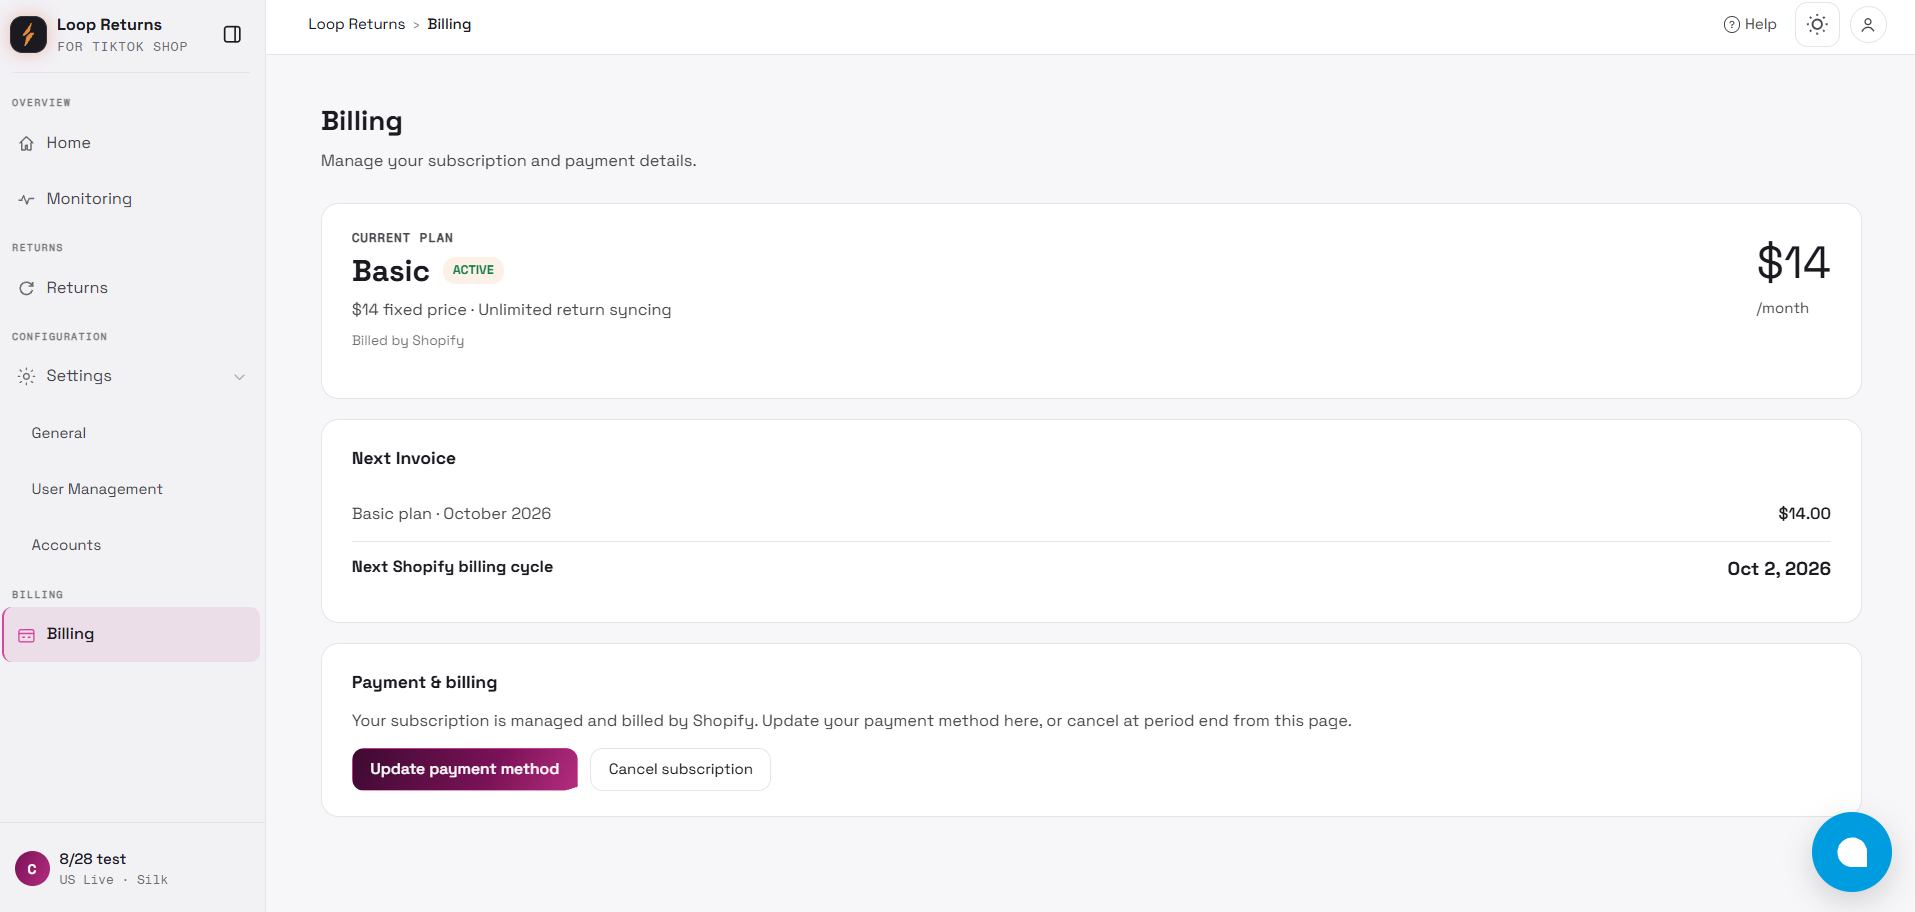
The Billing page is your central hub for managing your subscription.The table below provides a clear overview of the access rights for each possible subscription status.
| Status | Description | Page Access |
|---|---|---|
| Inactive | Never subscribed or subscription process not completed. | Can access pages, but sees an empty panel with no data; all features are disabled. |
| Not Paid (ACH Pending) | ACH bank transfer processing (typically 1-3 business days). Features will be automatically unlocked upon successful payment. | Can access pages, but features are locked; can only view payment guidance information. |
| Payment Failed | Subscription payment failed. Please retry the payment process to activate features. | Can access pages, but features are locked; interface displays payment failure alerts and guidance. |
| Active | Current subscription is valid and active. | Full access to all pages, features, and data. |
| Grace Period | 30-day grace period after subscription expiry. | Maintains full access to all pages, features, and data during the grace period. |
| Canceled | User-initiated cancellation; subscription remains active until the end of the current billing cycle. | Retains full access to all pages, features, and data until the billing cycle ends. |
| Expired | Grace period ended without renewal | Can view pages and historical data (up to the expiry date), but all operational features are disabled. |
Subscription Information Display
Section titled “Subscription Information Display”The page can display:
-
Current subscription status
-
Billing provider
-
Plan name
-
Billing period
-
Next billing date or expiration date
-
Grace period or expiration warnings
-
Read-only or blocked operation guidance
Subscription Management Actions
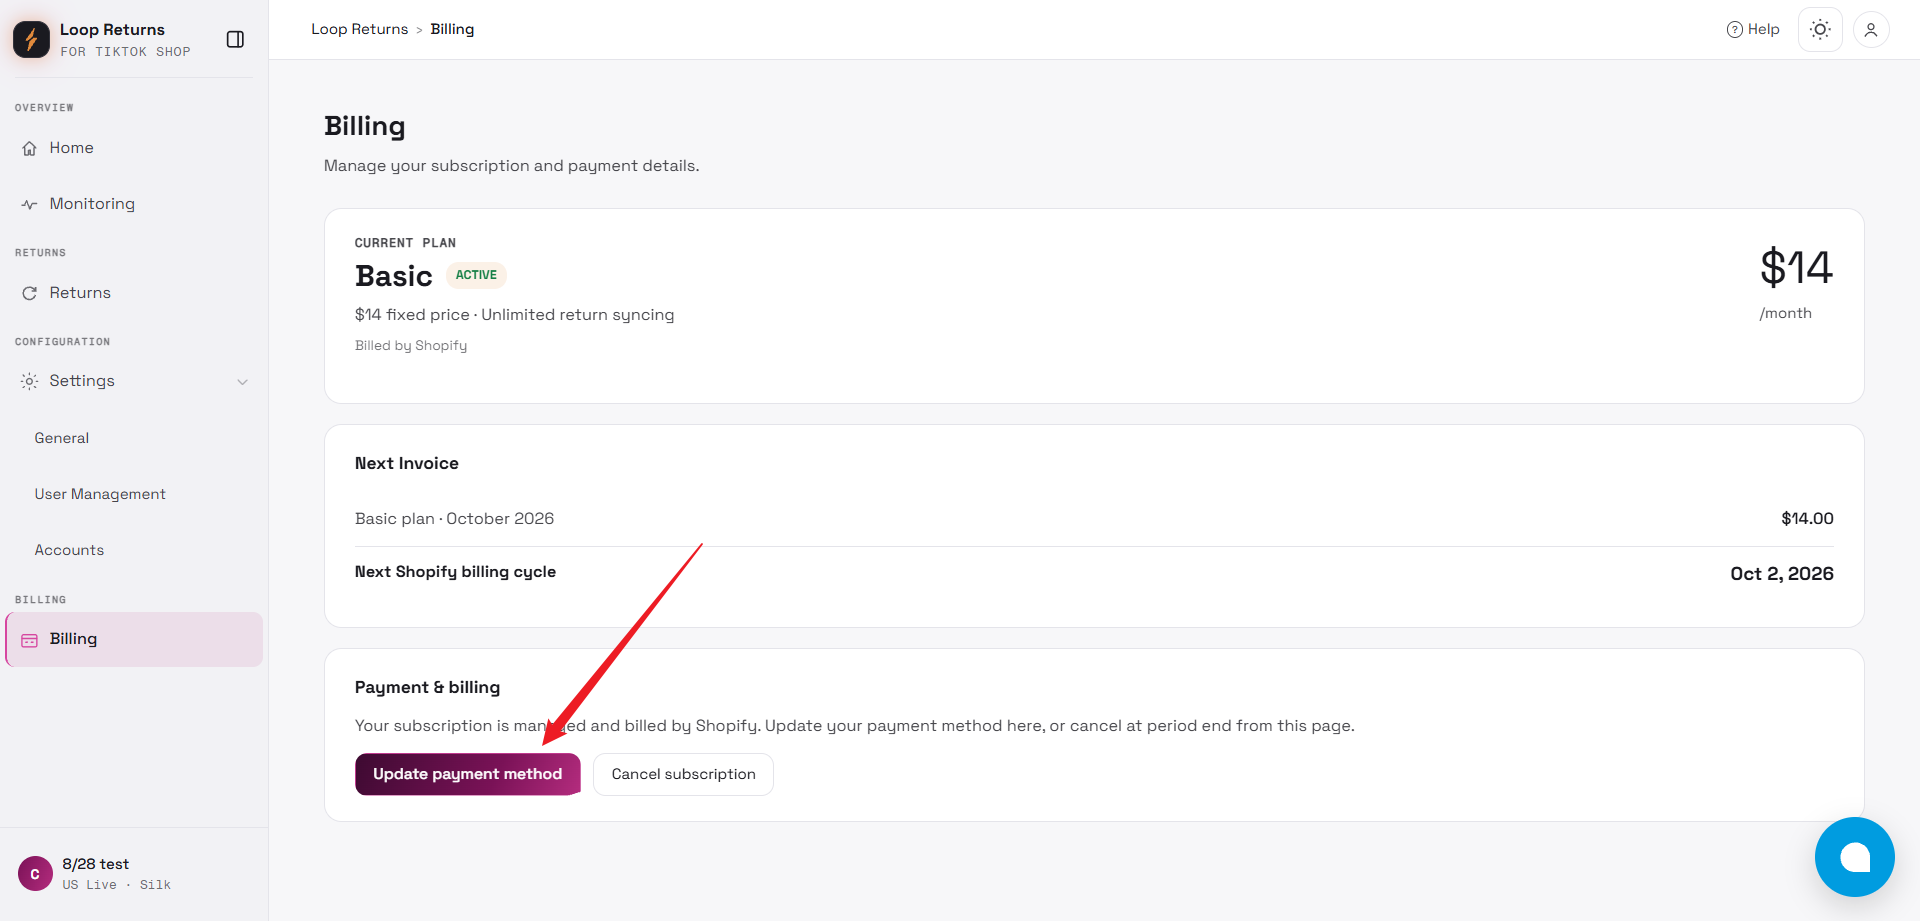
Section titled “Subscription Management Actions”Update Payment Method:
- Click “Update Payment Method” to securely update your card or bank details via the Stripe portal.
Cancel Subscription:
- Click “Cancel Subscription”. A confirmation pop-up will appear, clearly stating the date when your service will end.
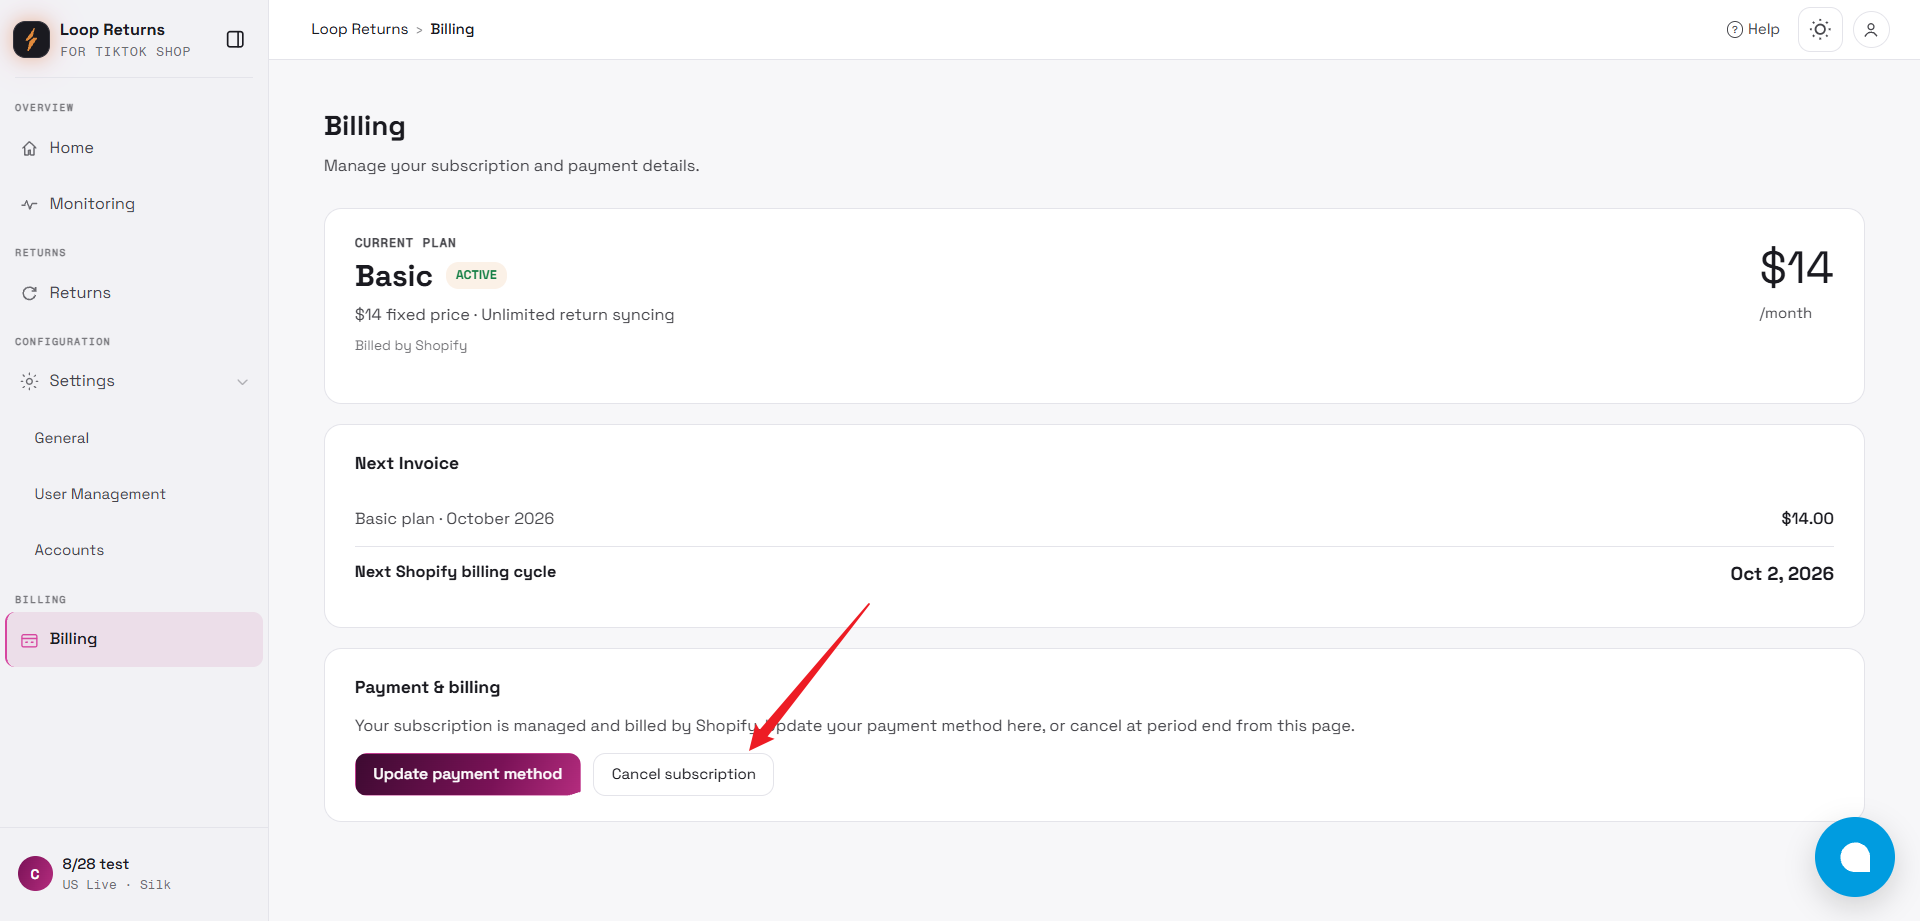
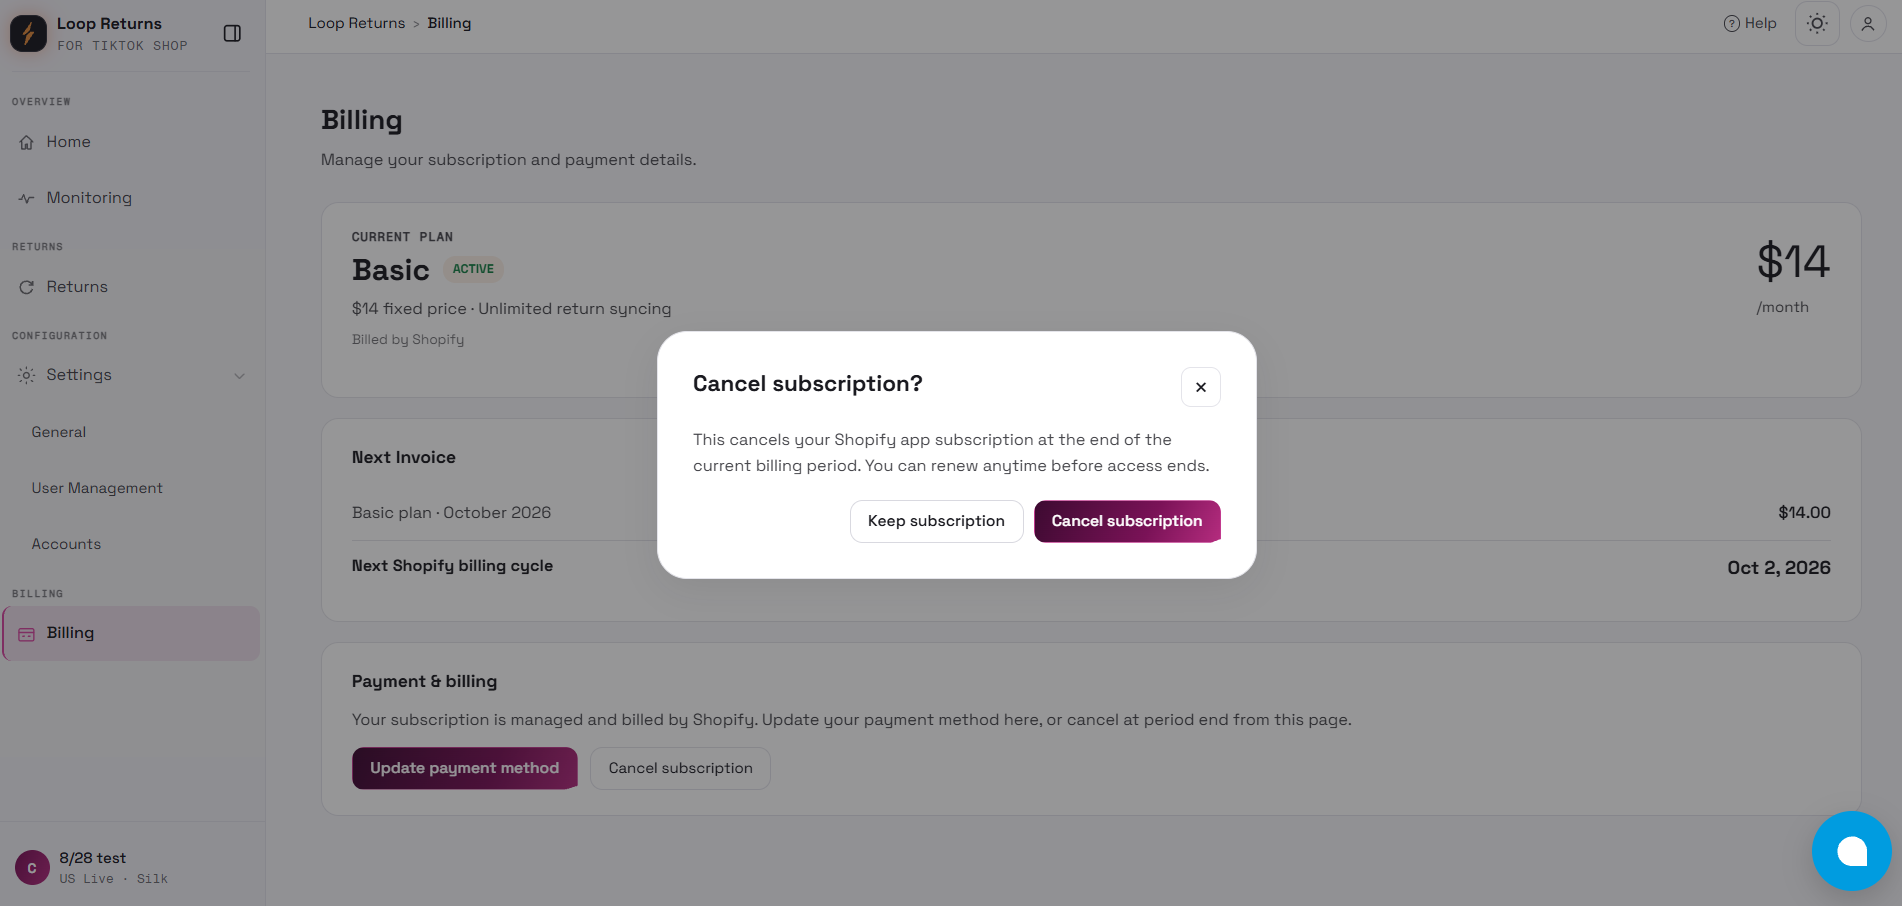
After cancellation, your status changes to Canceled. You retain full access until the pre-paid billing cycle ends.Once the billing cycle ends, access transitions directly to Expired (read-only). On the cycle end date, access reverts directly to the Expired(read-only) state.
Reactivating an Expired Subscription
Section titled “Reactivating an Expired Subscription”If your subscription has expired, you can restart it at any time.
Process: Use the original subscription entrance to go through the Stripe Checkout process again. Upon successful payment, the status will be updated to Active.
Important Notes on Status & Notifications
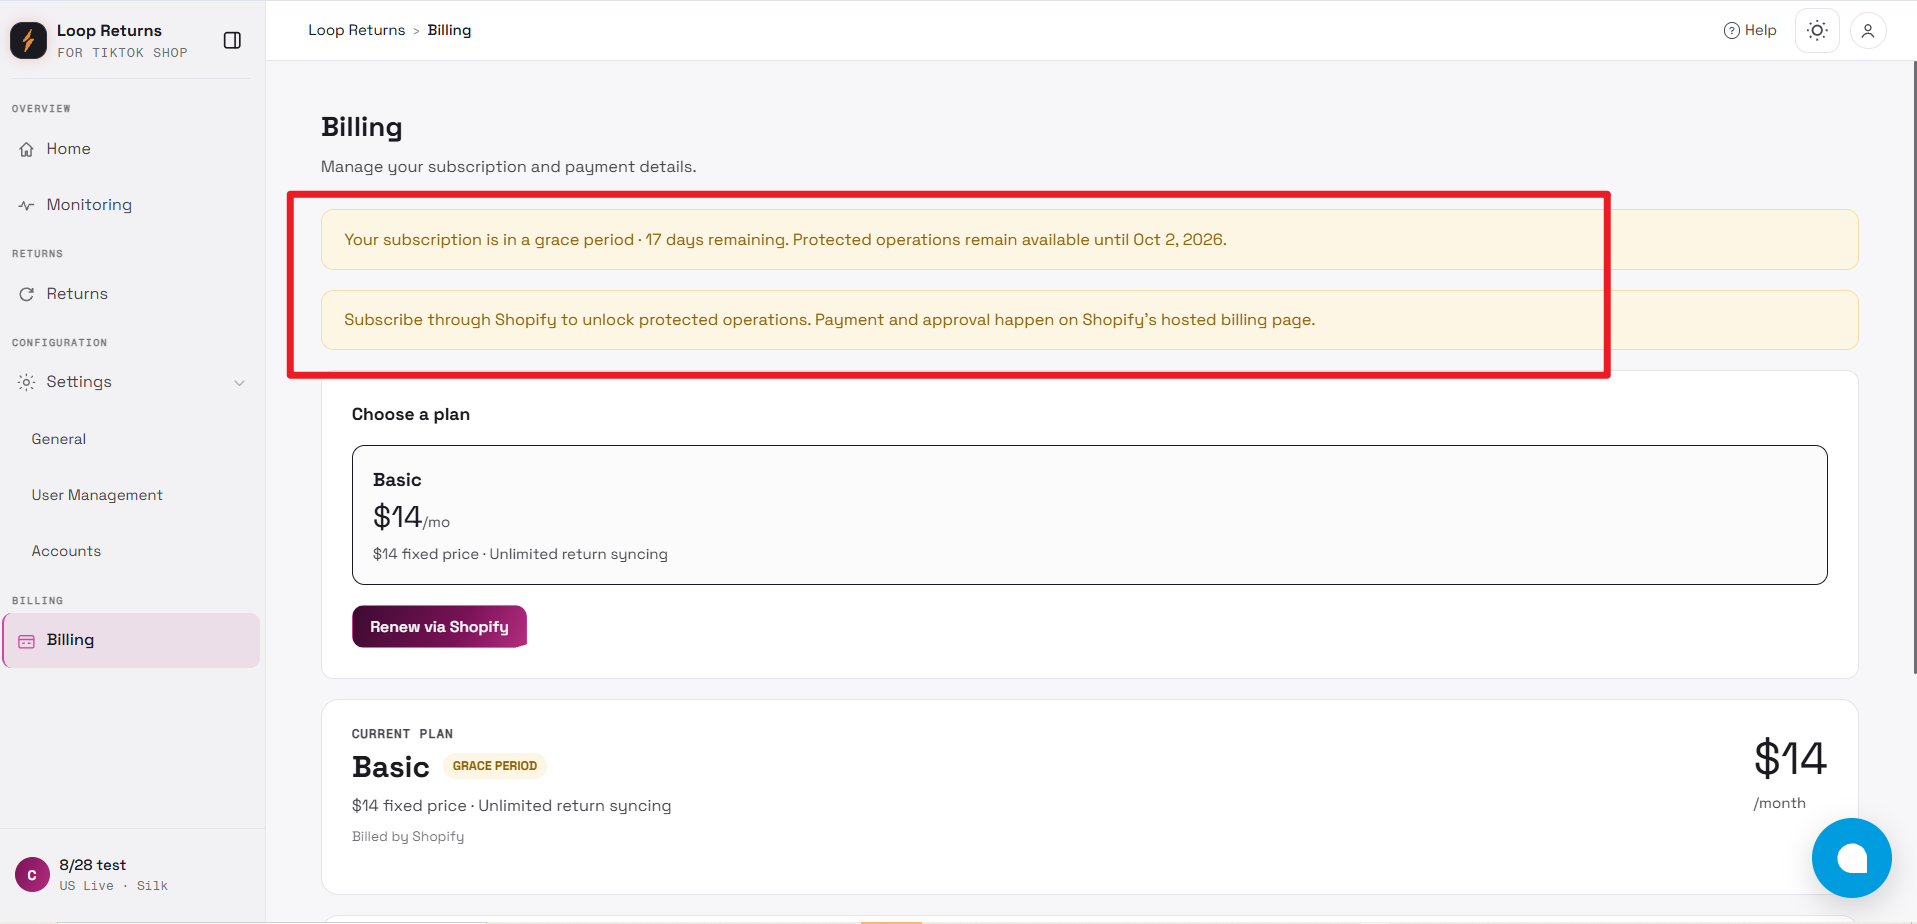
Section titled “Important Notes on Status & Notifications”- **Grace Period (30 days): **Full access is maintained for 30 days after the subscription expiry date to allow for renewal. System-generated reminder emails will be sent on Day 1, Day 15, and Day 29 of the grace period.
-
System Notifications: The system will display clear banners and reminders on the interface regarding your subscription status
-
Email Notifications: You will receive system emails for key events ( successful subscription activation, grace period reminders, confirmation of subscription termination).
-
**Not Paid Status: **If you create an ACH payment but the charge is not completed, the system will be in a not paid status and Loop Returns features will remain locked. Please follow the in-app prompts to complete the payment, then refresh and try again.
-
Payment Failure Status: The Loop Returns subscription has been created, but the payment attempt failed. Loop Returns features are not unlocked until the payment is successfully completed.
How Return Automation Works
Section titled “How Return Automation Works”This section explains how return data flows between TikTok Shop, Loop Returns, and Shopify within the integration.
Regardless of which connector you use to synchronize TikTok Shop orders to Shopify (the recommended integration is TikTok Shop for Shopify), you must ensure that orders and products are correctly synced between the two platforms before return processing.
The app acts as an automation layer that synchronizes return events and status updates across platforms to maintain consistency and reduce manual work.
Order Mapping
Section titled “Order Mapping”Although the app does not store original order data, accurate order mapping is required for return creation.
How Mapping Works
-
TikTok Shop return data is used to identify the corresponding Shopify order.
-
When a return is approved in TikTok Shop, the system verifies that the related Shopify order exists.
-
Line item identifiers are preferred when available.
-
SKU matching is used as a fallback to validate product-level alignment.
-
Existing Loop line item usage may be checked to avoid duplicate use.
Important Requirements
-
The TikTok Shop order must exist in Shopify before return processing.
-
SKUs must match exactly between TikTok Shop and Shopify.
-
SKU fields should not be blank.
-
Orders created before platform authorization or before the active connector setup may not be processed automatically.
-
Missing Shopify order, missing SKU, SKU mismatch, duplicate line items, or previously used line items can block Loop return creation.
If order or SKU matching fails, the return will not be created in Loop Returns and the app will record an actionable error.
TikTok Shop Approval Behavior
Section titled “TikTok Shop Approval Behavior”In TikTok Shop, return requests may be approved either automatically or manually:
- Automatically Approved Returns
-
Most return requests are automatically approved by TikTok Shop.
-
In these cases, the Return Integration will immediately create a corresponding return record in Loop Returns.
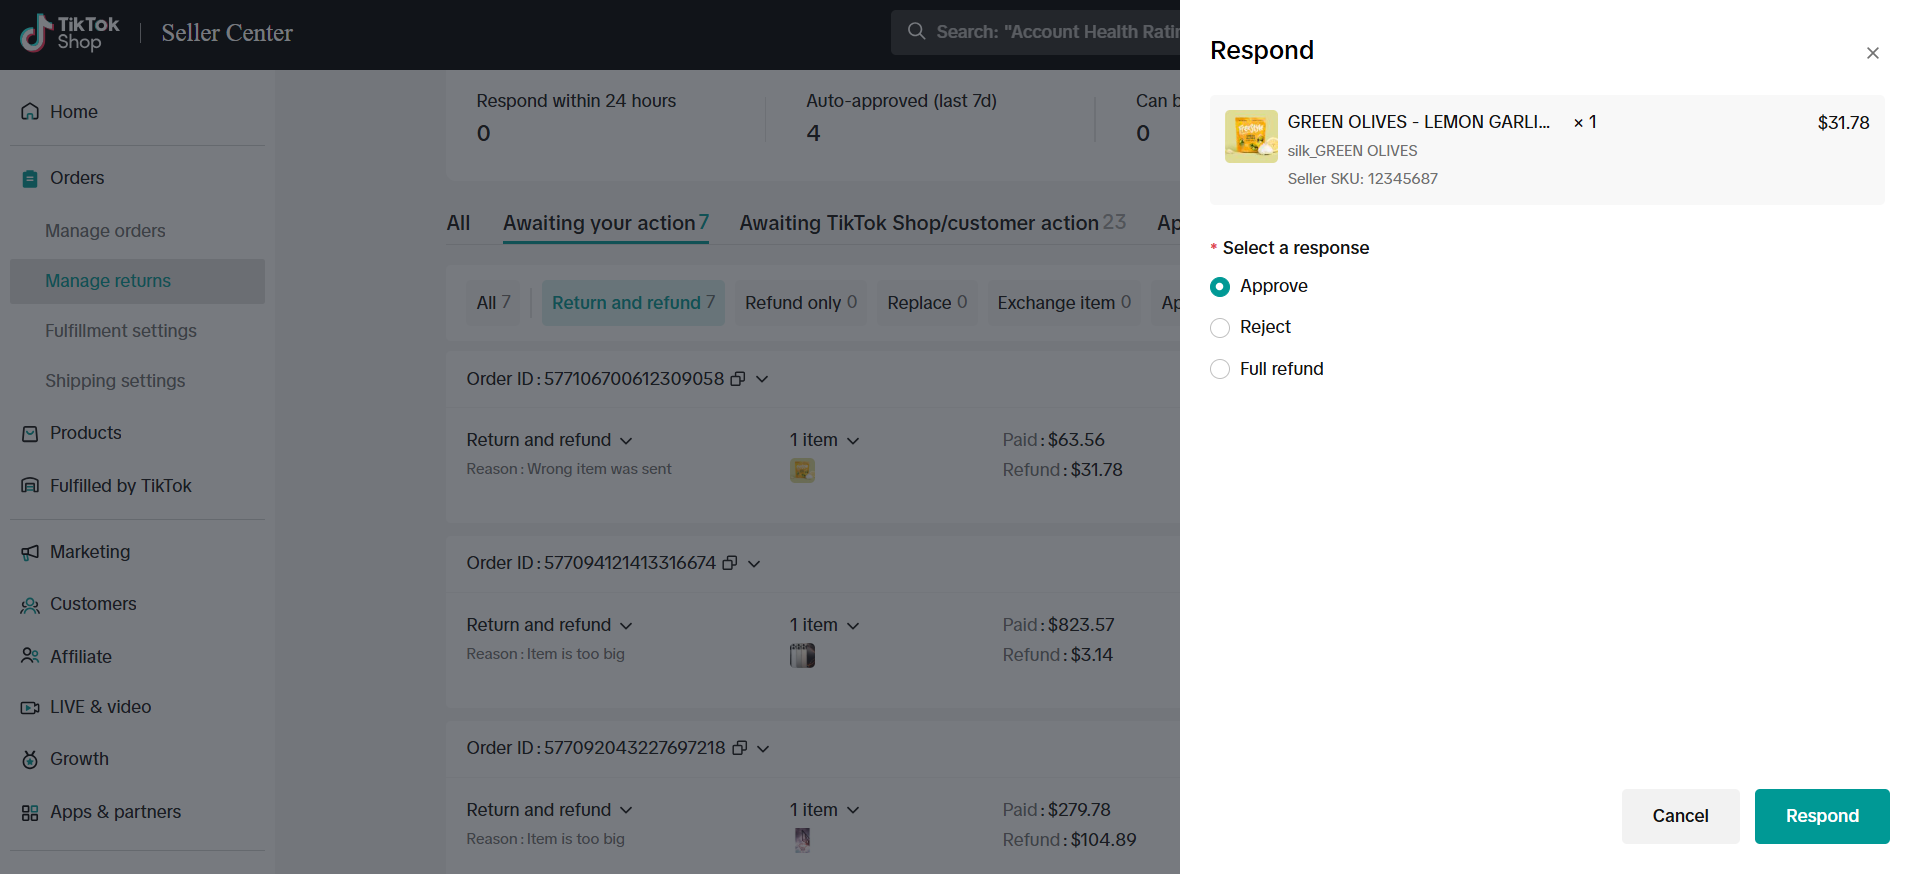
- Manually Approved Returns
Some return requests require merchant review and manual approval. These follow two possible scenarios:
-
If the merchant approves the request within the approval window (typically 24 or 48 hours, depending on TikTok Shop policy):
- The Return Integration will immediately create the corresponding return in Loop Returns.
-
If the merchant does not take action within the approval window:
-
Once the window expires, TikTok Shop will automatically approve the return.
-
The Return Integration will then create the corresponding return in Loop Returns.
-
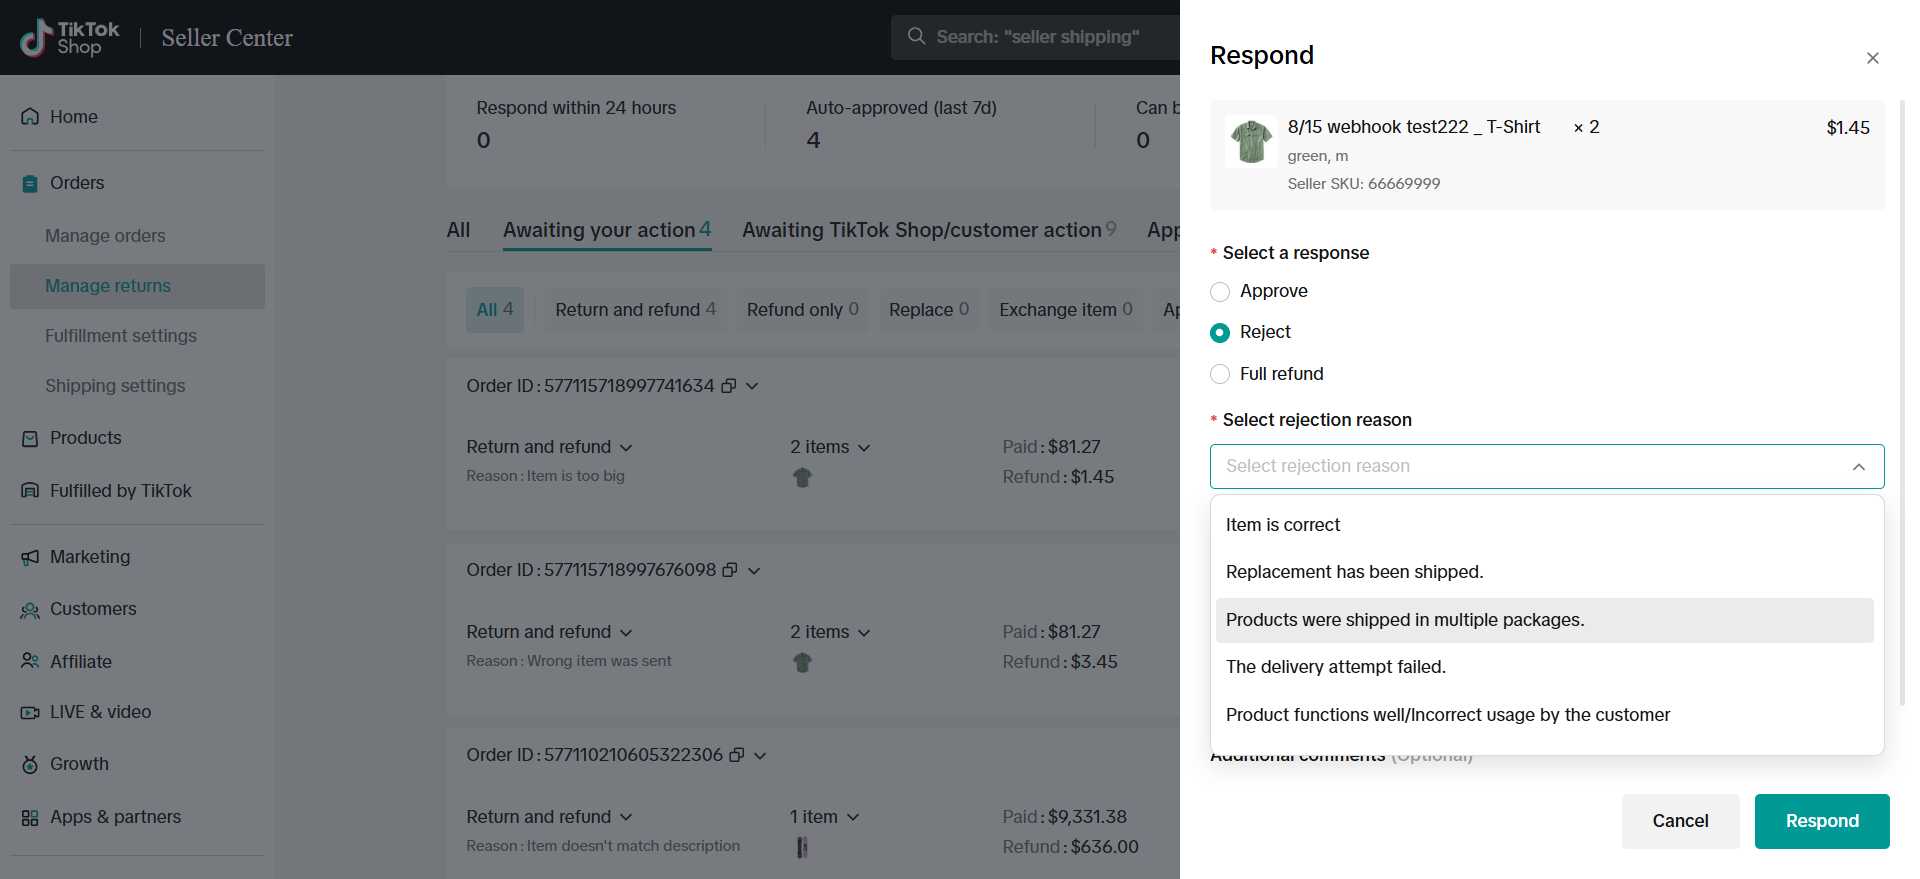
- Manually Reject Returns in TikTok Shop
-
If a return is rejected in TikTok Shop, the return integration will not create the return in Loop Returns, and Loop Returns will not have any record of the rejected return.
-
In this case, the return is directly rejected in TikTok Shop, and no action is reflected in Loop Returns.
Refund-Only / Keep-Item Cases
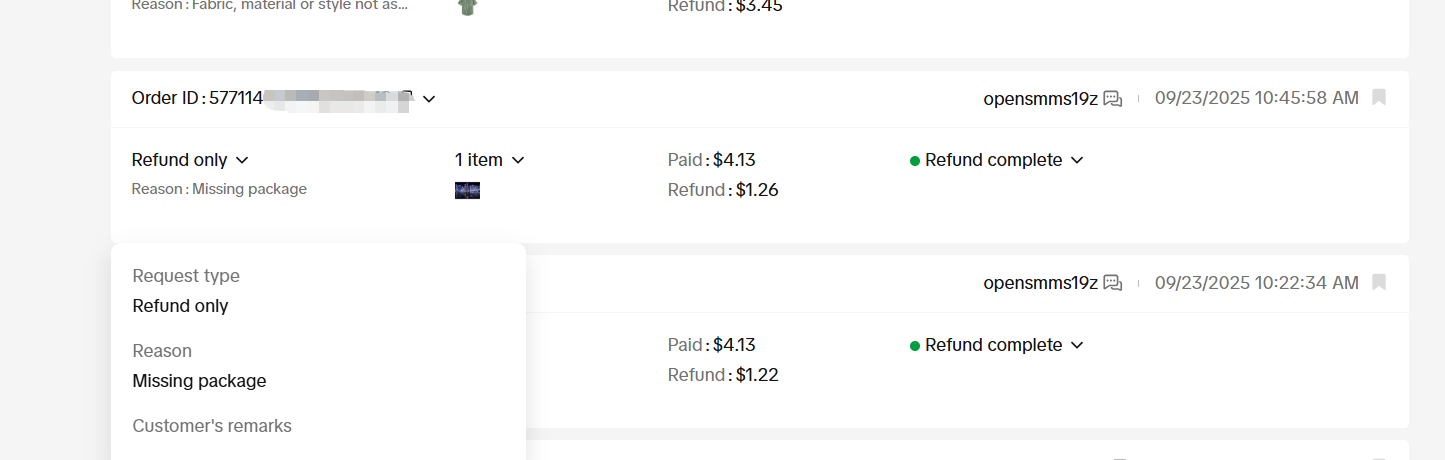
Section titled “Refund-Only / Keep-Item Cases”**Note: **In TikTok Shop, a “Refund-Only Case” means the buyer is refunded without returning the item. In Loop, this is referred to as a “Keep Item Return.” Since Loop does not use the term “Refund-Only Case,” please note that these two terms represent the same type of return scenario.
Some return requests may not require the buyer to physically return the product. These are treated as refund-only cases in TikTok Shop and Loop Returns.
- Record Keeping in Loop
-
Even if no product is returned, the refund-only case will appear in Loop Returns.
-
This allows merchants to have a complete record of all return and refund requests.
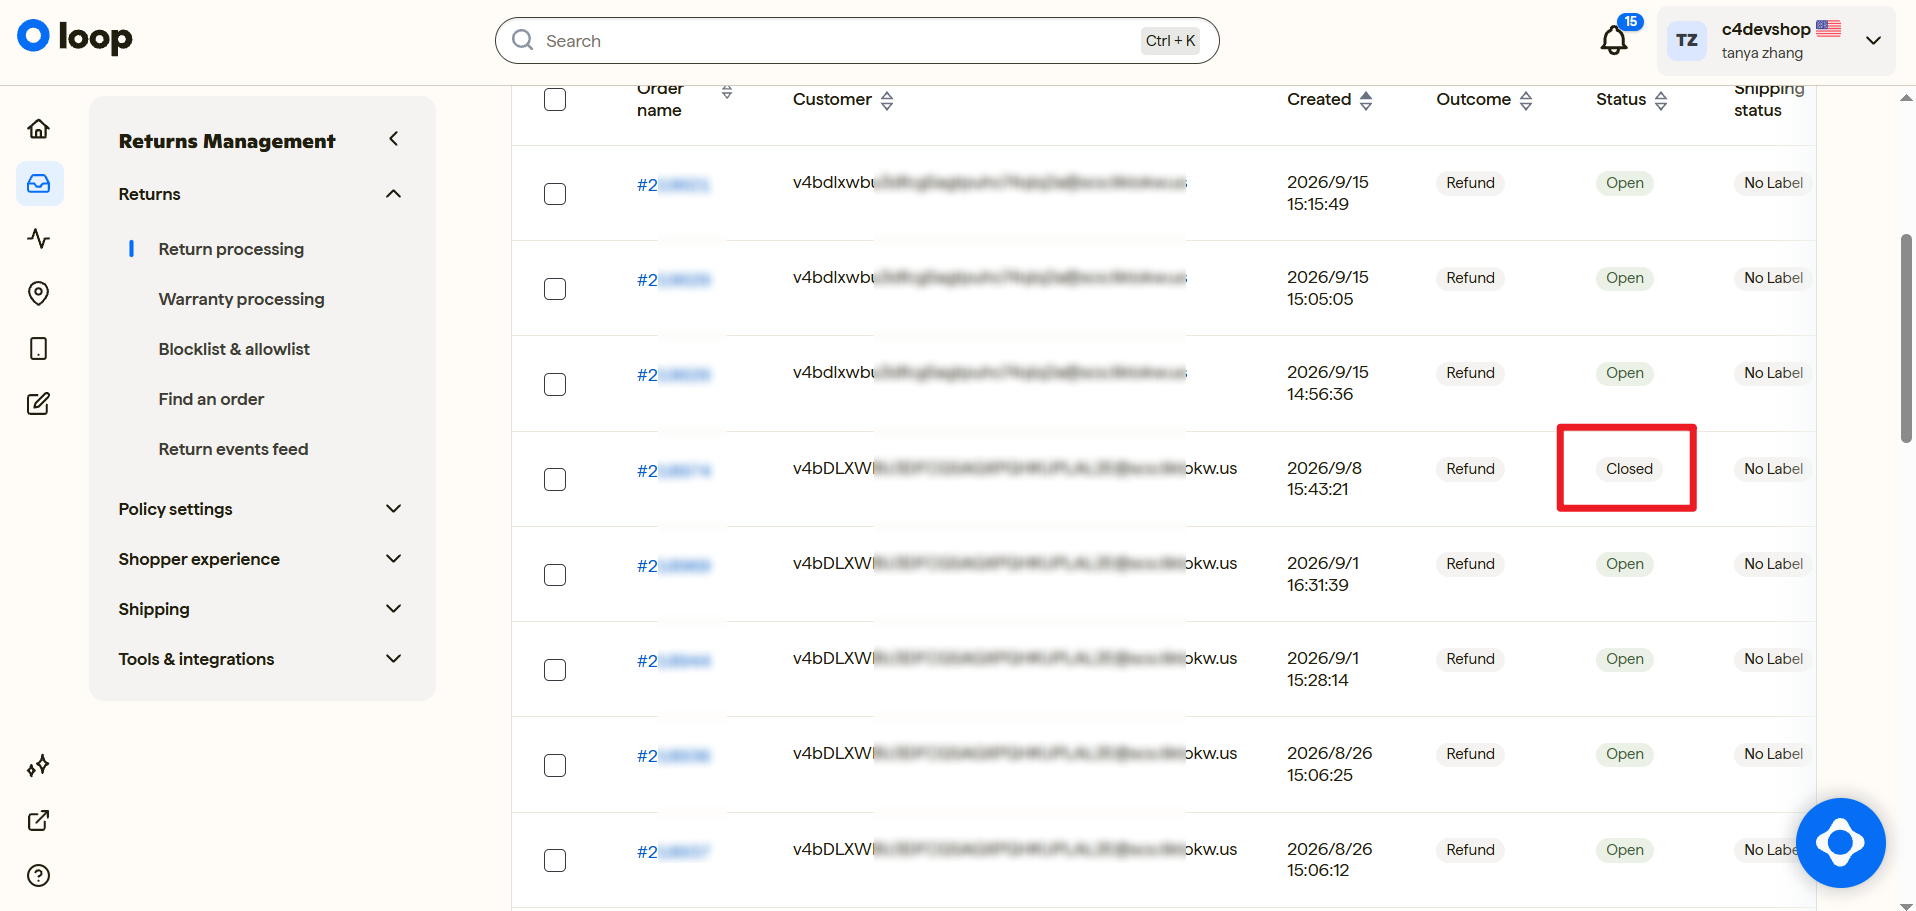
- Refund Confirmation
-
Once TikTok Shop confirms that the refund has been issued to the buyer:
-
The corresponding case in Loop Returns will be automatically processed.
-
The status will be updated to refunded.
-
- Key Points for Merchants
-
Merchants cannot reject a refund-only case in Loop, because no physical product is involved.
-
Loop Returns serves for tracking and audit purposes.
-
Monitor Loop Returns to confirm that TikTok Shop has completed the refund.
Return Logistics
Section titled “Return Logistics”After a return request is approved, proper handling of shipping labels and tracking information ensures a smooth return process.
- Generating Shipping Labels
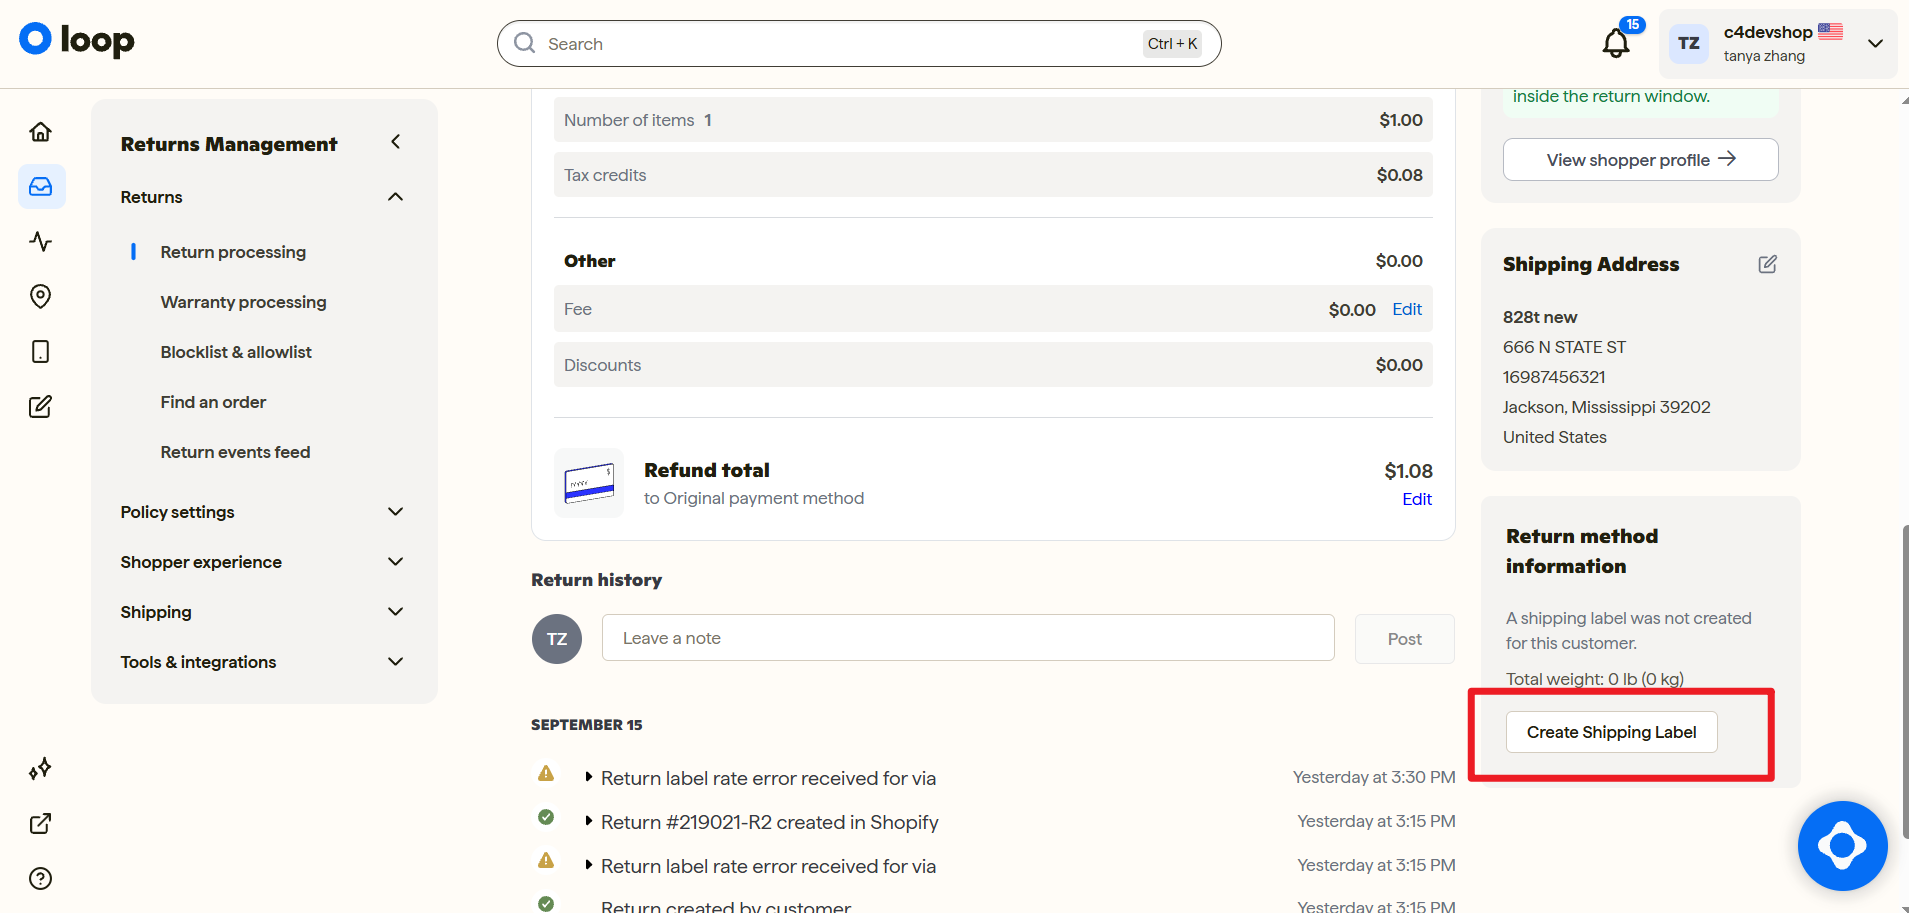
You can generate the required shipping label and tracking number through either of the following methods:
- Manual Generation: Merchants can manually create the shipping label and tracking number within Loop Returns for the approved return.
- Automatic Generation: If you have enabled the “Auto-Create Shipping Label for TikTok Shop Returns” option in the Integration Settings (and met all prerequisites, including enabling “Generate Labels” in your Loop return policy), the system will automatically generate the shipping label and tracking number upon return creation.
Regardless of the method used, Loop Returns will store this information and prepare it for synchronization.
- Synchronization to TikTok Shop
-
The Return Integration automatically uploads the shipping label and tracking number to TikTok Shop once it is created in Loop.
-
TikTok Shop then enables the buyer to view and download the shipping label from the TikTok Shop app, allowing them to complete the return shipment without delay.
-
TikTok Shop will guide the buyer on the next steps to ship the package.
- QR Code Drop-off
In addition to traditional return shipping labels, the Loop Returns Integration supports QR Code drop-off for eligible returns.
When a buyer selects the QR Code return method in TikTok Shop, the integration automatically retrieves the QR Code generated by Loop Returns and synchronizes it back to TikTok Shop.
How it works:
-
The buyer submits a return request in TikTok Shop and selects QR Code as the return method.
-
After the return is approved, the corresponding return is created in Loop Returns.
-
Loop Returns generates the return QR Code and tracking information.
-
The Silk Loop Returns Integration automatically retrieves the QR Code and uploads it to TikTok Shop.
-
The buyer can then view the QR Code directly in the TikTok Shop app and present it at the designated carrier drop-off location.
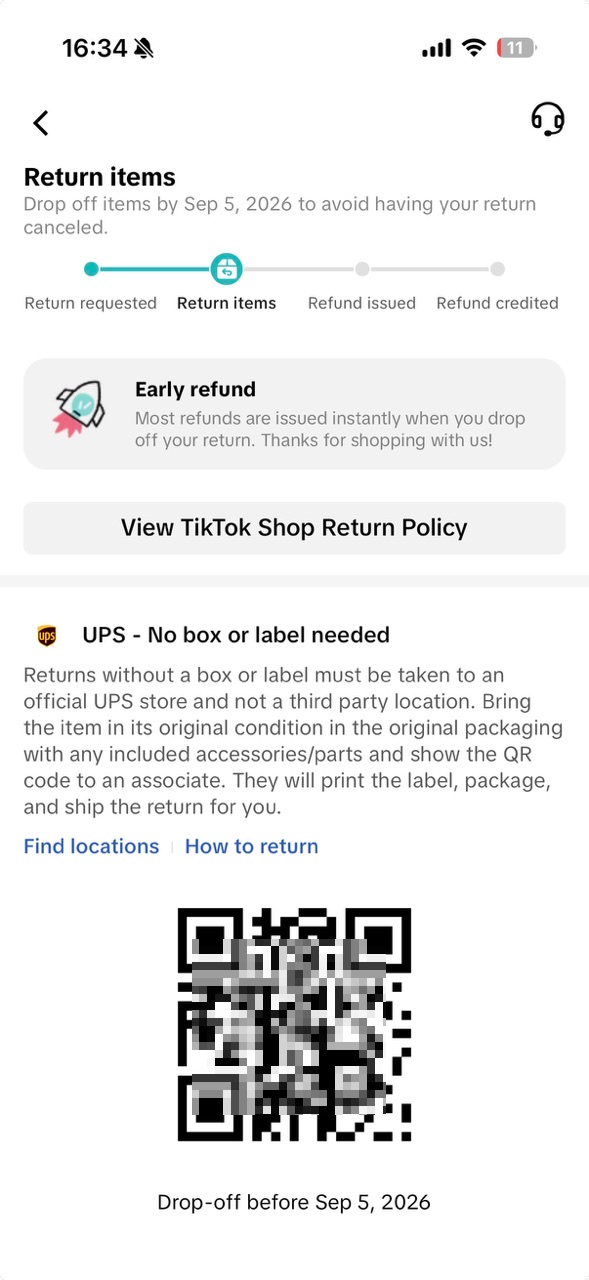
- The carrier scans the QR Code and processes the return shipment. The buyer does not need to print the return shipping label manually.
In Loop Returns for TikTok Shop, merchants can verify the generated QR Code from the Returns page. Returns using this method are displayed as QR drop-off in the Label column. Click the return to open Return Detail, where the QR Code, carrier, and tracking information can be reviewed.
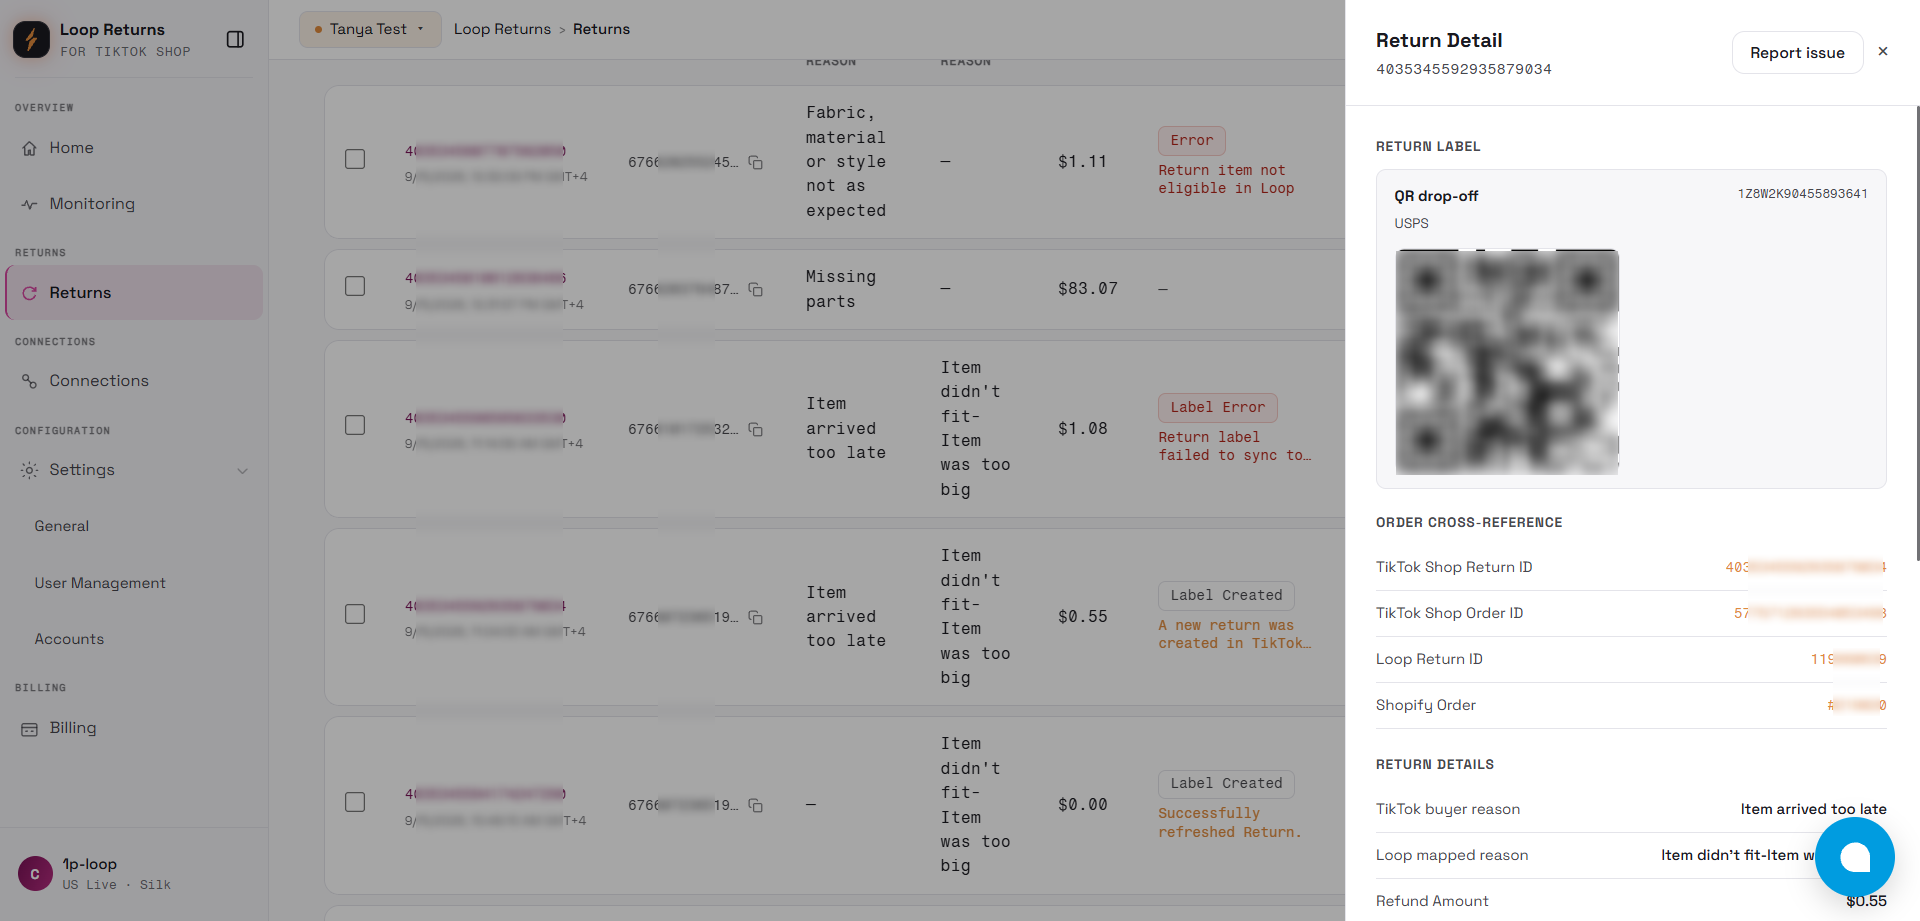
Note: QR Code generation in Loop Returns may take a short period of time after the return is created. If a QR Code cannot be generated, the integration may fall back to the standard shipping label flow.
- Return Shipping Label Carrier Requirements
-
When creating a return shipping label in Loop, please ensure that the selected **carrier is supported by **TikTok Shop.
-
If the carrier is **not supported by **TikTok Shop, the integration will return an error and the return information will not be synced to TikTok Shop.
Return Accepted
Section titled “Return Accepted”**Note: **When a return is processed in Loop, Loop updates Shopify by closing the return and marking it as refunded, but Shopify does not issue another refund. These updates are made for status alignment only, ensuring that order records remain consistent across TikTok Shop, Loop, and Shopify.
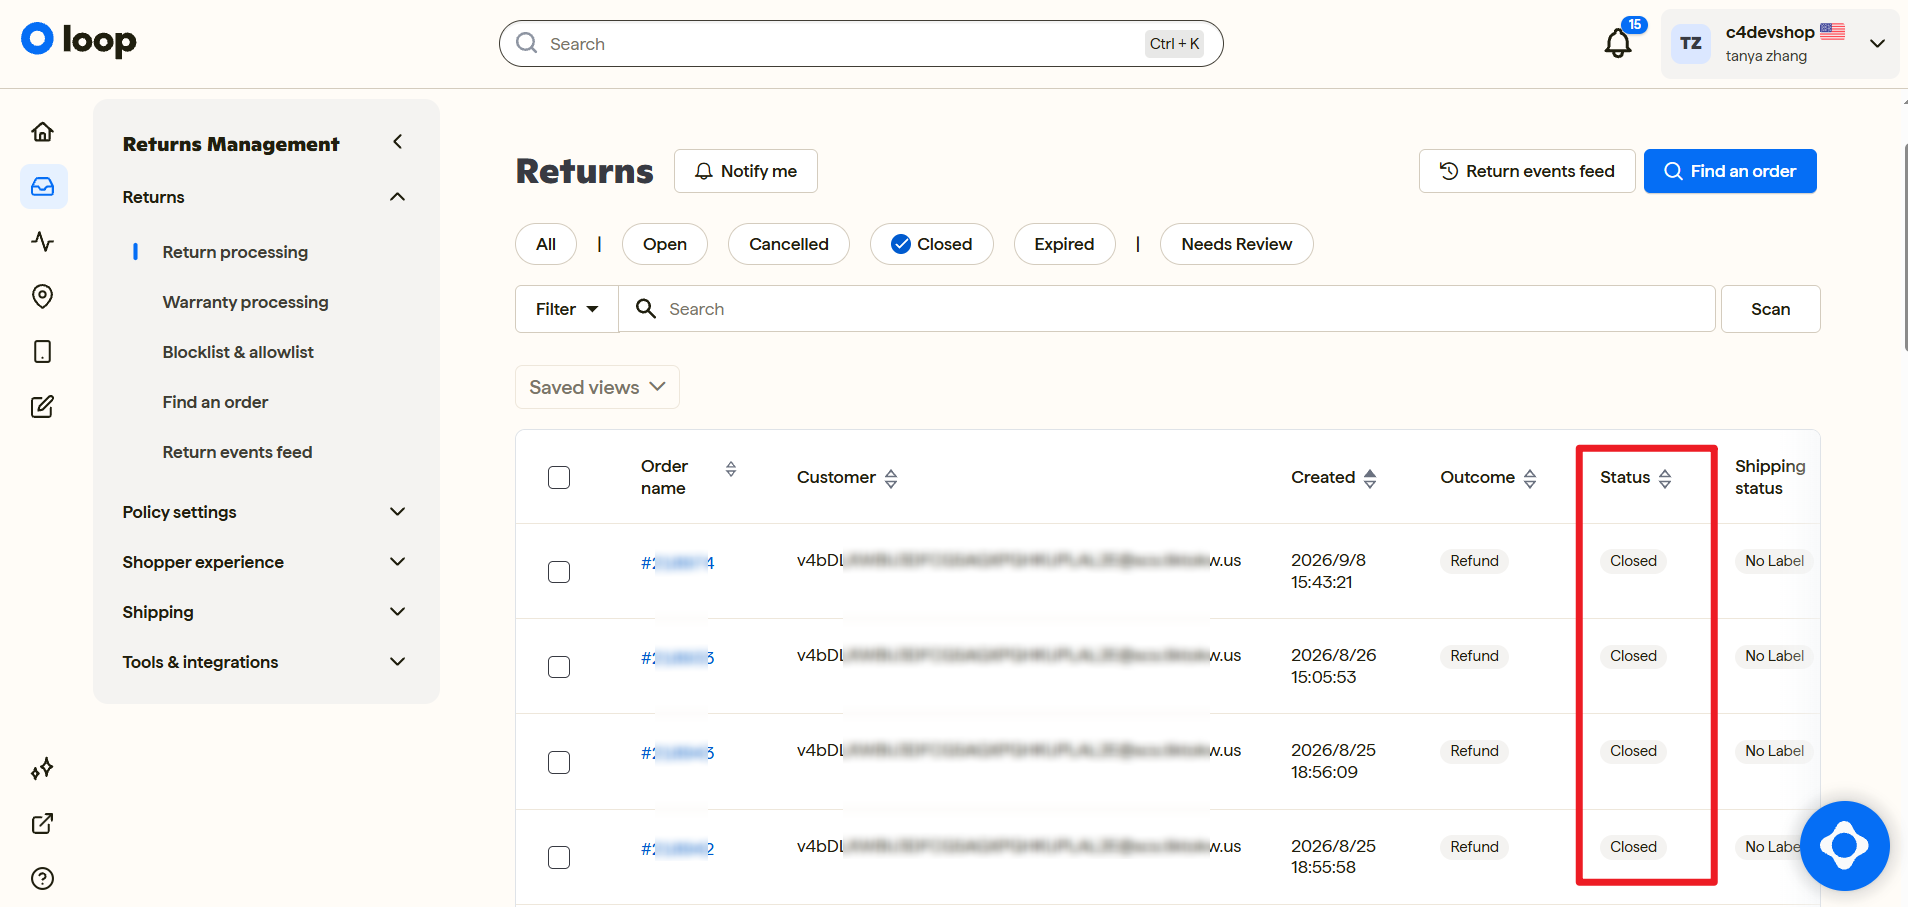
If the merchant confirms that the returned package has been received, they can click Process Return in Loop Returns to mark the package as received.
Note: If you would like to automatically process returns (for example, automatically process the return when the return package status is delivered), please refer to the Loop Returns Help Center** **for configuration details.
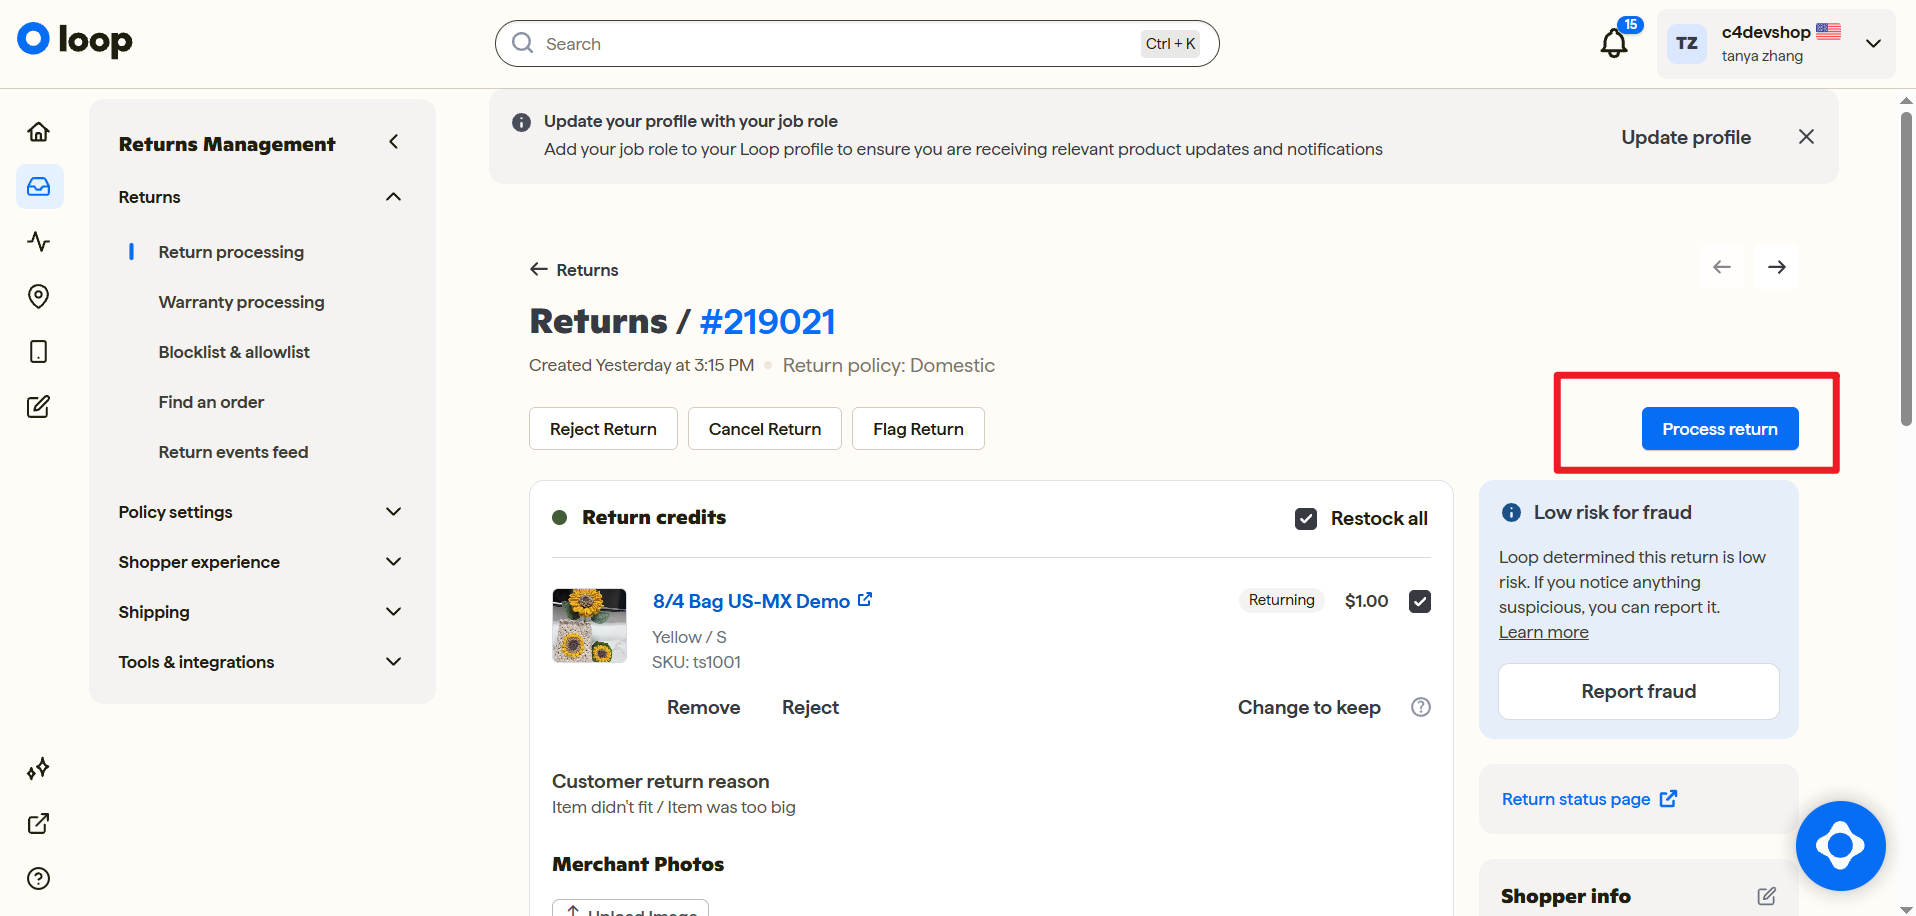
- The return status in Loop Returns will change to Closed.
-
Loop Returns updates the Shopify Order Status through their existing flow.
-
Return Integration retrieves the order status update (Return Accepted) from Shopify via webhook.
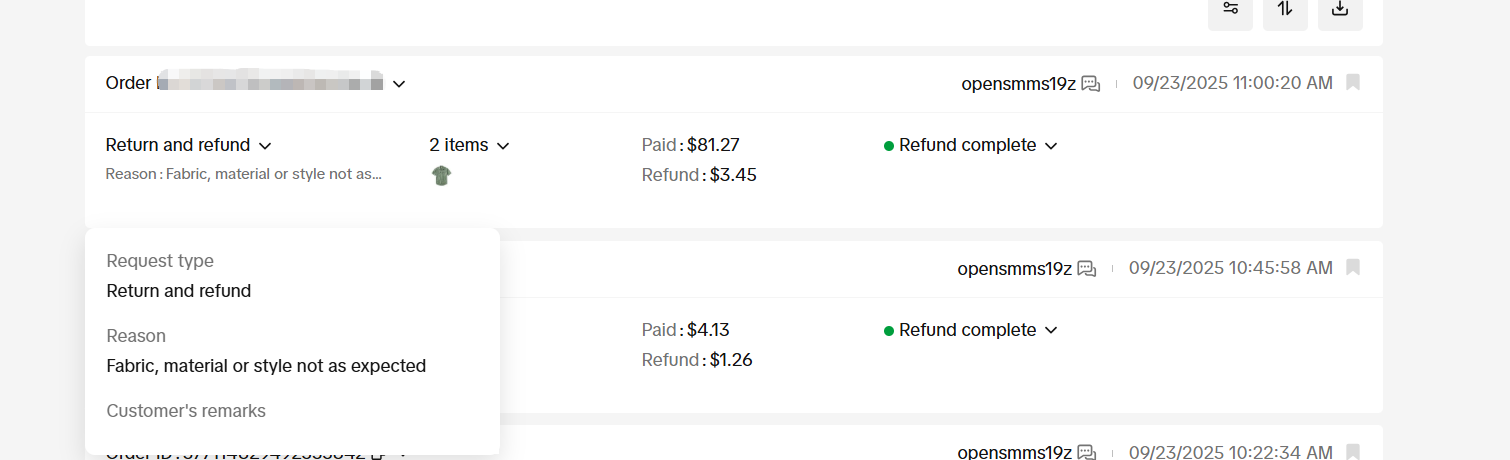
Once retrieved, the Return Integration will trigger the refund process in TikTok Shop.
Return Rejected
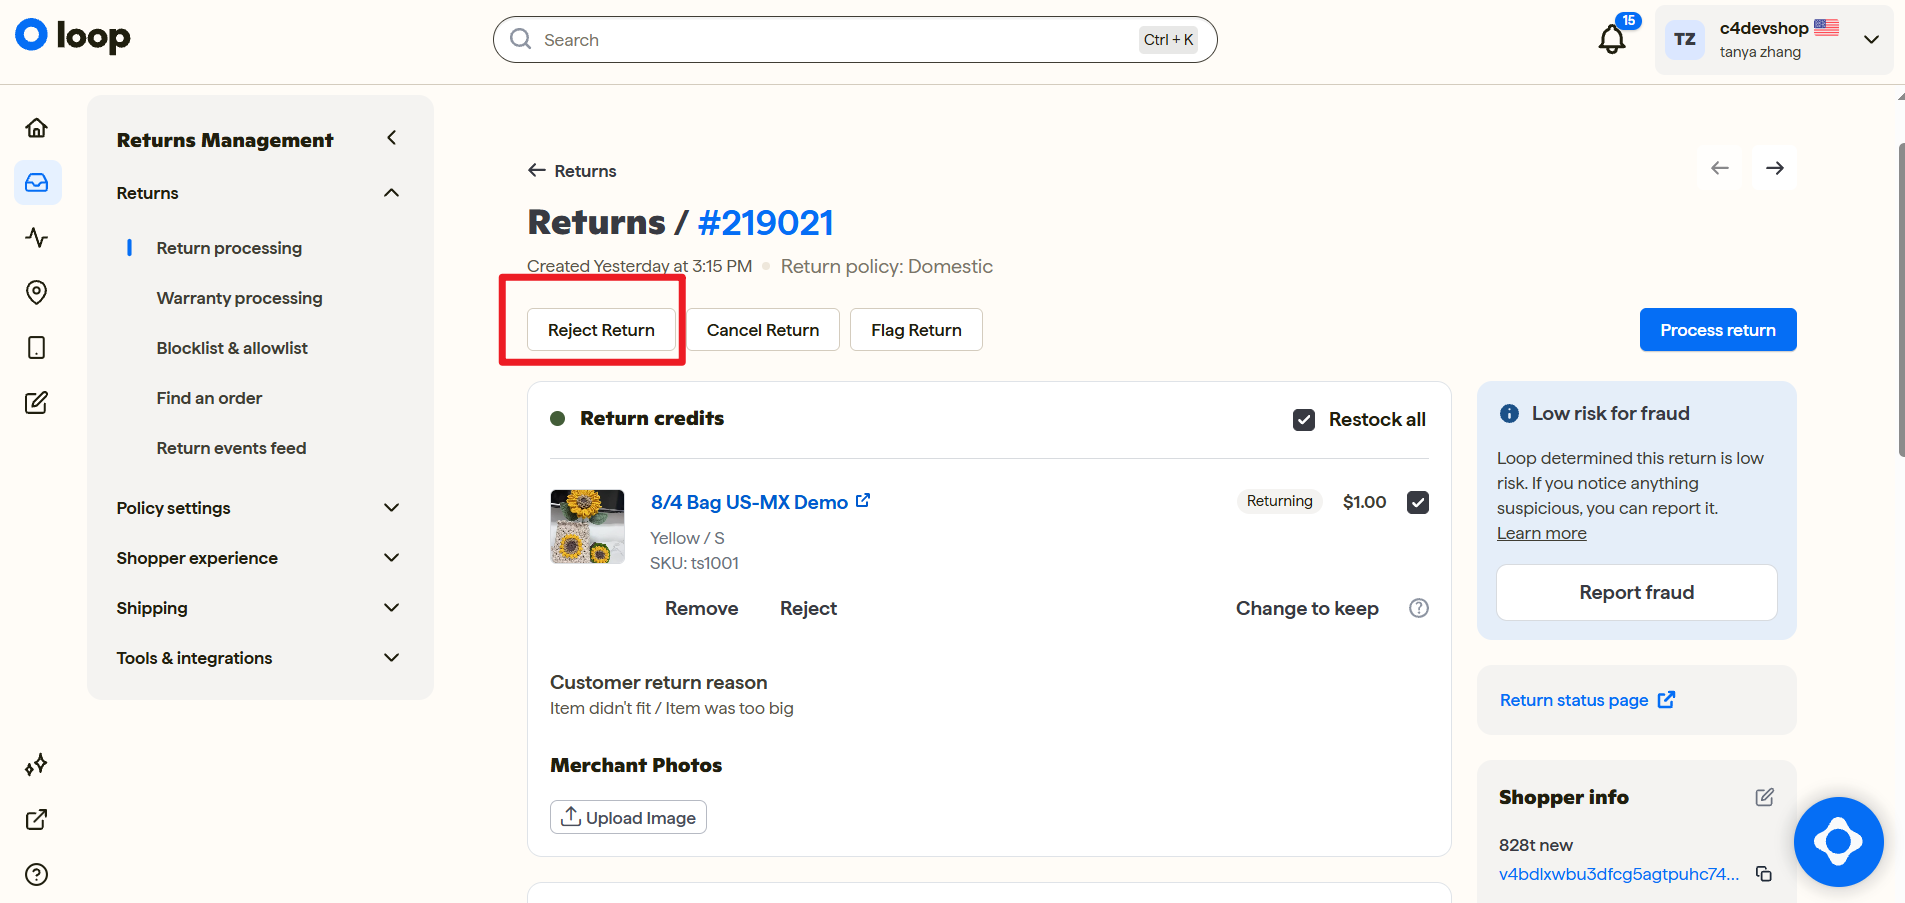
Section titled “Return Rejected”If the merchant confirms that the returned item is incorrect and wishes to reject the return, they should click Reject Return in Loop Returns.
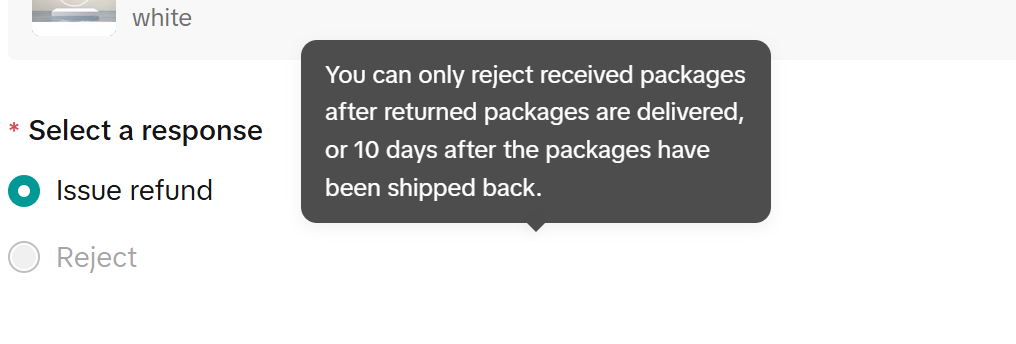
Important: In TikTok Shop, you can only reject received packages after the returned package has been delivered, or 10 days after the package has been shipped back.
-
Loop Returns updates the Shopify Order Status through their existing flow.
-
Return Integration retrieves the order status update (Return Rejected) from Shopify via webhook.
-
Return Integration will then sync the rejected return status to TikTok Shop.
-
For more details, you can refer to Loop Returns Help Center documentation: Reject Return – Loop Returns Help Center
⚠️ Note: While Loop Returns supports Reject Line Items of return, TikTok Shop does not support partial rejection. Therefore, we only sync the rejected return status to TikTok Shop when all items in the return are rejected.
Error Handling
Section titled “Error Handling”The system automatically logs errors when return synchronization fails, making it easy to identify and resolve issues.
Where to View Errors
-
Tasks Module: Background sync jobs are displayed here. Failed tasks are clearly marked and can be filtered by status.
-
Monitoring: Operational alerts and repeated issues may appear here.
-
Error Returns KPI Card: Click the Error Returns count to jump directly to affected returns where supported.
-
Return Details: Failed returns may show error details in the timeline or error section.
What to Do When an Error Occurs
-
Go to the Task Monitoring Center on the Home dashboard.
-
Filter by Failed status to see all error tasks.
-
Click on a failed task to open the slide‑out panel with:
-
Error details and message
-
Timestamp of the failure
-
Direct link to the affected return or order
-
-
Resolve the underlying issue.
-
The system will automatically retry failed tasks once the issue is fixed.
Note: If an error persists, contact support with the error message and return ID for faster troubleshooting.
Limitation
Section titled “Limitation”Replacements and Exchanges Not Supported
Section titled “Replacements and Exchanges Not Supported”The current solution requires disabling replacement and exchange requests in TikTok Shop. Any historical orders with replacement or exchange requests must be processed manually in the TikTok Shop Seller Center.
Partial Rejection for the Same Item Not Supported
Section titled “Partial Rejection for the Same Item Not Supported”TikTok Shop does not support partial approval or rejection for multiple quantities of the same item within a single return request. If a return contains multiple units of the same item, and only part of the quantity is approved in Loop Returns, the system will sync the refund for the entire return to TikTok Shop.
For these cases, merchants should manage partial quantity decisions directly in TikTok Shop to ensure the return and refund status remains accurate.
Refund Method Restriction
Section titled “Refund Method Restriction”TikTok Shop only supports cash refunds; store credit is not accepted. If your Loop Returns policy is configured to offer only store credit, special workflow adjustments are required (refer to the 8.FAQ section for configuration steps).
External Connector APIs
Section titled “External Connector APIs”AfterShip, ShoppeDance, and SKU IQ are connector channel options in this app. The app does not collect their API keys and does not call their APIs directly. Merchants must manage those tools separately and disable their return/refund sync when officially switching to the standalone return lifecycle.
Loop Policy Check
Section titled “Loop Policy Check”The app stores and displays return policy settings, but automated Loop policy validation may require additional verification. Support or operations may need to verify policy readiness before go-live.
Historical Data
Section titled “Historical Data”Orders, returns, jobs, and webhook events created before authorization or connector switching may not be automatically backfilled. Merchants should manually handle in-flight or historical returns when switching connectors.
Notes & Best Practices
Section titled “Notes & Best Practices”Keep SKUs Consistent
Ensure every product in TikTok Shop has the exact same SKU as in Shopify.
Inconsistent or missing SKUs will cause return creation to fail with a “SKU mismatch” error.
Regularly audit your product listings to maintain synchronization.
Complete Reason Mapping
After authorization, configure return reason mapping in Settings → General Settings.
Proper mapping ensures that refund reasons align correctly between TikTok Shop and Loop Returns, avoiding customer confusion and manual corrections.
Use Category Templates When Needed
If different product categories require different Loop return reasons, configure Category Templates so category-level mapping can override Default Mapping.
Monitor Tasks and Alerts
Check the Tasks module and Monitoring page regularly. They provide visibility into background sync jobs, failed returns, and operational alerts.
Align Return Windows
TikTok Shop enforces a 30‑day return window.
Make sure your Loop Returns return policy is also set to 30 days to avoid rejected returns due to window mismatch.
Check Connection Status Periodically
Visit Settings → Account from time to time to verify that all three platforms (Shopify, Loop Returns, TikTok Shop) are still connected.
If a token expires or is revoked, you will see a Disconnected status and can reconnect immediately.
Test Auto‑Label After Enabling
If you enable Auto‑Create Shipping Label, verify that:
-
“Generate Labels” is enabled in your Loop Returns return policy.
-
Carriers and label templates are fully configured in Loop.
-
A test return triggers automatic label generation. This ensures a smooth, hands‑off logistics experience.
Coordinate External Connector Cutover
If you use AfterShip, ShoppeDance, or SKU IQ, keep order sync enabled but disable return/refund sync to avoid duplicate processing.
Stay Informed via Email Notifications
The system sends email alerts for important events:
-
Subscription activation and renewal reminders
-
Grace period warnings
-
Sync errors (if configured) Keep your registered email address up to date and check these notifications regularly to avoid service interruptions.
Run a Controlled Test Return Before Go-Live
Before broader rollout, complete a controlled end-to-end test return and verify order mapping, Loop return creation, label behavior, status sync, task status, and error handling.
How to Configure Workflow When the DTC Store Only Supports Store Credit
Section titled “How to Configure Workflow When the DTC Store Only Supports Store Credit”My DTC store only supports Store Credit. How can I allow TikTok orders to use a Refund?
To set this up:
-
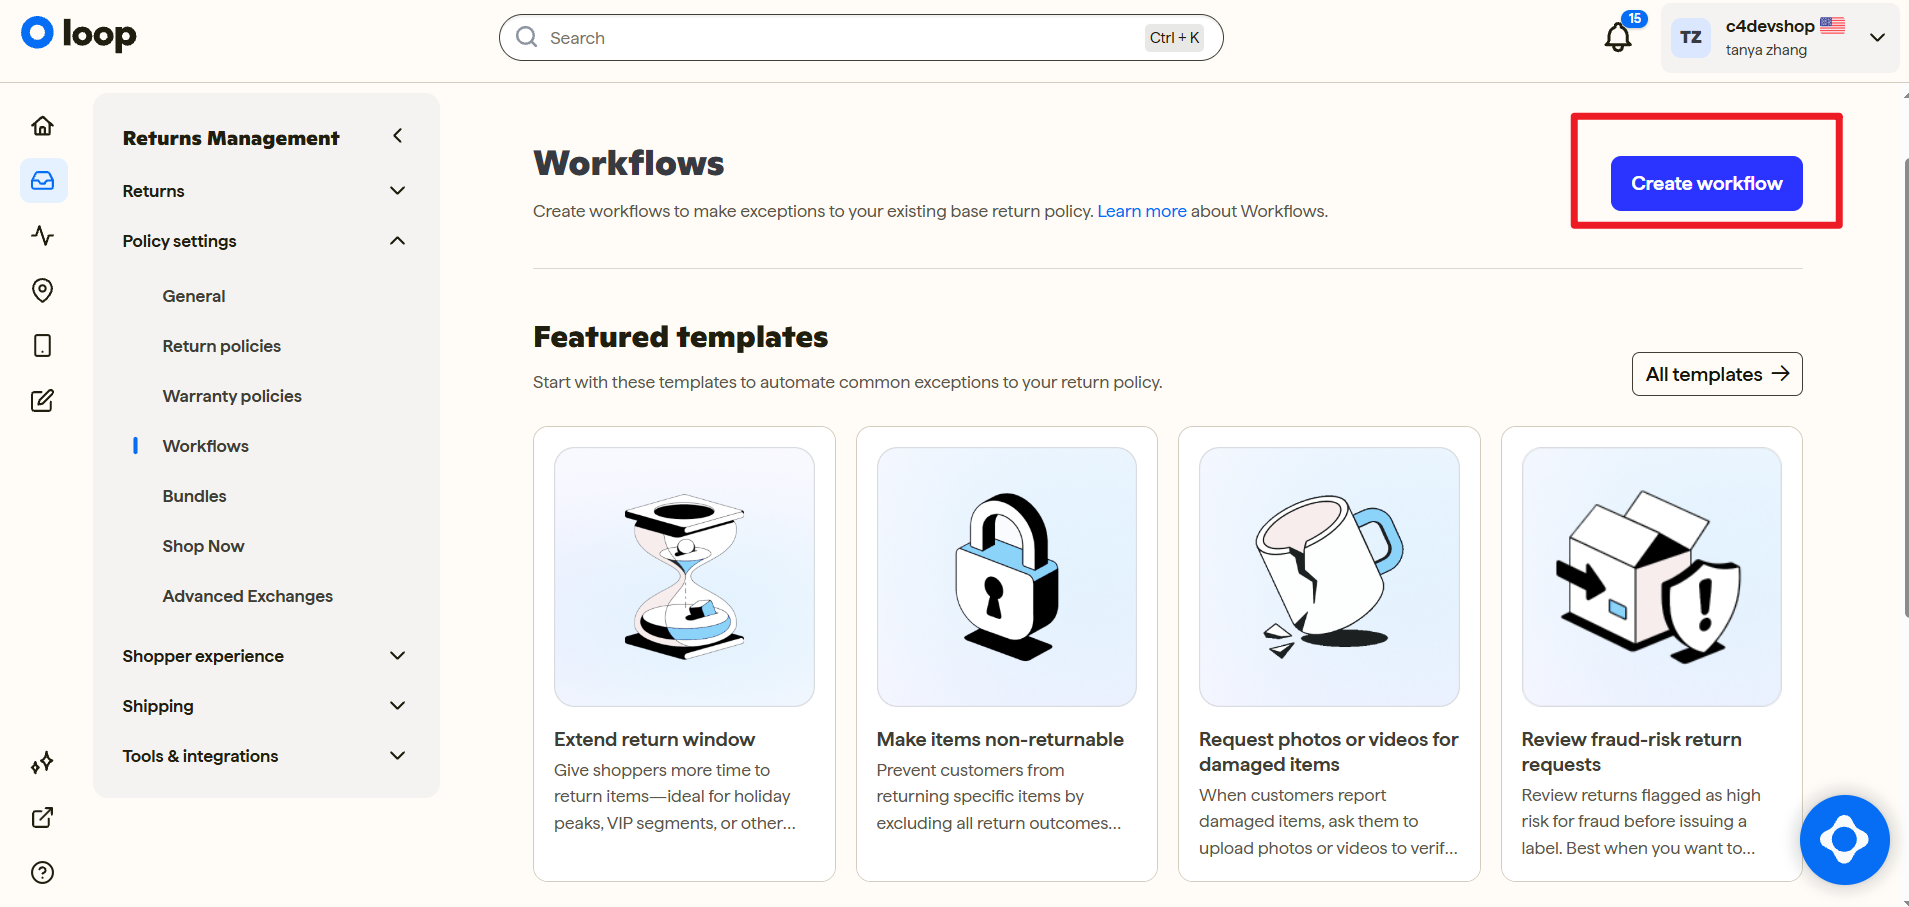
Go to Loop Returns → Policy Settings → Workflows.
-
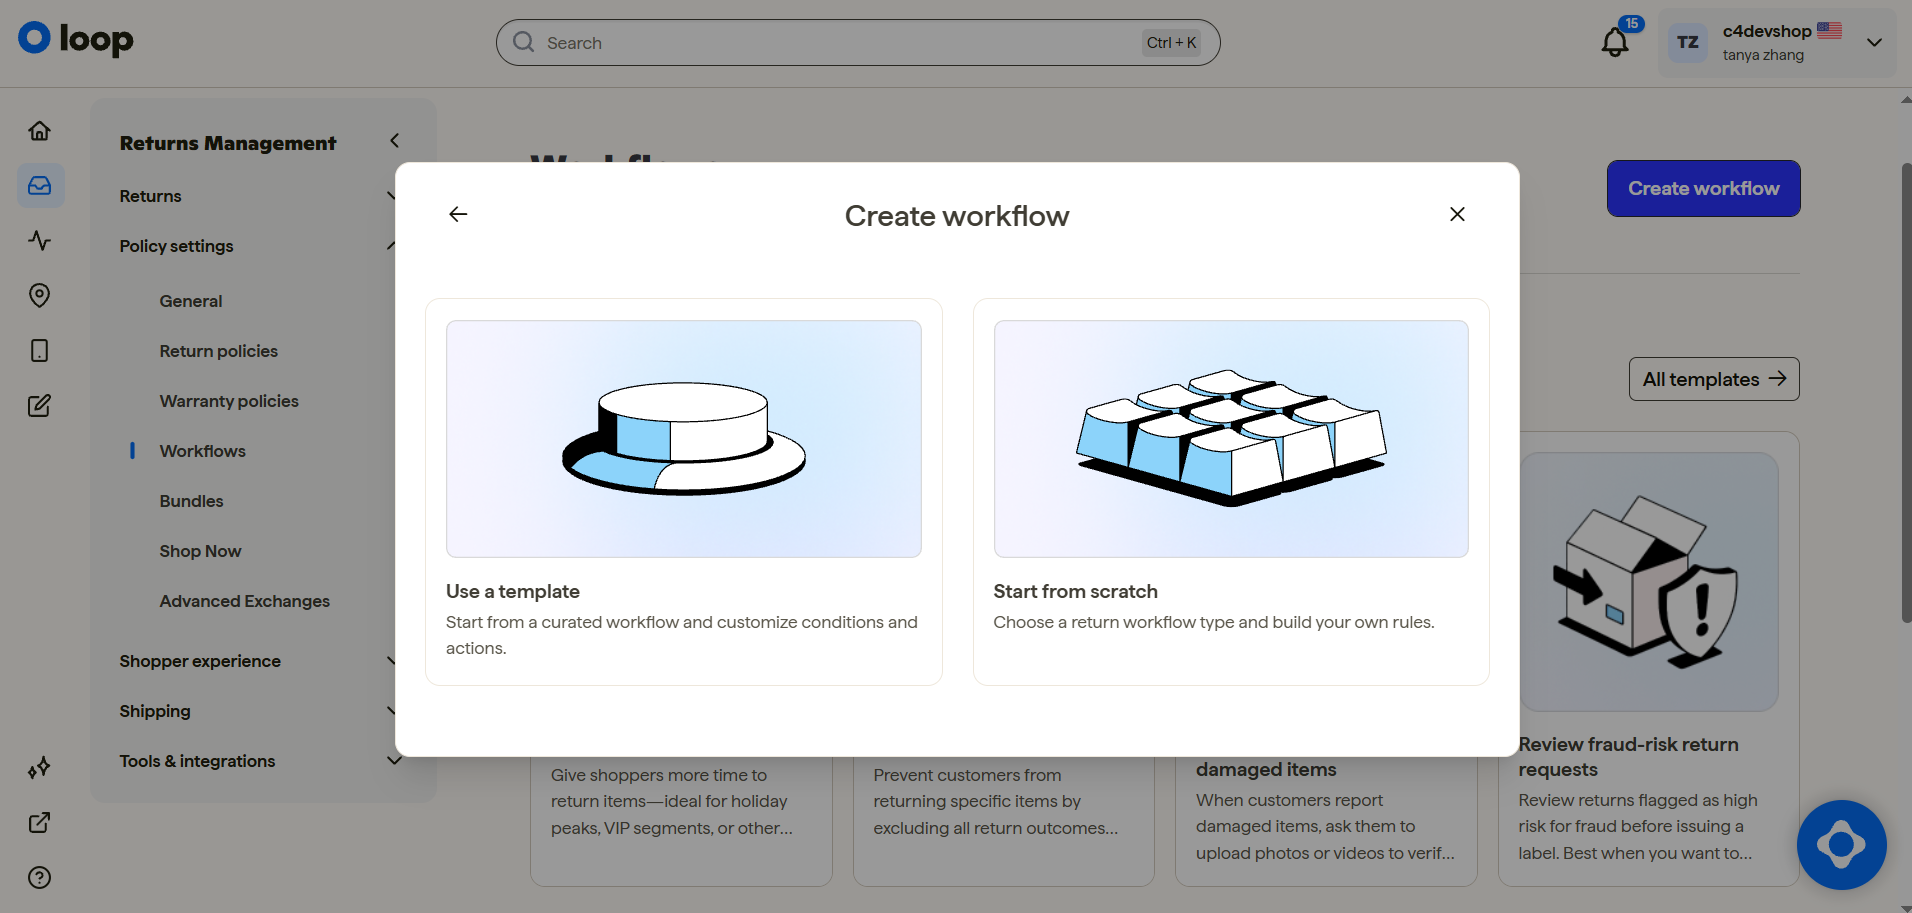
Click Create workflow to create a new workflow.
-
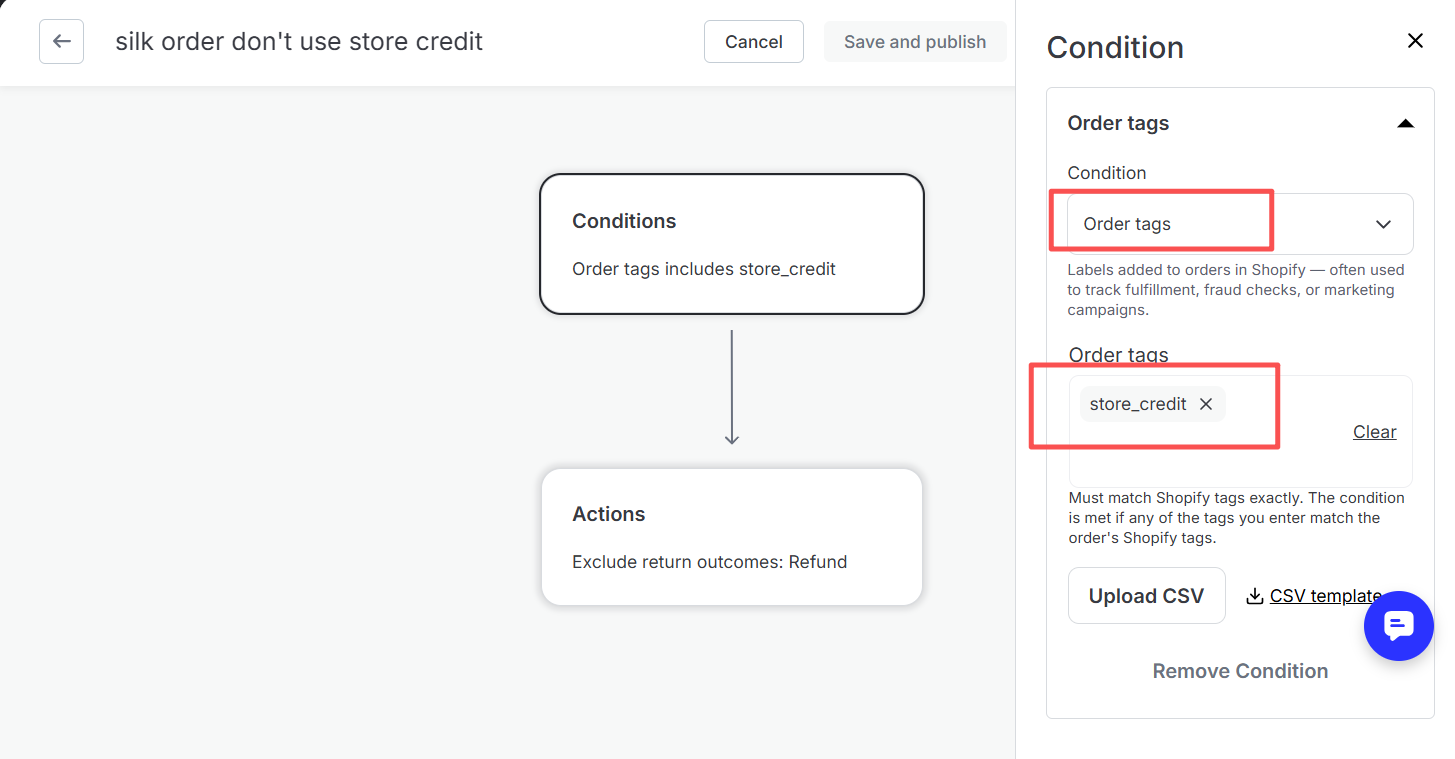
Under Condition, select Order Tags.
-
In the Order Tags field, add all order tags except the TikTok tag.
- This means every non-TikTok tagged order will be captured by the workflow.
-
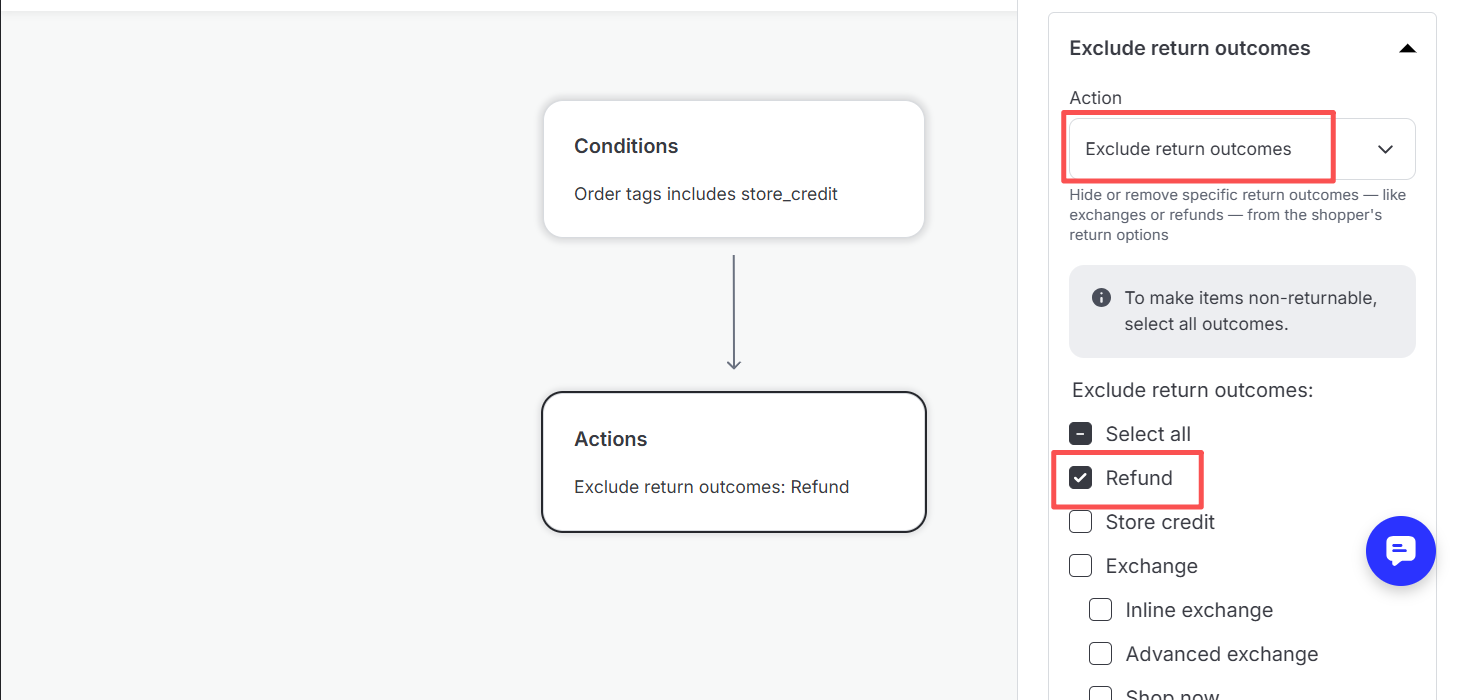
In the Actions section, choose Exclude Refund Outcomes.
-
Select Refund as the excluded return outcomes
-
This forces these orders to use Store Credit and Exchange.
-
-
Since TikTok-tagged orders are not included in this rule, they remain eligible for standard Refund.
- Save and publish this workflow
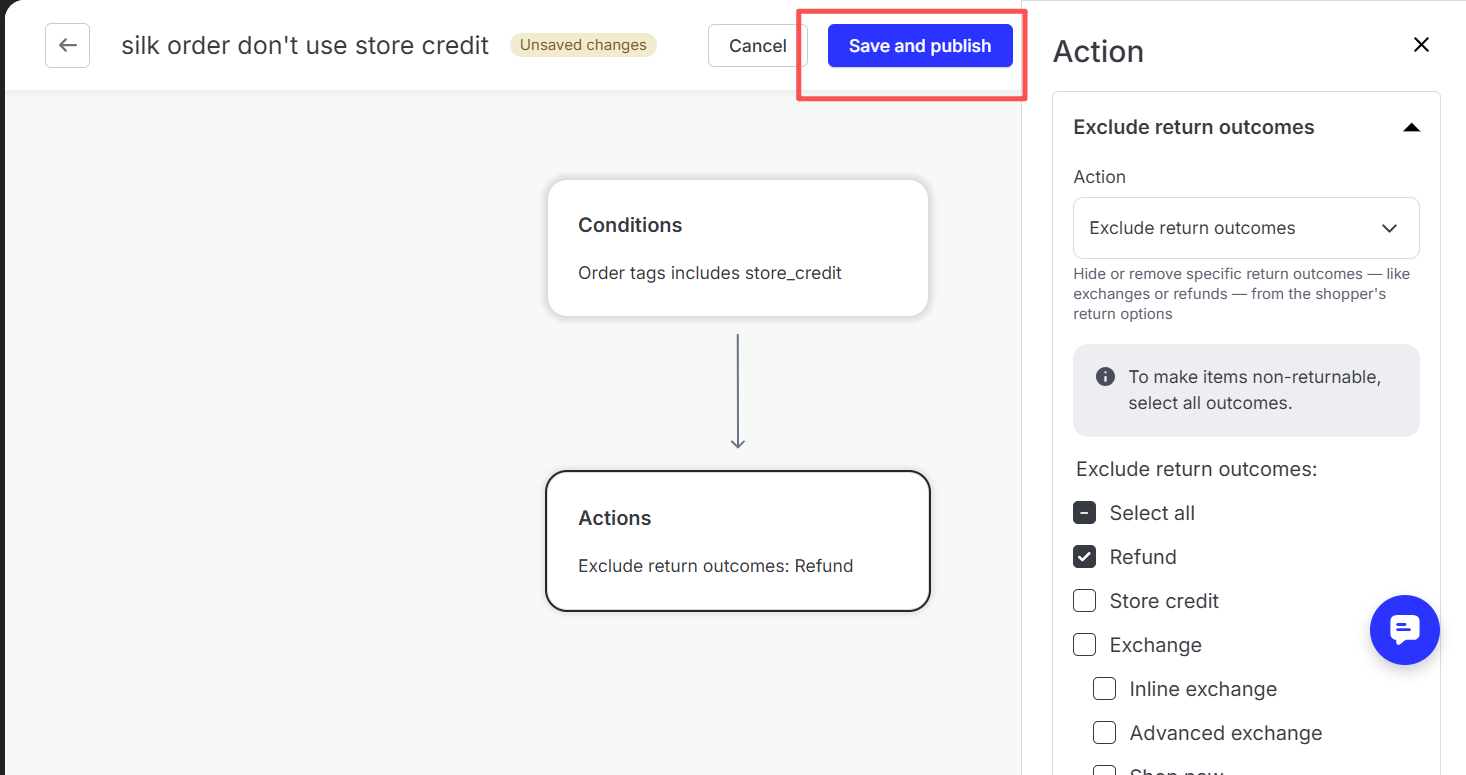
This configuration ensures:
-
Only TikTok orders can use the Refund method.
-
All other orders default to Store Credit or Exchange, matching the merchant’s DTC policy.
This workflow is required due to current platform limitations in Loop Returns.